


blog
2022/04/22
Running Apache Hop visual pipelines with Google Cloud DataflowIsrael Herraiz [@herraiz]
Intro
Apache Hop (https://hop.apache.org/) is a visual development environment for creating data pipelines using Apache Beam. You can run your Hop pipelines in Spark, Flink or Google Cloud Dataflow.
In this post, we will see how to install Hop, and we will run a sample pipeline in the cloud with Dataflow. To follow the steps given in this post, you should have a project in Google Cloud Platform, and you should have enough permissions to create a Google Cloud Storage bucket (or to use an existing one), as well as to run Dataflow jobs.
Once you have your Google Cloud project ready, you will need to install the Google Cloud SDK to trigger the Dataflow pipeline.
Also, don’t forget to configure the Google Cloud SDK to use your account and your project.
Setup and local execution
You can run Apache Hop as a local application, or use the Hop web version from a Docker container. The instructions given in this post will work for the local application, as the authentication for Cloud Dataflow would be different if Hop is running in a container. All the rest of the instructions remain valid. The UI of Hop is exactly the same either running as a local app or in the web version.
Now it’s time to download and install Apache Hop, following these instructions.
For this post, I have used the binaries in the apache-hop-client package, version 1.2.0, released on March 7th, 2022.
After installing Hop, we are ready to start.
The Zip file contains a directory config where you will find some sample projects and some pipeline run configuration for Dataflow and other runners.
For this example, we are going to use the pipeline located in config/projects/samples/beam/pipelines/input-process-output.hpl.
Let’s start by opening Apache Hop. In the directory where you have unzipped the client, run
./hop/hop-gui.sh
(or ./hop/hop-gui.bat if you are on Windows).
Once we are in Hop, let’s open the pipeline.
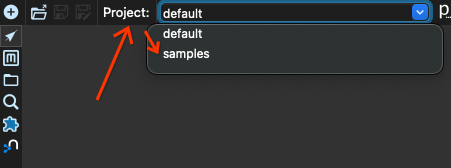
We first switch from the project default to the project samples. Locate the projects box in the top left corner of the window, and select the project samples:
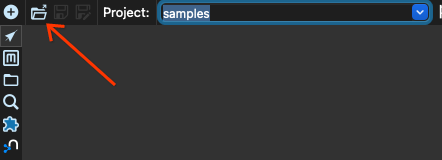
Now we click the open button:
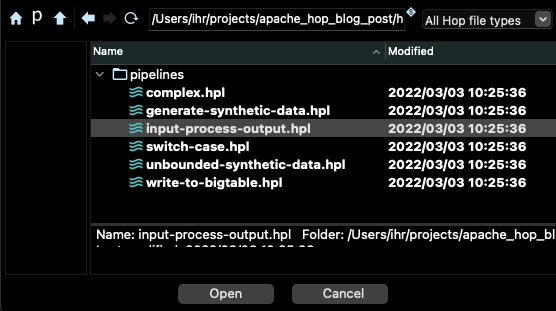
Select the pipeline input-process-output.hpl in the beam/pipelines subdirectory:
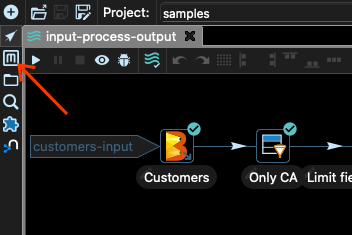
You should see a graph like the following in the main window of Hop:
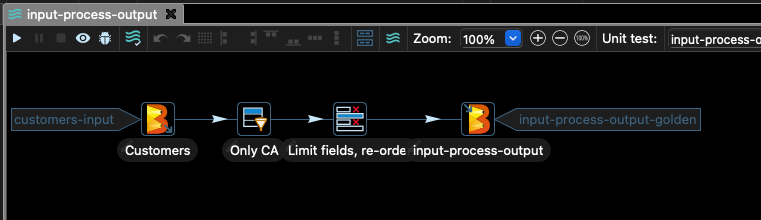
This pipeline takes some customer data from a CSV file and filters out everything but the records with the column stateCode equal to CA.
Then we select only some of the columns of the file, and the result is written to Google Cloud Storage.
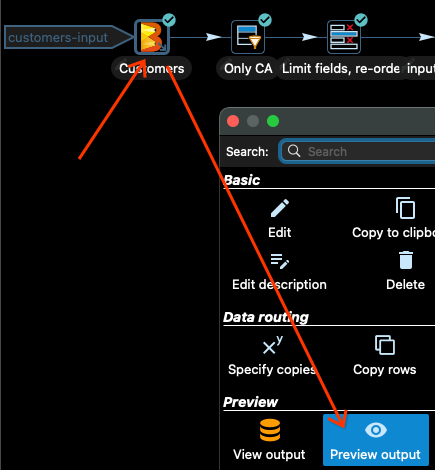
It is always a good idea to test the pipeline locally before submitting it to Dataflow. In Apache Hop, you can preview the output of each transform. Let’s have a look at the input Customers.
Click in the Customers input transform and then in Preview Output in the dialog box that opens after selecting the transform:
Now select the option Quick launch and you will see some of the input data:

Click Stop when you finish reviewing the data.
If we repeat the process right after the Only CA transform, we will see that all the rows have the stateCode column equal to CA.
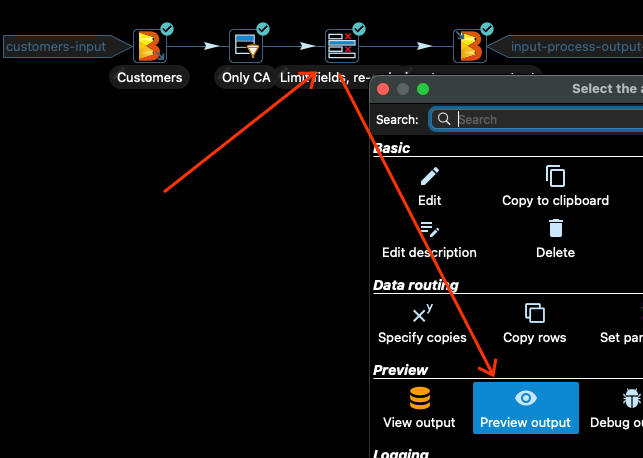
The next transform selects only some of the columns of the input data and reorders the columns. Let’s have a look. Click the transform and then Preview Output:
Then click _Quick Launch _again, and you should see output like the following:
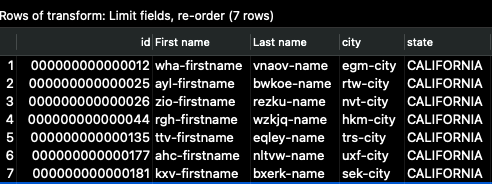
The column id is now the first, and we see only a subset of the input columns. This is how the data will look once the pipeline finishes writing the full output.
Using the Beam Direct Runner
Let’s run the pipeline. To run the pipeline, we need to specify a runner configuration. This is done through the Metadata tool of Apache Hop:
In the samples project, there are already several configurations created:
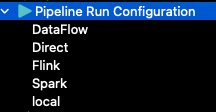
The local configuration is the one used to run the pipeline using Hop. For instance, this is the configuration that we used when we examined the previews of the output of different steps.
The Direct configuration uses the direct runner of Apache Beam. Let’s examine what it looks like. There are two tabs in the Pipeline Run Configurations: main and variables.
For the direct runner, the main tab has the following options:
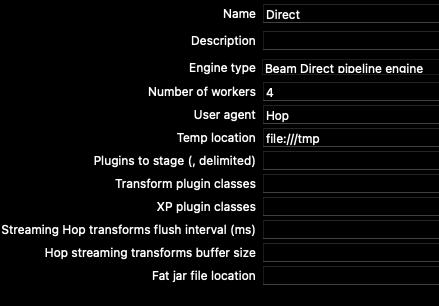
We can change the number of workers settings to match our number of CPUs, or even limit it just to 1 so the pipeline does not consume a lot of resources.
In the variables tab, we find the configuration parameters for the pipeline itself (not for the runner): \

For this pipeline, only the DATA_INPUT and DATA_OUTPUT variables are used. The STATE_INPUT is used in a different example.
If you go to the Beam transforms in the input and output nodes of the pipeline, you will see how these variables are used there:
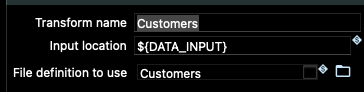

Since those variables are correctly set up to point to the location of data in the samples project folder, let’s try to run the pipeline using the Beam Direct Runner.
For that, we need to go back to the pipeline view (arrow button just above the Metadata tool), and click the run button (the small “play” button in the toolbar). Then choose the Direct pipeline run configuration, and click the Launch button:

How do you know if the job has finished or not? You can check the logs at the bottom of the main window for that. You should see something like this:

If we go to the location set by DATA_OUTPUT, in our case config/projects/samples/beam/output, we should see some output files there. In my case, I see these files:

The number of files depends on the number of workers that you have set in the run configuration.
Great, so the pipeline works locally. It is time to run it in the cloud!
Running at cloud scale with Dataflow
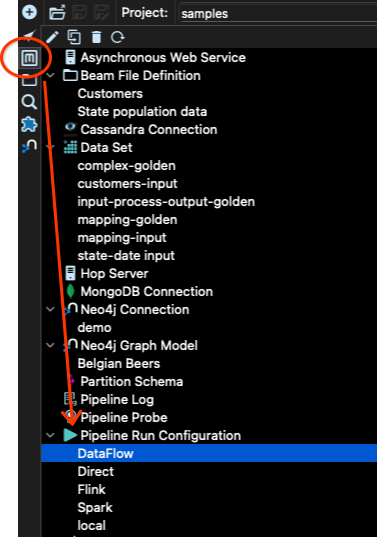
Let’s have a look at the Dataflow Pipeline Run Configuration. Go to the metadata tool, then to Pipeline Run Configuration and select Dataflow:
We have again the Main and the Variables tab. We will need to change some values in both. Let’s start with the Variables. Click the Variables tab, and you should see the following values:

Those are Google Cloud Storage (GCS) locations that belong to the author of that sample project. We need to change them to point to our own GCS bucket.
Project setup in Google Cloud
But for that, we will have to create a bucket. For the next step, you need to make sure that you have configured gcloud (the Google Cloud SDK), and that you have managed to authenticate.
To double check, run the command gcloud config list and check if the account and the project look correct. If they do, let’s triple check and run gcloud auth login. That should open a tab in your web browser, to do the authentication process. Once you have done that, you can interact with your project using the SDK.
For this example, I will use the region europe-west1 of GCP. Let’s create a regional bucket there. In my case, I am using the name ihr-apache-hop-blog for the bucket name. Choose a different name for your bucket!
gsutil mb -c regional -l europe-west1 gs://ihr-apache-hop-blog
Now let’s upload the sample data to the GCS bucket, to test how the pipeline would run in Dataflow. Go to the same directory where you have all the hop files (the same directory that hop-gui.sh is in), and let’s copy the data to GCS:
gsutil cp config/projects/samples/beam/input/customers-noheader-1k.txt gs://ihr-apache-hop-blog/data/
Notice the final slash / in the path, indicating that you want to create a directory of name data, with all the contents.
To make sure that you have uploaded the data correctly, check the contents of that location:
gsutil ls gs://ihr-apache-hop-blog/data/
You should see the file customer-noheader-1k.txt in that location.
Before we continue, make sure that Dataflow is enabled in your project, and that you have a service account ready to be used with Hop. Please check the instructions given at the documentation of Dataflow, in the Before you begin section to see how to enable the API for Dataflow.
Now we need to make sure that Hop can use the necessary credentials for accessing Dataflow. In the Hop documentation, you will find that it recommends creating a service account, exporting a key for that service account, and setting the GOOGLE_APPLICATION_CREDENTIALS environment variable. This is also the method given in the above link.
Exporting the key of a service account is potentially dangerous, so we are going to use a different method, by leveraging the Google Cloud SDK. Run the following command:
gcloud auth application-default login
That will open a tab in your web browser asking to confirm the authentication. Once you have confirmed, any application in your system that needs to access Google Cloud Platform will use those credentials for that access.
We need also to create a service account for the Dataflow job, with certain permissions. Create the service account with
gcloud iam service-accounts create dataflow-hop-sa
And now we give permissions to this service account for Dataflow:
gcloud projects add-iam-policy-binding ihr-hop-playground \
--member="serviceAccount:dataflow-hop-sa@ihr-hop-playground.iam.gserviceaccount.com"\
 --role="roles/dataflow.worker"
We also need to give additional permissions for Google Cloud Storage:
gcloud projects add-iam-policy-binding ihr-hop-playground \
--member="serviceAccount:dataflow-hop-sa@ihr-hop-playground.iam.gserviceaccount.com"\
 --role="roles/storage.admin"
Make sure that you change the project id ihr-hop-playground to your own project id.
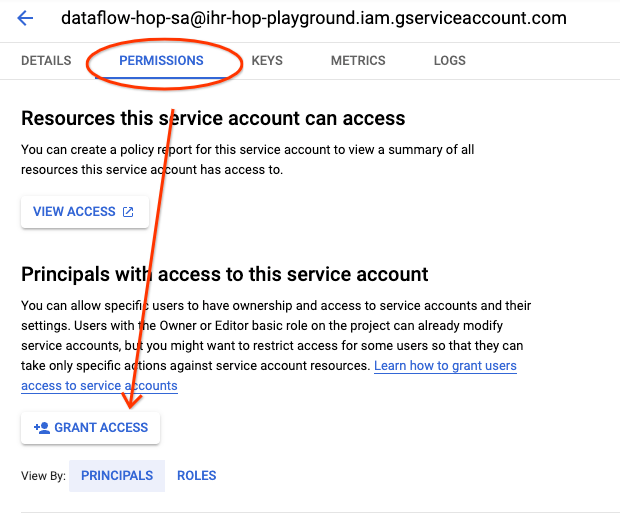
Now let’s give permissions to our user to impersonate that service account. For that, go to Service Accounts in the Google Cloud Console in your project, and click on the service account we have just created.
Click on the Permissions tab and then in the Grant Access button:
Give your user the role Service Account User:
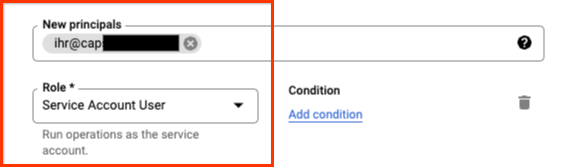
You are now all set to be able to run Dataflow with that service account and your user.
Updating the Pipeline Run Configuration
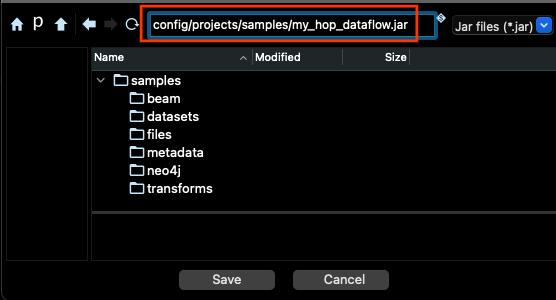
Before we can run a pipeline in Dataflow, we need to generate the JAR package for the pipeline code. For that, you have to go to the Tools menu (in the menu bar), and choose the option Generate a Hop fat jar. Click ok in the dialog, and then select a location and filename for the jar, and click Save:
It will take some minutes to generate the file:

We are ready to run the pipeline in Dataflow. Or almost :).
Go the pipeline editor, click the play button, and select DataFlow as Pipeline run configuration, and then click the play button on the right side:
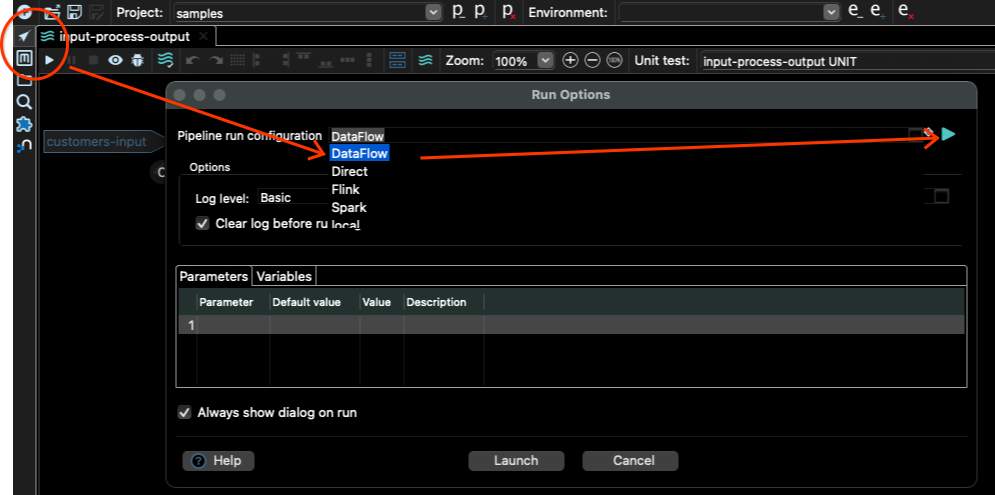
That will open the Dataflow Pipeline Run Configuration, where we can change the input variables, and other Dataflow settings.
Click on the Variables tab and modify only the DATA_INPUT and DATA_OUTPUT variables.
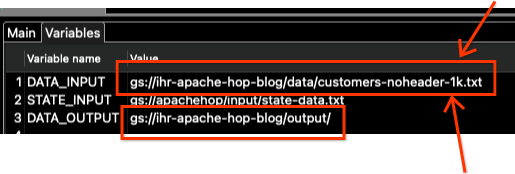
Notice that we also need to change the filename.
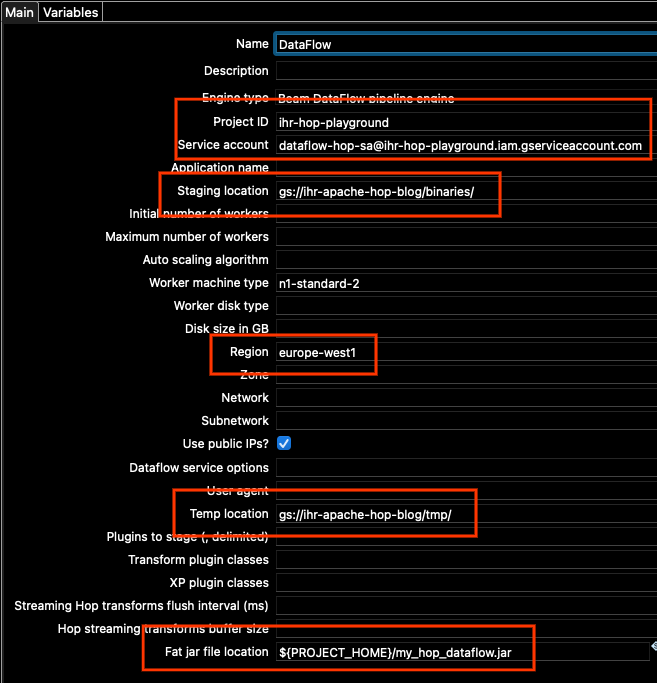
Let’s go now to the Main tab, because there are some other options that we need to change there. We need to update:
- Project id
- Service account
- Staging location
- Region
- Temp location
- Fat jar file location
For project id, set your project id (the same one you see when you run gcloud config list).
For service account, use the address of the Service Account we have created. If you don’t remember, you can find it under Service Accounts in the Google Cloud Console.
For staging and temp locations, use the same bucket that we have just created. Change the bucket address in the paths, and leave the same “binaries” and “tmp” locations that are already set in the configuration.
For region, in this example we are using europe-west1.
Also, depending on your network configuration, you may want to check the box of “Use Public IPs?”, or alternatively leave it unchecked but enable Google Private Access in the regional subnetwork for europe-west1 in your project (for more details, please see Configuring Private Google Access | VPC). In this example, I will check the box for simplicity.
For the fat jar location, use the _Browse _button on the right side, and locate the JAR that we generated above. In summary, my Main options look like these (your project id and locations will be different):
You may, of course, change any other option, depending on the specific settings that might be required for your project.
When you are ready, click on the _Ok _button and then Launch to trigger the pipeline.
In the logging window, you should see a line like the following:

Checking the job in Dataflow
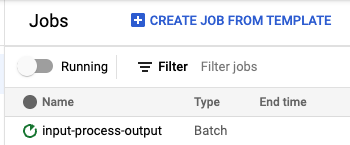
If everything has gone well, you should now see a job running at https://console.cloud.google.com/dataflow/jobs.
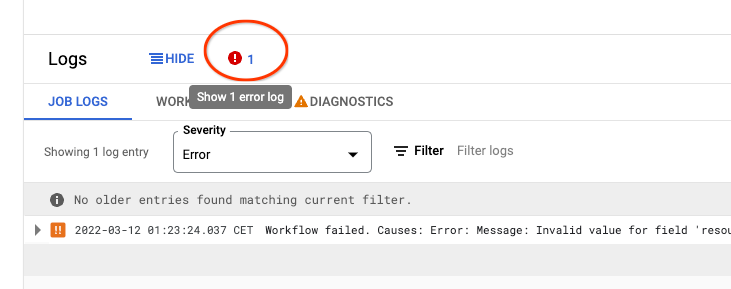
If for some reason the job has failed, open the failed job page, check the _Logs _at the bottom, and click the error icon to find why the pipeline has failed. It is normally because we have set some wrong option in your configuration:
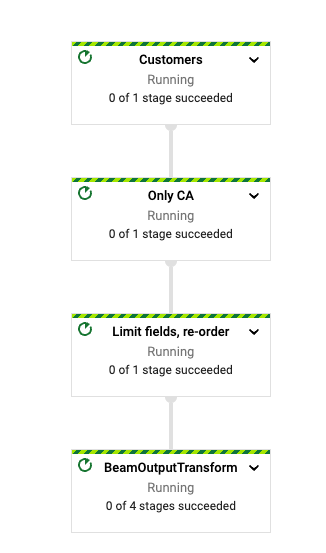
When the pipeline starts running, you should see the graph of the pipeline in the job page:
When the job finishes, there should be a file in the output location. You can check it out with gsutil
% gsutil ls gs://ihr-apache-hop-blog/output
gs://ihr-apache-hop-blog/output/input-process-output-00000-of-00003.csv
gs://ihr-apache-hop-blog/output/input-process-output-00001-of-00003.csv
gs://ihr-apache-hop-blog/output/input-process-output-00002-of-00003.csv
In my case, the job has generated three files, but the actual number will vary from run to run.
Let’s explore the first lines of those files:
gsutil cat "gs://ihr-apache-hop-blog/output/*csv"| head
 12,wha-firstname,vnaov-name,egm-city,CALIFORNIA
 25,ayl-firstname,bwkoe-name,rtw-city,CALIFORNIA
 26,zio-firstname,rezku-name,nvt-city,CALIFORNIA
 44,rgh-firstname,wzkjq-name,hkm-city,CALIFORNIA
 135,ttv-firstname,eqley-name,trs-city,CALIFORNIA
 177,ahc-firstname,nltvw-name,uxf-city,CALIFORNIA
 181,kxv-firstname,bxerk-name,sek-city,CALIFORNIA
 272,wpy-firstname,qxjcn-name,rew-city,CALIFORNIA
 304,skq-firstname,cqapx-name,akw-city,CALIFORNIA
 308,sfu-firstname,ibfdt-name,kqf-city,CALIFORNIA
We can see that all the rows have CALIFORNIA as the state, that the output contains only the columns that we selected, and that the user id is the first column. The actual output you get will probably be different, as the order in which data is processed will not be the same in each run.
We have run this job with a small data sample, but we could have run the same job with an arbitrarily large input CSV. Dataflow would parallelize and process the data in chunks.
Conclusions
Apache Hop is a visual development environment for Beam pipelines, that allows us to run the pipelines locally, inspect the data, debug, unit test and many other capabilities. Once we are happy with a pipeline that has run locally, we can deploy the same visual pipeline in the cloud by just setting the necessary parameters for using Dataflow.
If you want to know more about Apache Hop, don’t miss the Beam Summit talk delivered by the author of Hop, and don’t forget to check out the getting started guide.