


blog
2022/10/15
Apache Hop web version with Cloud DataflowIsrael Herraiz [@herraiz]
Hop is a codeless visual development environment for Apache Beam pipelines that can run jobs in any Beam runner, such as Dataflow, Flink or Spark. In a previous post, we introduced the desktop version of Apache Hop. Hop also has a web environment, Hop Web, that you can run from a container, so you don’t have to install anything on your computer to use it.
In this detailed tutorial, you access Hop through the internet using a web browser and point to a container running in a virtual machine on Google Cloud. That container will launch jobs in Dataflow and report back the results of those jobs. Because we don’t want just anyone to access your Hop instance, we’re going to secure it so that only you can access that virtual machine. The following diagram illustrates the setup:

We will show how to do the deployment described previously, creating a web and visual development environment that builds Beam pipelines using just a web browser. When complete, you will have a secure web environment that you can use to create pipelines with your web browser and launch them using Google Cloud Dataflow.
What do you need to run this example?
We are using Google Cloud, so the first thing you need is a Google Cloud project. If needed, you can sign up for the free trial of Google Cloud at https://cloud.google.com/free.
When you have a project, you can use Cloud Shell in your web browser with no additional setup. In Cloud Shell, the Google Cloud SDK is automatically configured for your project and credentials. That’s the option we use here. Alternatively, you can configure the Google Cloud SDK in your local computer. For instructions, see https://cloud.google.com/sdk/docs/install.
To open Cloud Shell, go to the [Google Cloud console]
(http://console.cloud.google.com), make sure your project is selected, and click
the Cloud Shell button  . Cloud Shell opens,
and you can use it to run the commands shown in this post.
. Cloud Shell opens,
and you can use it to run the commands shown in this post.
The commands that we are going to use in the next steps are available in a Gist in Github, just in case you prefer to run that script instead of copying the commands from this tutorial.
Permissions and accounts
When we run a Dataflow pipeline, we can use our personal Google Cloud credentials to run the job. But Hop web will be running in a virtual machine, and in Google Cloud, virtual machines run using service accounts as credentials. So we need to make sure that we have a service account that has permission to run Dataflow jobs.
By default, virtual machines use the service account called Compute Engine default service account. For the sake of simplicity, we will use this account. Still, we need to add some permissions to run Dataflow jobs with that service account.
First, let’s make sure that you have enabled all the required Google Cloud APIs. Click this link to enable Dataflow, BigQuery and Pub/Sub, which we’ll use in this workflow. The link takes you to your project in the Google Cloud console, where you can enable the APIs.
Let’s now give permissions to the VM account. First, find the ID of the service account. Open Cloud Shell, and run the following command.
gcloud iam service-accounts list | grep compute
The output is similar to the following, with <PROJECT_NUMBER> replaced by your
project number:
EMAIL: <PROJECT_NUMBER>-compute@developer.gserviceaccount.com
Copy that service account ID, because we use it in the next step. Run the following command to grant the Dataflow Admin role to the service account. This role is required to run jobs:
gcloud projects add-iam-policy-binding $GOOGLE_CLOUD_PROJECT --member="serviceAccount:<SERVICE_ACCOUNT_ID>" --role="roles/dataflow.admin"
where <SERVICE_ACCOUNT_ID> is the ID that you retrieved previously. If you are
running these commands in Cloud Shell, the environment variable
GOOGLE_CLOUD_PROJECT is already set to your project ID. If you are running
this from any other place, set the $GOOGLE_CLOUD_PROJECT variable with the ID
of your project.
Now your “user” for Dataflow is that service account. If your jobs are accessing data in BigQuery, Cloud Storage, Pub/Sub, and so on, you also need to grant roles for those services to the service account.
Disk and virtual machine
Let’s create a virtual machine (VM) in Compute Engine to run the Docker container of Apache Hop.
In Compute Engine, it is possible to run a container directly in a VM. There are other options to run containers in Google Cloud, but a VM is probably the simplest and most straightforward. The full details are in the Deploying containers on VMs and MIGs page of the Google Cloud documentation.
In this tutorial, we will always be working in the zone europe-west1-b, so you
will see that zone in a lot of the commands. However, you can choose any Google
Cloud zone; just remember to use the value for your zone instead of
europe-west1-b. Always use the same zone for all the resources, such as disks
and VMs. To minimize the latency when using Hop web, choose a zone that is
geographically close to your location. Let’s define the zone now and use this
variable for the rest of the commands:
ZONE=europe-west1-b
Containers have ephemeral storage: when you restart the container, the disk of the container returns to its original state. Therefore, if we restart the Hop web container, we lose all our precious pipelines. To avoid that, we are going to create a persistent disk, where we will store all our work with Hop web. Run the following command to create the disk:
gcloud compute disks create my-hop-disk \
  --type=pd-balanced \
  --size=10GB \
  --zone=$ZONE
Thanks to this disk, we’re able to stop the virtual machine and still keep all our personal files in Hop web intact.
Let’s now create the VM. For the VM, we need to select the network (default in
the, well, default case) so the VM will not have a public IP address. This is
important for security reasons, but it won’t stop us from using the VM from our
web browser thanks to the Identity Aware Proxy. More on this later; for now
let’s create the VM:
gcloud compute instances create-with-container my-hop-vm \
 --zone=$ZONE \
 --network-interface=subnet=default,no-address \
 --scopes=https://www.googleapis.com/auth/cloud-platform \
 --tags=http-server,https-server,ssh \
 --container-image=apache/hop-web:2.0.1 \
 --container-restart-policy=on-failure \
 --container-mount-disk=mode=rw,mount-path=/root,name=my-hop-disk,partition=0 \
 --disk=boot=no,device-name=my-hop-disk,mode=rw,name=my-hop-disk
You might be wondering what those additional options are. They are required for
the VM to work properly with Hop web. For instance, the scopes option is what
allows the VM to use Dataflow, and the tags option lets your browser reach the
Hop web address through the network firewall.
Apache Hop listens on port 8080 for HTTP connections, so if you have additional custom firewall rules in your project, make sure you are not stopping TCP traffic on port 8080.
But wait a minute; we have created a machine with only private IPs. How can we reach Hop web from the web browser on our computer? Don’t we need a public IP address for that?
Google Cloud has a feature called the Identity Aware Proxy (IAP) that can be used to wrap services with an authorization layer, allowing connections to resources with only internal IPs.
We can use the IAP to wrap our Apache Hop web server. With the following command, we create a tunnel listening on local port 8080 that connects to port 8080 on the VM:
gcloud compute start-iap-tunnel my-hop-vm 8080 --local-host-port=localhost:8080 --zone=$ZONE
To keep the tunnel open, leave that command running. If the command fails right after creating the VM, wait a few seconds and try again; the container might still be booting up.
We now have a tunnel that we can connect to using our web browser. If you’re
running these commands on your local computer and not in Cloud Shell, point your
browser to localhost:8080. The Hop UI should load.
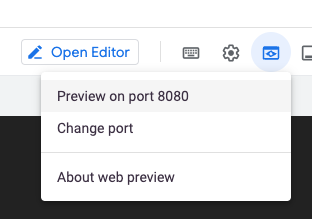
If you are running these command in Cloud Shell, where do we point the browser to? Cloud Shell comes with an utility for situations like this one. In Cloud Shell, locate the Web Preview button:
If the preview isn’t using port 8080, click Change port, and switch to port 8080. When you click Preview on port, Cloud Shell opens a new tab in your browser that points to the tunnel address.
The Identity Aware Proxy will ask you to identify yourself using your Google account.
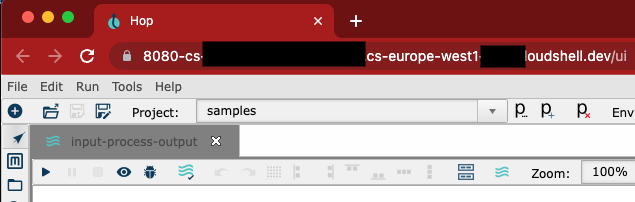
After that, the Apache Hop web interface loads:
That URL is authenticated using your Google account, the same one that you are using for Google Cloud (the one you are authenticated with in the Google Cloud SDK). So even if another person gets that URL address, they won’t be able to access your Apache Hop instance.
You are now ready to use Apache Hop in a web browser!
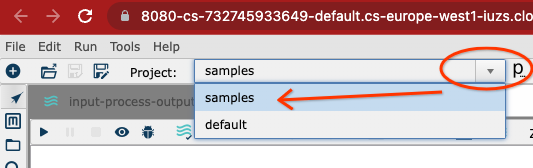
You can try to replicate the example that was given in a previous post using Hop web, or just try to launch any other project from the samples included with Hop:
Where should I store my stuff?
The directories in the file system of a container are ephemeral. How can you be sure that you store your pipelines and JARs in a persistent location?
The home directory container is /root, and it is the only persistent
directory in the container (thanks to the disk we created previously). When you
restart the VM for whatever reason, any file included in that directory is
retained. But the rest of the directories reset to their original state. So make
sure you save your stuff, such as your pipelines, the fat JAR generated for
Dataflow, and so on, in the /root directory or its subdirectories.
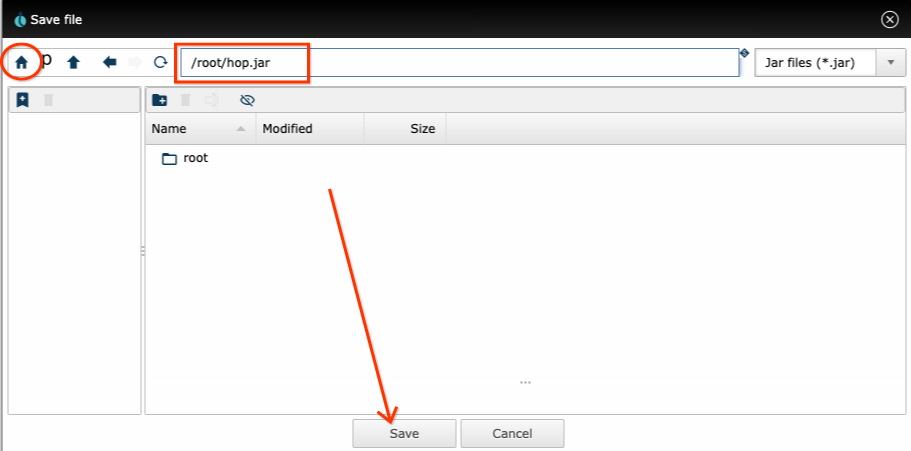
In the Hop file dialogs, when you click the home icon, you are directed to the
/root directory, so it is very straightforward to use it to store
everything. In the example in the picture, we clicked the Home button and
are storing a JAR in that persistent directory:
Turning off the virtual machine
If you want to save some money when you are not using the virtual machine, stop the VM and launch it again when needed. The content of the /root directory is saved when you stop the virtual machine.
To stop the VM, run the following command (or in the console, on the Compute Engine VM page, click Stop):
gcloud compute instances stop my-hop-vm --zone=$ZONE
And to start it again, run the following command:
gcloud compute instances start my-hop-vm --zone=$ZONE
Remember that you need to have the Identity Aware Proxy running in order to access Hop web, so after starting the VM, don’t forget to run the command to start the Identity Aware Proxy (and if it fails right after starting, wait a few seconds and run it again):
gcloud compute start-iap-tunnel my-hop-vm 8080 --local-host-port=localhost:8080 --zone=$ZONE
Summary
This post has shown that all that you need to run Hop is a web browser. And, well, a Google Cloud project too.
We deployed the container to a virtual machine in Google Cloud, so you can access Hop from anywhere, and we created a persistent disk, so you can have permanent storage for your pipelines. Now you can use your web browser to create your pipelines and to run Dataflow jobs without having to install anything locally in your computer: not Java, not Docker, not the Google Cloud SDK; nothing, just your favourite web browser.
If you followed the instructions in this post, head over to the post Running Apache Hop visual pipelines with Google Cloud Dataflow to run a Dataflow pipeline right from your web browser!