


Workflow orchestration
This page provides KFP and TFX orchestration examples. It first provides the KFP example, and then it demonstrates how TFX manages functionality that is defined by hand when using KFP.
Understanding the Beam DAG
Apache Beam is an open source, unified model for defining both batch and streaming data-parallel processing pipelines. A concept central to the Apache Beam programming model is the Directed Acyclic Graph (DAG). Each Apache Beam pipeline is a DAG that you can construct through the Beam SDK in your programming language of choice (from the set of supported Apache Beam SDKs). Each node of this DAG represents a processing step (PTransform) that accepts a collection of data as input (PCollection) and then outputs a transformed collection of data (PCollection). The edges define how data flows through the pipeline from one processing step to another. The following diagram shows an example pipeline workflow.

Defining a pipeline and the corresponding DAG does not mean that data starts flowing through the pipeline. To run the pipeline, you need to deploy it to one of the supported Beam runners. These distributed processing backends include Apache Flink, Apache Spark, and Google Cloud Dataflow. To run the pipeline locally on your machine for development and debugging purposes, a Direct Runner is also provided. View the runner capability matrix to verify that your chosen runner supports the data processing steps defined in your pipeline, especially when using the Direct Runner.
Orchestrating frameworks
Successfully delivering machine learning projects requires more than training a model. A full ML workflow often contains a range of other steps, including data ingestion, data validation, data preprocessing, model evaluation, model deployment, data drift detection, and so on. Furthermore, you need to track metadata and artifacts from your experiments to answer important questions, such as:
- What data was this model trained on and with which training parameters?
- When was this model deployed and what accuracy did it have on a test dataset? Without this knowledge, troubleshooting, monitoring, and improving your ML solutions becomes increaseingly difficult when your solutions grow in size.
The solution: MLOps. MLOps is an umbrella term used to describe best practices and guiding principles that aim to make the development and maintenance of machine learning systems seamless and efficient. MLOps most often entails automating machine learning workflows throughout the model and data lifecycle. Popular frameworks to create these workflow DAGs are Kubeflow Pipelines, Apache Airflow, and TFX.
You can either use an Apache Beam pipeline as a standalone data processing job, or you can make it part of a larger sequence of steps in a workflow. In the latter case, the Apache Beam DAG is one node in the overarching DAG composed by the workflow orchestrator. This workflow thus contains a DAG withinin a DAG, as illustrated in the following diagram.

The key difference between the Apache Beam DAG and the orchestrating DAG is that the Apache Beam DAG processes data and passes that data between the nodes of its DAG, whereas the orchestration DAG schedules and monitors steps in the workflow and passes execution parameters, metadata, and artifacts between the nodes of the DAG.
- Apache Beam focuses on parallelization and enabling both batch and streaming jobs.
- Examples of orchestration DAG artifacts include trained models and datasets. Such artifacts are often passed by a reference URI and not by value.
Note: TFX creates a workflow DAG, which needs an orchestrator of its own to run. Natively supported orchestrators for TFX are Airflow, Kubeflow Pipelines, and Apache Beam itself. As mentioned in the TFX docs:
“Several TFX components rely on Beam for distributed data processing. In addition, TFX can use Apache Beam to orchestrate and execute the pipeline DAG. Beam orchestrator uses a different BeamRunner than the one which is used for component data processing.”
Caveat: The Beam orchestrator is not meant to be a TFX orchestrator used in production environments. It simply enables debugging TFX pipelines locally on Beam’s Direct Runner without the need for the extra setup required for Airflow or Kubeflow.
Preprocessing example
This section describes two orchestrated ML workflows, one with Kubeflow Pipelines (KFP) and one with Tensorflow Extended (TFX). These two frameworks both create workflows but have their own distinct advantages and disadvantages:
- KFP requires you to create your workflow components from scratch, and requires a user to explicitly indicate which artifacts should be passed between components and in what way.
- TFX offers a number of prebuilt components and takes care of the artifact passing more implicitly. When choosing between the two frameworks, you need to consider the trade-off between flexibility and programming overhead.
For simplicity, the workflows only contain three components: data ingestion, data preprocessing, and model training. Depending on the scenario, you can add a range of extra components, such as model evaluation and model deployment. This example focuses on the preprocessing component, because it demonstrates how to use Apache Beam in an ML workflow for efficient and parallel processing of your ML data.
The dataset consists of images paired with a textual caption describing the content of the image. These pairs are taken from a captions subset of the MSCOCO 2014 dataset. This multi-modal data (image and text) gives us the opportunity to experiment with preprocessing operations for both modalities.
Kubeflow pipelines (KFP)
In order to run our ML workflow with KFP we must perform three steps:
- Create the KFP components by specifying the interface to the components and by writing and containerizing the implementation of the component logic.
- Create the KFP pipeline by connecting the created components, specifying how inputs and outputs should be passed between components, and compiling the pipeline definition to a full pipeline definition.
- Run the KFP pipeline by submitting it to a KFP client endpoint.
The full example code can be found in the GitHub repository
Create the KFP components
The following diagram shows our target file structure:
    kfp
    ├── pipeline.py
    ├── components
    │   ├── ingestion
    │   │   ├── Dockerfile
    │   │   ├── component.yaml
    │   │   ├── requirements.txt
    │   │   └── src
    │   │       └── ingest.py
    │   ├── preprocessing
    │   │   ├── Dockerfile
    │   │   ├── component.yaml
    │   │   ├── requirements.txt
    │   │   └── src
    │   │       └── preprocess.py
    │   └── train
    │       ├── Dockerfile
    │       ├── component.yaml
    │       ├── requirements.txt
    │       └── src
    │           └── train.py
    └── requirements.txt
The full preprocessing component specification is shown in the folllowing illustration. The inputs are the path where the ingested dataset was saved by the ingest component and a path to a directory where the component can store artifacts. Additionally, some inputs specify how and where the Apache Beam pipeline runs. The specifications for the ingestion and train components are similar and can be found in the ingestion component.yaml file and in the train component.yaml file, respectively.
Note: we are using the KFP v1 SDK, because v2 is still in beta. The v2 SDK introduces some new options for specifying the component interface with more native support for input and output artifacts. To see how to migrate components from v1 to v2, consult the KFP docs.
name: preprocessing
description: Component that mimicks scraping data from the web and outputs it to a jsonlines format file
inputs:
  - name: ingested_dataset_path
    description: source uri of the data to scrape
    type: String
  - name: base_artifact_path
    description: base path to store data
    type: String
  - name: gcp_project_id
    description: ID for the google cloud project to deploy the pipeline to.
    type: String
  - name: region
    description: Region in which to deploy the Dataflow pipeline.
    type: String
  - name: dataflow_staging_root
    description: Path to staging directory for the dataflow runner.
    type: String
  - name: beam_runner
    description: Beam runner, DataflowRunner or DirectRunner.
    type: String
outputs:
  - name: preprocessed_dataset_path
    description: target uri for the ingested dataset
    type: String
implementation:
  container:
    image: <your-docker-registry/preprocessing-image-name:latest>
    command: [
      python3,
      preprocess.py,
      --ingested-dataset-path,
      {inputValue: ingested_dataset_path},
      --base-artifact-path,
      {inputValue: base_artifact_path},
      --preprocessed-dataset-path,
      {outputPath: preprocessed_dataset_path},
      --gcp-project-id,
      {inputValue: gcp_project_id},
      --region,
      {inputValue: region},
      --dataflow-staging-root,
      {inputValue: dataflow_staging_root},
      --beam-runner,
      {inputValue: beam_runner},
    ]
In this case, each component shares an identical Dockerfile, but you can add extra component-specific dependencies where needed.
FROM python:3.9-slim

# (Optional) install extra dependencies

# install pypi dependencies
COPY requirements.txt /
RUN python3 -m pip install --no-cache-dir -r requirements.txt

# copy src files and set working directory
COPY src /src
WORKDIR /src
With the component specification and containerization done, implement the preprocessing component.
Because KFP provides the input and output arguments as command-line arguments, an argumentparser is needed.
def parse_args():
  """Parse preprocessing arguments."""
  parser = argparse.ArgumentParser()
  parser.add_argument(
      "--ingested-dataset-path",
      type=str,
      help="Path to the ingested dataset",
      required=True)
  parser.add_argument(
      "--preprocessed-dataset-path",
      type=str,
      help="The target directory for the ingested dataset.",
      required=True)
  parser.add_argument(
      "--base-artifact-path",
      type=str,
      help="Base path to store pipeline artifacts.",
      required=True)
  parser.add_argument(
      "--gcp-project-id",
      type=str,
      help="ID for the google cloud project to deploy the pipeline to.",
      required=True)
  parser.add_argument(
      "--region",
      type=str,
      help="Region in which to deploy the pipeline.",
      required=True)
  parser.add_argument(
      "--dataflow-staging-root",
      type=str,
      help="Path to staging directory for dataflow.",
      required=True)
  parser.add_argument(
      "--beam-runner",
      type=str,
      help="Beam runner: DataflowRunner or DirectRunner.",
      default="DirectRunner")

  return parser.parse_args()
The implementation of the preprocess_dataset function contains the Apache Beam pipeline code and the Beam pipeline options that select the runner. The executed preprocessing involves downloading the image bytes from their URL, converting them to a Torch Tensor, and resizing to the desired size. The caption undergoes a series of string manipulations to ensure that our model receives uniform image descriptions. Tokenization is not done here, but could be included here if the vocabulary is known. Finally, each element is serialized and written to Avro files. You can use alternative files formats, such as TFRecords.
# We use the save_main_session option because one or more DoFn's in this
# workflow rely on global context (e.g., a module imported at module level).
pipeline_options = PipelineOptions(
    runner=beam_runner,
    project=gcp_project_id,
    job_name=f'preprocessing-{int(time.time())}',
    temp_location=dataflow_staging_root,
    region=region,
    requirements_file="/requirements.txt",
    save_main_session=True,
)

with beam.Pipeline(options=pipeline_options) as pipeline:
  (
      pipeline
      | "Read input jsonlines file" >>
      beam.io.ReadFromText(ingested_dataset_path)
      | "Load json" >> beam.Map(json.loads)
      | "Filter licenses" >> beam.Filter(valid_license)
      | "Download image from URL" >> beam.FlatMap(download_image_from_url)
      | "Resize image" >> beam.Map(resize_image, size=IMAGE_SIZE)
      | "Clean Text" >> beam.Map(clean_text)
      | "Serialize Example" >> beam.Map(serialize_example)
      | "Write to Avro files" >> beam.io.WriteToAvro(
          file_path_prefix=target_path,
          schema={
              "namespace": "preprocessing.example",
              "type": "record",
              "name": "Sample",
              "fields": [{
                  "name": "id", "type": "int"
              }, {
                  "name": "caption", "type": "string"
              }, {
                  "name": "image", "type": "bytes"
              }]
          },
          file_name_suffix=".avro"))
It also contains the necessary code to perform the component I/O. First, a target path is constructed to store the preprocessed dataset based on the component input parameter base_artifact_path and a timestamp. Output values from components are only returned as files, so we write the value of the constructed target path to an output file that was provided to our component by KFP.
timestamp = time.time()
target_path = f"{base_artifact_path}/preprocessing/preprocessed_dataset_{timestamp}"

# the directory where the output file is created may or may not exists
# so we have to create it.
Path(preprocessed_dataset_path).parent.mkdir(parents=True, exist_ok=True)
with open(preprocessed_dataset_path, 'w') as f:
  f.write(target_path)
Because we are mainly interested in the preprocessing component to show how a Beam pipeline can be integrated into a larger ML workflow, this section doesn’t cover the implementation of the ingestion and train components in depth. Implementations of dummy components that mock their behavior are provided in the full example code.
Create the pipeline definition
pipeline.py first loads the created components from their specification .yaml file.
# load the kfp components from their yaml files
DataIngestOp = comp.load_component('components/ingestion/component.yaml')
DataPreprocessingOp = comp.load_component(
    'components/preprocessing/component.yaml')
TrainModelOp = comp.load_component('components/train/component.yaml')
After that, the pipeline is created, and the required component inputs and outputs are specified manually.
@dsl.pipeline(
    pipeline_root=PIPELINE_ROOT,
    name="beam-preprocessing-kfp-example",
    description="Pipeline to show an apache beam preprocessing example in KFP")
def pipeline(
    gcp_project_id: str,
    region: str,
    component_artifact_root: str,
    dataflow_staging_root: str,
    beam_runner: str):
  """KFP pipeline definition.

  Args:
      gcp_project_id (str): ID for the google cloud project to deploy the pipeline to.
      region (str): Region in which to deploy the pipeline.
      component_artifact_root (str): Path to artifact repository where Kubeflow Pipelines
        components can store artifacts.
      dataflow_staging_root (str): Path to staging directory for the dataflow runner.
      beam_runner (str): Beam runner: DataflowRunner or DirectRunner.
  """

  ingest_data_task = DataIngestOp(base_artifact_path=component_artifact_root)

  data_preprocessing_task = DataPreprocessingOp(
      ingested_dataset_path=ingest_data_task.outputs["ingested_dataset_path"],
      base_artifact_path=component_artifact_root,
      gcp_project_id=gcp_project_id,
      region=region,
      dataflow_staging_root=dataflow_staging_root,
      beam_runner=beam_runner)

  train_model_task = TrainModelOp(
      preprocessed_dataset_path=data_preprocessing_task.
      outputs["preprocessed_dataset_path"],
      base_artifact_path=component_artifact_root)
Finally, the defined pipeline is compiled, and a pipeline.json specification file is generated.
Compiler().compile(pipeline_func=pipeline, package_path="pipeline.json")Run the KFP pipeline
Using the following specification file and snippet with the necessary requirements installed, you can now run the pipeline. Consult the run_pipeline documentation for more information. Before running the pipeline, a container for each component must be built and pushed to a container registry that your pipeline can access. Also, the component specification .yaml files must point to the correct container image.
client = kfp.Client()
experiment = client.create_experiment("KFP orchestration example")
run_result = client.run_pipeline(
    experiment_id=experiment.id,
    job_name="KFP orchestration job",
    pipeline_package_path="pipeline.json",
    params=run_arguments)
Tensorflow Extended (TFX)
Working with TFX is similar to the approach for KFP illustrated previously: Define the individual workflow components, connect them in a pipeline object, and run the pipeline in the target environment. What makes TFX different is that it has already built a set of Python packages that are libraries to create workflow components. Unlike with the KFP example, you don’t need to start from scratch by writing and containerizing the code.
With TFX, you need to choose which TFX components are relevant to your workflow and use the library to adapt their functionality to your use case. The following diagram shows the available components and their corresponding libraries.
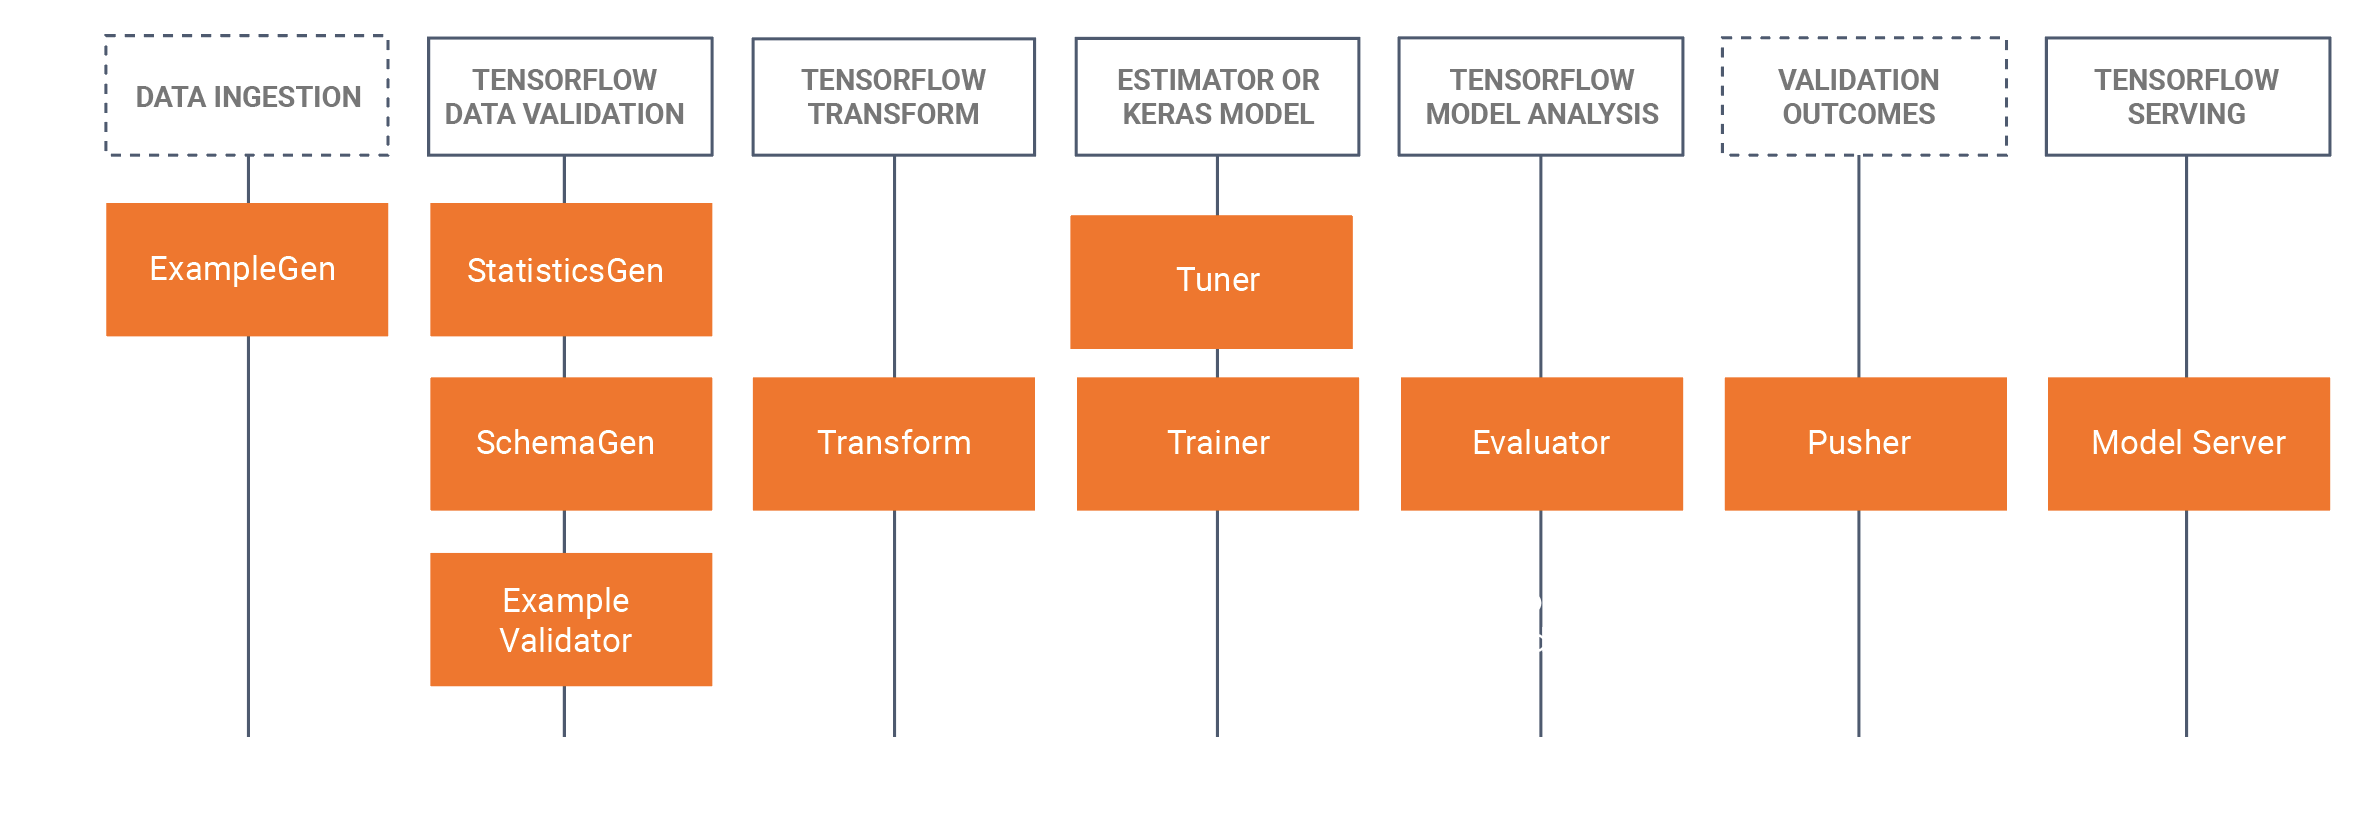
TFX relies heavily on Apache Beam to implement data-parallel pipelines in these libraries. You need to run components created with these libraries with one of the supported Apache Beam runners. The full TFX example code can again be found in the GitHub repository.
For the KFP example, we used ingestion, preprocessing, and trainer components. In this TFX example, we use the ExampleGen, Transform, and Trainer libraries.
First, review the pipeline definition. Note that this definition looks similar to our previous example.
def create_pipeline(
    gcp_project_id,
    region,
    pipeline_name,
    pipeline_root,
    csv_file,
    module_file,
    beam_runner,
    metadata_file):
  """Create the TFX pipeline.

  Args:
      gcp_project_id (str): ID for the google cloud project to deploy the pipeline to.
      region (str): Region in which to deploy the pipeline.
      pipeline_name (str): Name for the Beam pipeline
      pipeline_root (str): Path to artifact repository where TFX
        stores a pipeline’s artifacts.
      csv_file (str): Path to the csv input file.
      module_file (str): Path to module file containing the preprocessing_fn and run_fn.
      beam_runner (str): Beam runner: DataflowRunner or DirectRunner.
      metadata_file (str): Path to store a metadata file as a mock metadata database.
  """
  example_gen = tfx.components.CsvExampleGen(input_base=csv_file)

  # Computes statistics over data for visualization and example validation.
  statistics_gen = tfx.components.StatisticsGen(
      examples=example_gen.outputs['examples'])

  schema_gen = tfx.components.SchemaGen(
      statistics=statistics_gen.outputs['statistics'], infer_feature_shape=True)

  transform = tfx.components.Transform(
      examples=example_gen.outputs['examples'],
      schema=schema_gen.outputs['schema'],
      module_file=module_file)

  trainer = tfx.components.Trainer(
      module_file=module_file,
      examples=transform.outputs['transformed_examples'],
      transform_graph=transform.outputs['transform_graph'])

  components = [example_gen, statistics_gen, schema_gen, transform, trainer]

  beam_pipeline_args_by_runner = {
      'DirectRunner': [],
      'DataflowRunner': [
          '--runner=DataflowRunner',
          '--project=' + gcp_project_id,
          '--temp_location=' + os.path.join(pipeline_root, 'tmp'),
          '--region=' + region,
      ]
  }

  return tfx.dsl.Pipeline(
      pipeline_name=pipeline_name,
      pipeline_root=pipeline_root,
      components=components,
      enable_cache=True,
      metadata_connection_config=tfx.orchestration.metadata.
      sqlite_metadata_connection_config(metadata_file),
      beam_pipeline_args=beam_pipeline_args_by_runner[beam_runner])
We use the same data input, that is, a couple of image-captions pairs extracted from the MSCOCO 2014 dataset. This time, however, we use the data in CSV format, because the ExampleGen component does not by default support jsonlines. The formats that are supported out of the box are listed in the Data Sources and Formats page in the TensorFlow documentation. Alternatively, you can write a custom ExampleGen.
Copy the snippet below to an input data CSV file:
image_id,id,caption,image_url,image_name,image_license
318556,255,"An angled view of a beautifully decorated bathroom.","http://farm4.staticflickr.com/3133/3378902101_3c9fa16b84_z.jpg","COCO_train2014_000000318556.jpg","Attribution-NonCommercial-ShareAlike License"
476220,14,"An empty kitchen with white and black appliances.","http://farm7.staticflickr.com/6173/6207941582_b69380c020_z.jpg","COCO_train2014_000000476220.jpg","Attribution-NonCommercial License"
So far, we have only imported standard TFX components and chained them together into a pipeline. Both the Transform and the Trainer components have a module_file argument defined. That’s where we define the behavior we want from these standard components.
Preprocess
The Transform component searches the module_file for a definition of the function preprocessing_fn. This function is the central concept of the tf.transform library. The TFX documentation describes this function:
The preprocessing function is the most important concept of tf.Transform. The preprocessing function is a logical description of a transformation of the dataset. The preprocessing function accepts and returns a dictionary of tensors, where a tensor means Tensor or SparseTensor. There are two kinds of functions used to define the preprocessing function:
- Any function that accepts and returns tensors. These add TensorFlow operations to the graph that transform raw data into transformed data.
- Any of the analyzers provided by tf.Transform. Analyzers also accept and return tensors, but unlike TensorFlow functions, they do not add operations to the graph. Instead, analyzers cause tf.Transform to compute a full-pass operation outside of TensorFlow. They use the input tensor values over the entire dataset to generate a constant tensor that is returned as the output. For example, tft.min computes the minimum of a tensor over the dataset. tf.Transform provides a fixed set of analyzers, but this will be extended in future versions.
Therefore, preprocesing_fn can contain all tf operations that accept and return tensors, as well as specific tf.transform operations. In the following example, we use the former to convert all incoming captions to lowercase letters only, while the latter does a full pass on all the data in our dataset to compute the average length of the captions used for a follow-up preprocessing step.
def preprocessing_fn(inputs):
  """Transform raw data."""
  # convert the captions to lowercase
  # split the captions into separate words
  lower = tf.strings.lower(inputs['caption'])

  # compute the vocabulary of the captions during a full pass
  # over the dataset and use this to tokenize.
  mean_length = tft.mean(tf.strings.length(lower))
  # <do some preprocessing with the mean length>

  return {
      'caption_lower': lower,
  }
This function only defines the logical steps that must be performed during preprocessing. The function needs a concrete implementation before it can run. One such implementation is provided by tf.Transform using Apache Beam, which provides a PTransform tft_beam.AnalyzeAndTransformDataset to process the data. We can test this preproccesing_fn outside of the TFX Transform component using this PTransform explicitly. Calling the processing_fn in such a way is not necessary when using tf.Transform in combination with the TFX Transform component.
if __name__ == "__main__":
  # Test processing_fn directly without the tfx pipeline
  raw_data = [
      {
          "caption": "A bicycle replica with a clock as the front wheel."
      }, {
          "caption": "A black Honda motorcycle parked in front of a garage."
      }, {
          "caption": "A room with blue walls and a white sink and door."
      }
  ]

  # define the feature_spec (in a tfx pipeline this would be generated by a SchemaGen component)
  feature_spec = dict(caption=tf.io.FixedLenFeature([], tf.string))
  raw_data_metadata = tft.DatasetMetadata.from_feature_spec(feature_spec)

  # test out the beam implementation of the
  # processing_fn with AnalyzeAndTransformDataset
  with tft_beam.Context(temp_dir=tempfile.mkdtemp()):
    transformed_dataset, transform_fn = (
      (raw_data, raw_data_metadata)
      | tft_beam.AnalyzeAndTransformDataset(preprocessing_fn))
  transformed_data, transformed_metadata = transformed_dataset
Train
The Trainer component behaves like the Transform component, but instead of looking for a preprocessing_fn, it requires a run_fn function in the specified module_file. Our simple implementation creates a stub model using tf.Keras and saves the resulting model to a directory.
def run_fn(fn_args: tfx.components.FnArgs) -> None:
  """Build the TF model, train it and export it."""
  # create a model
  model = tf.keras.Sequential()
  model.add(tf.keras.layers.Dense(1, input_dim=10))
  model.compile()

  # train the model on the preprocessed data
  # model.fit(...)

  # Save model to fn_args.serving_model_dir.
  model.save(fn_args.serving_model_dir)
Executing the pipeline
To launch the pipeline, provide two configurations: The orchestrator for the TFX pipeline and the pipeline options to run Apache Beam pipelines. To run the pipeline locally without extra setup dependencies, this example uses the LocalDagRunner for orchestration. The pipeline created can specify Apache Beam’s pipeline options through the beam_pipeline_args argument.
args = parse_args()
tfx.orchestration.LocalDagRunner().run(create_pipeline(**vars(args)))
Last updated on 2026/07/16
Have you found everything you were looking for?
Was it all useful and clear? Is there anything that you would like to change? Let us know!