


Apache Beam Programming Guide
The Beam Programming Guide is intended for Beam users who want to use the Beam SDKs to create data processing pipelines. It provides guidance for using the Beam SDK classes to build and test your pipeline. The programming guide is not intended as an exhaustive reference, but as a language-agnostic, high-level guide to programmatically building your Beam pipeline. As the programming guide is filled out, the text will include code samples in multiple languages to help illustrate how to implement Beam concepts in your pipelines.
If you want a brief introduction to Beam’s basic concepts before reading the programming guide, take a look at the Basics of the Beam model page.
The Python SDK supports Python 3.8, 3.9, 3.10, 3.11, and 3.12.
The Go SDK supports Go v1.20+.
The Typescript SDK supports Node v16+ and is still experimental.
YAML is supported as of Beam 2.52, but is under active development and the most recent SDK is advised.
1. Overview
To use Beam, you need to first create a driver program using the classes in one of the Beam SDKs. Your driver program defines your pipeline, including all of the inputs, transforms, and outputs; it also sets execution options for your pipeline (typically passed in using command-line options). These include the Pipeline Runner, which, in turn, determines what back-end your pipeline will run on.
The Beam SDKs provide a number of abstractions that simplify the mechanics of large-scale distributed data processing. The same Beam abstractions work with both batch and streaming data sources. When you create your Beam pipeline, you can think about your data processing task in terms of these abstractions. They include:
Pipeline: APipelineencapsulates your entire data processing task, from start to finish. This includes reading input data, transforming that data, and writing output data. All Beam driver programs must create aPipeline. When you create thePipeline, you must also specify the execution options that tell thePipelinewhere and how to run.PCollection: APCollectionrepresents a distributed data set that your Beam pipeline operates on. The data set can be bounded, meaning it comes from a fixed source like a file, or unbounded, meaning it comes from a continuously updating source via a subscription or other mechanism. Your pipeline typically creates an initialPCollectionby reading data from an external data source, but you can also create aPCollectionfrom in-memory data within your driver program. From there,PCollections are the inputs and outputs for each step in your pipeline.PTransform: APTransformrepresents a data processing operation, or a step, in your pipeline. EveryPTransformtakes one or morePCollectionobjects as input, performs a processing function that you provide on the elements of thatPCollection, and produces zero or more outputPCollectionobjects.
Scope: The Go SDK has an explicit scope variable used to build aPipeline. APipelinecan return it’s root scope with theRoot()method. The scope variable is passed toPTransformfunctions to place them in thePipelinethat owns theScope.
- I/O transforms: Beam comes with a number of “IOs” - library
PTransforms that read or write data to various external storage systems.
A typical Beam driver program works as follows:
- Create a
Pipelineobject and set the pipeline execution options, including the Pipeline Runner. - Create an initial
PCollectionfor pipeline data, either using the IOs to read data from an external storage system, or using aCreatetransform to build aPCollectionfrom in-memory data. - Apply
PTransforms to eachPCollection. Transforms can change, filter, group, analyze, or otherwise process the elements in aPCollection. A transform creates a new outputPCollectionwithout modifying the input collection. A typical pipeline applies subsequent transforms to each new outputPCollectionin turn until processing is complete. However, note that a pipeline does not have to be a single straight line of transforms applied one after another: think ofPCollections as variables andPTransforms as functions applied to these variables: the shape of the pipeline can be an arbitrarily complex processing graph. - Use IOs to write the final, transformed
PCollection(s) to an external source. - Run the pipeline using the designated Pipeline Runner.
When you run your Beam driver program, the Pipeline Runner that you designate
constructs a workflow graph of your pipeline based on the PCollection
objects you’ve created and transforms that you’ve applied. That graph is then
executed using the appropriate distributed processing back-end, becoming an
asynchronous “job” (or equivalent) on that back-end.
2. Creating a pipeline
The Pipeline abstraction encapsulates all the data and steps in your data
processing task. Your Beam driver program typically starts by constructing a
Pipeline
Pipeline
Pipeline
object, and then using that object as the basis for creating the pipeline’s data
sets as PCollections and its operations as Transforms.
To use Beam, your driver program must first create an instance of the Beam SDK
class Pipeline (typically in the main() function). When you create your
Pipeline, you’ll also need to set some configuration options. You can set
your pipeline’s configuration options programmatically, but it’s often easier to
set the options ahead of time (or read them from the command line) and pass them
to the Pipeline object when you create the object.
// Start by defining the options for the pipeline.
PipelineOptions options = PipelineOptionsFactory.create();

// Then create the pipeline.
Pipeline p = Pipeline.create(options);
import apache_beam as beam
with beam.Pipeline() as pipeline:
pass # build your pipeline here// beam.Init() is an initialization hook that must be called
// near the beginning of main(), before creating a pipeline.
beam.Init()
// Create the Pipeline object and root scope.
pipeline, scope := beam.NewPipelineWithRoot()await beam.createRunner().run(function pipeline(root) {
// Use root to build a pipeline.
});pipeline:
...
options:
...For a more in-depth tutorial on creating basic pipelines in the Python SDK, please read and work through this colab notebook.
2.1. Configuring pipeline options
Use the pipeline options to configure different aspects of your pipeline, such as the pipeline runner that will execute your pipeline and any runner-specific configuration required by the chosen runner. Your pipeline options will potentially include information such as your project ID or a location for storing files.
When you run the pipeline on a runner of your choice, a copy of the
PipelineOptions will be available to your code. For example, if you add a PipelineOptions parameter
to a DoFn’s @ProcessElement method, it will be populated by the system.
2.1.1. Setting PipelineOptions from command-line arguments
While you can configure your pipeline by creating a PipelineOptions object and
setting the fields directly, the Beam SDKs include a command-line parser that
you can use to set fields in PipelineOptions using command-line arguments.
To read options from the command-line, construct your PipelineOptions object
as demonstrated in the following example code:
Use Go flags to parse command line arguments to configure your pipeline. Flags must be parsed
before beam.Init() is called.
Any Javascript object can be used as pipeline options.
One can either construct one manually, but it is also common to pass an object
created from command line options such as yargs.argv.
Pipeline options are simply an optional YAML mapping property that is a sibling to the pipeline definition itself. It will be merged with whatever options are passed on the command line.
PipelineOptions options =
    PipelineOptionsFactory.fromArgs(args).withValidation().create();
from apache_beam.options.pipeline_options import PipelineOptions
beam_options = PipelineOptions()// If beamx or Go flags are used, flags must be parsed first,
// before beam.Init() is called.
flag.Parse()const pipeline_options = {
runner: "default",
project: "my_project",
};
const runner = beam.createRunner(pipeline_options);
const runnerFromCommandLineOptions = beam.createRunner(yargs.argv);pipeline:
...
options:
my_pipeline_option: my_value
...This interprets command-line arguments that follow the format:
--<option>=<value>
Appending the method
.withValidationwill check for required command-line arguments and validate argument values.
Building your PipelineOptions this way lets you specify any of the options as
a command-line argument.
Defining flag variables this way lets you specify any of the options as a command-line argument.
Note: The WordCount example pipeline demonstrates how to set pipeline options at runtime by using command-line options.
2.1.2. Creating custom options
You can add your own custom options in addition to the standard
PipelineOptions.
To add your own options, define an interface with getter and setter methods for each option.
The following example shows how to addinput and output custom options:public interface MyOptions extends PipelineOptions {
String getInput();
void setInput(String input);
String getOutput();
void setOutput(String output);
}from apache_beam.options.pipeline_options import PipelineOptions
class MyOptions(PipelineOptions):
@classmethod
def _add_argparse_args(cls, parser):
parser.add_argument('--input')
parser.add_argument('--output')// Use standard Go flags to define pipeline options.
var (
input = flag.String("input", "", "")
output = flag.String("output", "", "")
)const options = yargs.argv; // Or an alternative command-line parsing library.
// Use options.input and options.output during pipeline construction.
You can also specify a description, which appears when a user passes --help as
a command-line argument, and a default value.
You set the description and default value using annotations, as follows:
public interface MyOptions extends PipelineOptions {
    @Description("Input for the pipeline")
    @Default.String("gs://my-bucket/input")
    String getInput();
    void setInput(String input);

    @Description("Output for the pipeline")
    @Default.String("gs://my-bucket/output")
    String getOutput();
    void setOutput(String output);
}
from apache_beam.options.pipeline_options import PipelineOptions
class MyOptions(PipelineOptions):
@classmethod
def _add_argparse_args(cls, parser):
parser.add_argument(
'--input',
default='gs://dataflow-samples/shakespeare/kinglear.txt',
help='The file path for the input text to process.')
parser.add_argument(
'--output', required=True, help='The path prefix for output files.')var (
input = flag.String("input", "gs://my-bucket/input", "Input for the pipeline")
output = flag.String("output", "gs://my-bucket/output", "Output for the pipeline")
)For Python, you can also simply parse your custom options with argparse; there is no need to create a separate PipelineOptions subclass.
It’s recommended that you register your interface with PipelineOptionsFactory
and then pass the interface when creating the PipelineOptions object. When you
register your interface with PipelineOptionsFactory, the --help can find
your custom options interface and add it to the output of the --help command.
PipelineOptionsFactory will also validate that your custom options are
compatible with all other registered options.
The following example code shows how to register your custom options interface
with PipelineOptionsFactory:
PipelineOptionsFactory.register(MyOptions.class);
MyOptions options = PipelineOptionsFactory.fromArgs(args)
                                                .withValidation()
                                                .as(MyOptions.class);
Now your pipeline can accept --input=value and --output=value as command-line arguments.
3. PCollections
The PCollection
PCollection
PCollection
abstraction represents a
potentially distributed, multi-element data set. You can think of a
PCollection as “pipeline” data; Beam transforms use PCollection objects as
inputs and outputs. As such, if you want to work with data in your pipeline, it
must be in the form of a PCollection.
After you’ve created your Pipeline, you’ll need to begin by creating at least
one PCollection in some form. The PCollection you create serves as the input
for the first operation in your pipeline.
3.1. Creating a PCollection
You create a PCollection by either reading data from an external source using
Beam’s Source API, or you can create a PCollection of data
stored in an in-memory collection class in your driver program. The former is
typically how a production pipeline would ingest data; Beam’s Source APIs
contain adapters to help you read from external sources like large cloud-based
files, databases, or subscription services. The latter is primarily useful for
testing and debugging purposes.
3.1.1. Reading from an external source
To read from an external source, you use one of the Beam-provided I/O
adapters. The adapters vary in their exact usage, but all of them
read from some external data source and return a PCollection whose elements
represent the data records in that source.
Each data source adapter has a Read transform; to read,
you must apply that transform to the Pipeline object itself.
place this transform in the source or transforms portion of the pipeline.
TextIO.Read
io.TextFileSource
textio.Read
textio.ReadFromText,
ReadFromText,
for example, reads from an
external text file and returns a PCollection whose elements
are of type String where each String
represents one line from the text file. Here’s how you
would apply TextIO.Read
io.TextFileSource
textio.Read
textio.ReadFromText
ReadFromText
to your Pipeline root to create
a PCollection:
public static void main(String[] args) {
    // Create the pipeline.
    PipelineOptions options =
        PipelineOptionsFactory.fromArgs(args).create();
    Pipeline p = Pipeline.create(options);

    // Create the PCollection 'lines' by applying a 'Read' transform.
    PCollection<String> lines = p.apply(
      "ReadMyFile", TextIO.read().from("gs://some/inputData.txt"));
}
lines = pipeline | 'ReadMyFile' >> beam.io.ReadFromText(
'gs://some/inputData.txt')// Read the file at the URI 'gs://some/inputData.txt' and return
// the lines as a PCollection<string>.
// Notice the scope as the first variable when calling
// the method as is needed when calling all transforms.
lines := textio.Read(scope, "gs://some/inputData.txt")async function pipeline(root: beam.Root) {
// Note that textio.ReadFromText is an AsyncPTransform.
const pcoll: PCollection<string> = await root.applyAsync(
textio.ReadFromText("path/to/text_pattern")
);
}pipeline:
source:
type: ReadFromText
config:
path: ...See the section on I/O to learn more about how to read from the various data sources supported by the Beam SDK.
3.1.2. Creating a PCollection from in-memory data
To create a PCollection from an in-memory Java Collection, you use the
Beam-provided Create transform. Much like a data adapter’s Read, you apply
Create directly to your Pipeline object itself.
As parameters, Create accepts the Java Collection and a Coder object. The
Coder specifies how the elements in the Collection should be
encoded.
To create a PCollection from an in-memory list, you use the Beam-provided
Create transform. Apply this transform directly to your Pipeline object
itself.
To create a PCollection from an in-memory slice, you use the Beam-provided
beam.CreateList transform. Pass the pipeline scope, and the slice to this transform.
To create a PCollection from an in-memory array, you use the Beam-provided
Create transform. Apply this transform directly to your Root object.
To create a PCollection from an in-memory array, you use the Beam-provided
Create transform. Specify the elements in the pipeline itself.
The following example code shows how to create a PCollection from an in-memory
List
list
slice
array:
public static void main(String[] args) {
    // Create a Java Collection, in this case a List of Strings.
    final List<String> LINES = Arrays.asList(
      "To be, or not to be: that is the question: ",
      "Whether 'tis nobler in the mind to suffer ",
      "The slings and arrows of outrageous fortune, ",
      "Or to take arms against a sea of troubles, ");

    // Create the pipeline.
    PipelineOptions options =
        PipelineOptionsFactory.fromArgs(args).create();
    Pipeline p = Pipeline.create(options);

    // Apply Create, passing the list and the coder, to create the PCollection.
    p.apply(Create.of(LINES)).setCoder(StringUtf8Coder.of());
}
import apache_beam as beam
with beam.Pipeline() as pipeline:
lines = (
pipeline
| beam.Create([
'To be, or not to be: that is the question: ',
"Whether 'tis nobler in the mind to suffer ",
'The slings and arrows of outrageous fortune, ',
'Or to take arms against a sea of troubles, ',
]))lines := []string{
"To be, or not to be: that is the question: ",
"Whether 'tis nobler in the mind to suffer ",
"The slings and arrows of outrageous fortune, ",
"Or to take arms against a sea of troubles, ",
}
// Create the Pipeline object and root scope.
// It's conventional to use p as the Pipeline variable and
// s as the scope variable.
p, s := beam.NewPipelineWithRoot()
// Pass the slice to beam.CreateList, to create the pcollection.
// The scope variable s is used to add the CreateList transform
// to the pipeline.
linesPCol := beam.CreateList(s, lines)function pipeline(root: beam.Root) {
const pcoll = root.apply(
beam.create([
"To be, or not to be: that is the question: ",
"Whether 'tis nobler in the mind to suffer ",
"The slings and arrows of outrageous fortune, ",
"Or to take arms against a sea of troubles, ",
])
);
}pipeline:
transforms:
- type: Create
config:
elements:
- A
- B
- ...3.2. PCollection characteristics
A PCollection is owned by the specific Pipeline object for which it is
created; multiple pipelines cannot share a PCollection.
In some respects, a PCollection functions like
a Collection class. However, a PCollection can differ in a few key ways:
3.2.1. Element type
The elements of a PCollection may be of any type, but must all be of the same
type. However, to support distributed processing, Beam needs to be able to
encode each individual element as a byte string (so elements can be passed
around to distributed workers). The Beam SDKs provide a data encoding mechanism
that includes built-in encoding for commonly-used types as well as support for
specifying custom encodings as needed.
3.2.2. Element schema
In many cases, the element type in a PCollection has a structure that can be introspected.
Examples are JSON, Protocol Buffer, Avro, and database records. Schemas provide a way to
express types as a set of named fields, allowing for more-expressive aggregations.
3.2.3. Immutability
A PCollection is immutable. Once created, you cannot add, remove, or change
individual elements. A Beam Transform might process each element of a
PCollection and generate new pipeline data (as a new PCollection), but it
does not consume or modify the original input collection.
Note: Beam SDKs avoid unnecessary copying of elements, so
PCollectioncontents are logically immutable, not physically immutable. Changes to input elements may be visible to other DoFns executing within the same bundle, and may cause correctness issues. As a rule, it’s not safe to modify values provided to a DoFn.
3.2.4. Random access
A PCollection does not support random access to individual elements. Instead,
Beam Transforms consider every element in a PCollection individually.
3.2.5. Size and boundedness
A PCollection is a large, immutable “bag” of elements. There is no upper limit
on how many elements a PCollection can contain; any given PCollection might
fit in memory on a single machine, or it might represent a very large
distributed data set backed by a persistent data store.
A PCollection can be either bounded or unbounded in size. A
bounded PCollection represents a data set of a known, fixed size, while an
unbounded PCollection represents a data set of unlimited size. Whether a
PCollection is bounded or unbounded depends on the source of the data set that
it represents. Reading from a batch data source, such as a file or a database,
creates a bounded PCollection. Reading from a streaming or
continuously-updating data source, such as Pub/Sub or Kafka, creates an unbounded
PCollection (unless you explicitly tell it not to).
The bounded (or unbounded) nature of your PCollection affects how Beam
processes your data. A bounded PCollection can be processed using a batch job,
which might read the entire data set once, and perform processing in a job of
finite length. An unbounded PCollection must be processed using a streaming
job that runs continuously, as the entire collection can never be available for
processing at any one time.
Beam uses windowing to divide a continuously updating unbounded
PCollection into logical windows of finite size. These logical windows are
determined by some characteristic associated with a data element, such as a
timestamp. Aggregation transforms (such as GroupByKey and Combine) work
on a per-window basis — as the data set is generated, they process each
PCollection as a succession of these finite windows.
3.2.6. Element timestamps
Each element in a PCollection has an associated intrinsic timestamp. The
timestamp for each element is initially assigned by the Source
that creates the PCollection. Sources that create an unbounded PCollection
often assign each new element a timestamp that corresponds to when the element
was read or added.
Note: Sources that create a bounded
PCollectionfor a fixed data set also automatically assign timestamps, but the most common behavior is to assign every element the same timestamp (Long.MIN_VALUE).
Timestamps are useful for a PCollection that contains elements with an
inherent notion of time. If your pipeline is reading a stream of events, like
Tweets or other social media messages, each element might use the time the event
was posted as the element timestamp.
You can manually assign timestamps to the elements of a PCollection if the
source doesn’t do it for you. You’ll want to do this if the elements have an
inherent timestamp, but the timestamp is somewhere in the structure of the
element itself (such as a “time” field in a server log entry). Beam has
Transforms that take a PCollection as input and output an
identical PCollection with timestamps attached; see Adding
Timestamps for more information
about how to do so.
4. Transforms
Transforms are the operations in your pipeline, and provide a generic
processing framework. You provide processing logic in the form of a function
object (colloquially referred to as “user code”), and your user code is applied
to each element of an input PCollection (or more than one PCollection).
Depending on the pipeline runner and back-end that you choose, many different
workers across a cluster may execute instances of your user code in parallel.
The user code running on each worker generates the output elements that are
ultimately added to the final output PCollection that the transform produces.
Aggregation is an important concept to understand when learning about Beam’s transforms. For an introduction to aggregation, see the Basics of the Beam model Aggregation section.
The Beam SDKs contain a number of different transforms that you can apply to
your pipeline’s PCollections. These include general-purpose core transforms,
such as ParDo or Combine. There are also pre-written
composite transforms included in the SDKs, which
combine one or more of the core transforms in a useful processing pattern, such
as counting or combining elements in a collection. You can also define your own
more complex composite transforms to fit your pipeline’s exact use case.
For a more in-depth tutorial of applying various transforms in the Python SDK, please read and work through this colab notebook.
4.1. Applying transforms
To invoke a transform, you must apply it to the input PCollection. Each
transform in the Beam SDKs has a generic apply method
(or pipe operator |).
Invoking multiple Beam transforms is similar to method chaining, but with one
slight difference: You apply the transform to the input PCollection, passing
the transform itself as an argument, and the operation returns the output
PCollection.
array
In YAML, transforms are applied by listing their inputs.
This takes the general form:
[Output PCollection] = [Input PCollection].apply([Transform])[Output PCollection] = [Input PCollection] | [Transform][Output PCollection] := beam.ParDo(scope, [Transform], [Input PCollection])[Output PCollection] = [Input PCollection].apply([Transform])
[Output PCollection] = await [Input PCollection].applyAsync([AsyncTransform])pipeline:
transforms:
...
- name: ProducingTransform
type: ProducingTransformType
...
- name: MyTransform
type: MyTransformType
input: ProducingTransform
...If a transform has more than one (non-error) output, the various outputs can be identified by explicitly giving the output name.
pipeline:
  transforms:
    ...
    - name: ProducingTransform
      type: ProducingTransformType
      ...

    - name: MyTransform
      type: MyTransformType
      input: ProducingTransform.output_name
      ...

    - name: MyTransform
      type: MyTransformType
      input: ProducingTransform.another_output_name
      ...
For linear pipelines, this can be further simplified by implicitly determining
the inputs based on by the ordering of the transforms by designating and setting
the type to chain. For example
pipeline:
  type: chain
  transforms:
    - name: ProducingTransform
      type: ReadTransform
      config: ...

    - name: MyTransform
      type: MyTransformType
      config: ...

    - name: ConsumingTransform
      type: WriteTransform
      config: ...
Because Beam uses a generic apply method for PCollection, you can both chain
transforms sequentially and also apply transforms that contain other transforms
nested within (called composite transforms in the Beam
SDKs).
It’s recommended to create a new variable for each new PCollection to
sequentially transform input data. Scopes can be used to create functions
that contain other transforms
(called composite transforms in the Beam SDKs).
How you apply your pipeline’s transforms determines the structure of your
pipeline. The best way to think of your pipeline is as a directed acyclic graph,
where PTransform nodes are subroutines that accept PCollection nodes as
inputs and emit PCollection nodes as outputs.
For example, you can chain together transforms to create a pipeline that successively modifies input data:
For example, you can successively call transforms on PCollections to modify the input data:
[Final Output PCollection] = [Initial Input PCollection].apply([First Transform])
.apply([Second Transform])
.apply([Third Transform])[Final Output PCollection] = ([Initial Input PCollection] | [First Transform]
| [Second Transform]
| [Third Transform])[Second PCollection] := beam.ParDo(scope, [First Transform], [Initial Input PCollection])
[Third PCollection] := beam.ParDo(scope, [Second Transform], [Second PCollection])
[Final Output PCollection] := beam.ParDo(scope, [Third Transform], [Third PCollection])[Final Output PCollection] = [Initial Input PCollection].apply([First Transform])
.apply([Second Transform])
.apply([Third Transform])The graph of this pipeline looks like the following:

Figure 1: A linear pipeline with three sequential transforms.
However, note that a transform does not consume or otherwise alter the input
collection — remember that a PCollection is immutable by definition. This means
that you can apply multiple transforms to the same input PCollection to create
a branching pipeline, like so:
[PCollection of database table rows] = [Database Table Reader].apply([Read Transform])
[PCollection of 'A' names] = [PCollection of database table rows].apply([Transform A])
[PCollection of 'B' names] = [PCollection of database table rows].apply([Transform B])[PCollection of database table rows] = [Database Table Reader] | [Read Transform]
[PCollection of 'A' names] = [PCollection of database table rows] | [Transform A]
[PCollection of 'B' names] = [PCollection of database table rows] | [Transform B][PCollection of database table rows] = beam.ParDo(scope, [Read Transform], [Database Table Reader])
[PCollection of 'A' names] = beam.ParDo(scope, [Transform A], [PCollection of database table rows])
[PCollection of 'B' names] = beam.ParDo(scope, [Transform B], [PCollection of database table rows])[PCollection of database table rows] = [Database Table Reader].apply([Read Transform])
[PCollection of 'A' names] = [PCollection of database table rows].apply([Transform A])
[PCollection of 'B' names] = [PCollection of database table rows].apply([Transform B])The graph of this branching pipeline looks like the following:

Figure 2: A branching pipeline. Two transforms are applied to a single PCollection of database table rows.
You can also build your own composite transforms that nest multiple transforms inside a single, larger transform. Composite transforms are particularly useful for building a reusable sequence of simple steps that get used in a lot of different places.
The pipe syntax allows one to apply PTransforms to tuples and dicts of
PCollections as well for those transforms accepting multiple inputs (such as
Flatten and CoGroupByKey).
PTransforms can also be applied to any PValue, which include the Root object,
PCollections, arrays of PValues, and objects with PValue values.
One can apply transforms to these composite types by wrapping them with
beam.P, e.g.
beam.P({left: pcollA, right: pcollB}).apply(transformExpectingTwoPCollections).
PTransforms come in two flavors, synchronous and asynchronous, depending on
whether their application* involves asynchronous invocations.
An AsyncTransform must be applied with applyAsync and returns a Promise
which must be awaited before further pipeline construction.
4.2. Core Beam transforms
Beam provides the following core transforms, each of which represents a different processing paradigm:
ParDoGroupByKeyCoGroupByKeyCombineFlattenPartition
The Typescript SDK provides some of the most basic of these transforms
as methods on PCollection itself.
4.2.1. ParDo
ParDo is a Beam transform for generic parallel processing. The ParDo
processing paradigm is similar to the “Map” phase of a
Map/Shuffle/Reduce-style
algorithm: a ParDo transform considers each element in the input
PCollection, performs some processing function (your user code) on that
element, and emits zero, one, or multiple elements to an output PCollection.
ParDo is useful for a variety of common data processing operations, including:
- Filtering a data set. You can use
ParDoto consider each element in aPCollectionand either output that element to a new collection or discard it. - Formatting or type-converting each element in a data set. If your input
PCollectioncontains elements that are of a different type or format than you want, you can useParDoto perform a conversion on each element and output the result to a newPCollection. - Extracting parts of each element in a data set. If you have a
PCollectionof records with multiple fields, for example, you can use aParDoto parse out just the fields you want to consider into a newPCollection. - Performing computations on each element in a data set. You can use
ParDoto perform simple or complex computations on every element, or certain elements, of aPCollectionand output the results as a newPCollection.
In such roles, ParDo is a common intermediate step in a pipeline. You might
use it to extract certain fields from a set of raw input records, or convert raw
input into a different format; you might also use ParDo to convert processed
data into a format suitable for output, like database table rows or printable
strings.
When you apply a ParDo transform, you’ll need to provide user code in the form
of a DoFn object. DoFn is a Beam SDK class that defines a distributed
processing function.
In Beam YAML, ParDo operations are expressed by the MapToFields, Filter,
and Explode transform types. These types can take a UDF in the language of your
choice, rather than introducing the notion of a DoFn.
See the page on mapping fns for more details.
When you create a subclass of
DoFn, note that your subclass should adhere to the Requirements for writing user code for Beam transforms.
All DoFns should be registered using a generic register.DoFnXxY[...]
function. This allows the Go SDK to infer an encoding from any inputs/outputs,
registers the DoFn for execution on remote runners, and optimizes the runtime
execution of the DoFns via reflection.
// ComputeWordLengthFn is a DoFn that computes the word length of string elements.
type ComputeWordLengthFn struct{}

// ProcessElement computes the length of word and emits the result.
// When creating structs as a DoFn, the ProcessElement method performs the
// work of this step in the pipeline.
func (fn *ComputeWordLengthFn) ProcessElement(ctx context.Context, word string) int {
   ...
}

func init() {
  // 2 inputs and 1 output => DoFn2x1
  // Input/output types are included in order in the brackets
	register.DoFn2x1[context.Context, string, int](&ComputeWordLengthFn{})
}
4.2.1.1. Applying ParDo
Like all Beam transforms, you apply ParDo by calling the apply method on the
input PCollection and passing ParDo as an argument, as shown in the
following example code:
Like all Beam transforms, you apply ParDo by calling the beam.ParDo on the
input PCollection and passing the DoFn as an argument, as shown in the
following example code:
beam.ParDo applies the passed in DoFn argument to the input PCollection,
as shown in the following example code:
// The input PCollection of Strings.
PCollection<String> words = ...;

// The DoFn to perform on each element in the input PCollection.
static class ComputeWordLengthFn extends DoFn<String, Integer> { ... }

// Apply a ParDo to the PCollection "words" to compute lengths for each word.
PCollection<Integer> wordLengths = words.apply(
    ParDo
    .of(new ComputeWordLengthFn()));        // The DoFn to perform on each element, which
                                            // we define above.
# The input PCollection of Strings.
words = ...

# The DoFn to perform on each element in the input PCollection.

class ComputeWordLengthFn(beam.DoFn):
  def process(self, element):
    return [len(element)]


# Apply a ParDo to the PCollection "words" to compute lengths for each word.
word_lengths = words | beam.ParDo(ComputeWordLengthFn())
// ComputeWordLengthFn is the DoFn to perform on each element in the input PCollection.
type ComputeWordLengthFn struct{}
// ProcessElement is the method to execute for each element.
func (fn *ComputeWordLengthFn) ProcessElement(word string, emit func(int)) {
emit(len(word))
}
// DoFns must be registered with beam.
func init() {
beam.RegisterType(reflect.TypeOf((*ComputeWordLengthFn)(nil)))
// 2 inputs and 0 outputs => DoFn2x0
// 1 input => Emitter1
// Input/output types are included in order in the brackets
register.DoFn2x0[string, func(int)](&ComputeWordLengthFn{})
register.Emitter1[int]()
}
// words is an input PCollection of strings
var words beam.PCollection = ...
wordLengths := beam.ParDo(s, &ComputeWordLengthFn{}, words)# The input PCollection of Strings.
const words : PCollection<string> = ...
# The DoFn to perform on each element in the input PCollection.
function computeWordLengthFn(): beam.DoFn<string, number> {
return {
process: function* (element) {
yield element.length;
},
};
}
const result = words.apply(beam.parDo(computeWordLengthFn()));In the example, our input PCollection contains String
string values. We apply a
ParDo transform that specifies a function (ComputeWordLengthFn) to compute
the length of each string, and outputs the result to a new PCollection of
Integer
int values that stores the length of each word.
4.2.1.2. Creating a DoFn
The DoFn object that you pass to ParDo contains the processing logic that
gets applied to the elements in the input collection. When you use Beam, often
the most important pieces of code you’ll write are these DoFns - they’re what
define your pipeline’s exact data processing tasks.
Note: When you create your
DoFn, be mindful of the Requirements for writing user code for Beam transforms and ensure that your code follows them. You should avoid time-consuming operations such as reading large files inDoFn.Setup.
A DoFn processes one element at a time from the input PCollection. When you
create a subclass of DoFn, you’ll need to provide type parameters that match
the types of the input and output elements. If your DoFn processes incoming
String elements and produces Integer elements for the output collection
(like our previous example, ComputeWordLengthFn), your class declaration would
look like this:
A DoFn processes one element at a time from the input PCollection. When you
create a DoFn struct, you’ll need to provide type parameters that match
the types of the input and output elements in a ProcessElement method.
If your DoFn processes incoming string elements and produces int elements
for the output collection (like our previous example, ComputeWordLengthFn), your dofn could
look like this:
static class ComputeWordLengthFn extends DoFn<String, Integer> { ... }// ComputeWordLengthFn is a DoFn that computes the word length of string elements.
type ComputeWordLengthFn struct{}
// ProcessElement computes the length of word and emits the result.
// When creating structs as a DoFn, the ProcessElement method performs the
// work of this step in the pipeline.
func (fn *ComputeWordLengthFn) ProcessElement(word string, emit func(int)) {
...
}
func init() {
// 2 inputs and 0 outputs => DoFn2x0
// 1 input => Emitter1
// Input/output types are included in order in the brackets
register.Function2x0(&ComputeWordLengthFn{})
register.Emitter1[int]()
}Inside your DoFn subclass, you’ll write a method annotated with
@ProcessElement where you provide the actual processing logic. You don’t need
to manually extract the elements from the input collection; the Beam SDKs handle
that for you. Your @ProcessElement method should accept a parameter tagged with
@Element, which will be populated with the input element. In order to output
elements, the method can also take a parameter of type OutputReceiver which
provides a method for emitting elements. The parameter types must match the input
and output types of your DoFn or the framework will raise an error. Note: @Element and
OutputReceiver were introduced in Beam 2.5.0; if using an earlier release of Beam, a
ProcessContext parameter should be used instead.
Inside your DoFn subclass, you’ll write a method process where you provide
the actual processing logic. You don’t need to manually extract the elements
from the input collection; the Beam SDKs handle that for you. Your process method
should accept an argument element, which is the input element, and return an
iterable with its output values. You can accomplish this by emitting individual
elements with yield statements, and use yield from to emit all elements from
an iterable, such as a list or a generator. Using return statement
with an iterable is also acceptable as long as you don’t mix yield and
return statements in the same process method, since that leads to incorrect behavior.
For your DoFn type, you’ll write a method ProcessElement where you provide
the actual processing logic. You don’t need to manually extract the elements
from the input collection; the Beam SDKs handle that for you. Your ProcessElement method
should accept a parameter element, which is the input element. In order to output elements,
the method can also take a function parameter, which can be called to emit elements.
The parameter types must match the input and output types of your DoFn
or the framework will raise an error.
static class ComputeWordLengthFn extends DoFn<String, Integer> {
  @ProcessElement
  public void processElement(@Element String word, OutputReceiver<Integer> out) {
    // Use OutputReceiver.output to emit the output element.
    out.output(word.length());
  }
}
class ComputeWordLengthFn(beam.DoFn):
def process(self, element):
return [len(element)]// ComputeWordLengthFn is the DoFn to perform on each element in the input PCollection.
type ComputeWordLengthFn struct{}
// ProcessElement is the method to execute for each element.
func (fn *ComputeWordLengthFn) ProcessElement(word string, emit func(int)) {
emit(len(word))
}
// DoFns must be registered with beam.
func init() {
beam.RegisterType(reflect.TypeOf((*ComputeWordLengthFn)(nil)))
// 2 inputs and 0 outputs => DoFn2x0
// 1 input => Emitter1
// Input/output types are included in order in the brackets
register.DoFn2x0[string, func(int)](&ComputeWordLengthFn{})
register.Emitter1[int]()
}function computeWordLengthFn(): beam.DoFn<string, number> {
return {
process: function* (element) {
yield element.length;
},
};
}Simple DoFns can also be written as functions.
func ComputeWordLengthFn(word string, emit func(int)) { ... }

func init() {
  // 2 inputs and 0 outputs => DoFn2x0
  // 1 input => Emitter1
  // Input/output types are included in order in the brackets
  register.DoFn2x0[string, func(int)](&ComputeWordLengthFn{})
  register.Emitter1[int]()
}
Note: Whether using a structural
DoFntype or a functionalDoFn, they should be registered with beam in aninitblock. Otherwise they may not execute on distributed runners.
Note: If the elements in your input
PCollectionare key/value pairs, you can access the key or value by usingelement.getKey()orelement.getValue(), respectively.
Note: If the elements in your input
PCollectionare key/value pairs, your process element method must have two parameters, for each of the key and value, respectively. Similarly, key/value pairs are also output as separate parameters to a singleemitter function.
Proper use of return vs yield in Python Functions.
Returning a single element (e.g.,
return element) is incorrect Theprocessmethod in Beam must return an iterable of elements. Returning a single value like an integer or string (e.g.,return element) leads to a runtime error (TypeError: 'int' object is not iterable) or incorrect results since the return value will be treated as an iterable. Always ensure your return type is iterable.
# Incorrectly Returning a single string instead of a sequence
class ReturnIndividualElement(beam.DoFn):
    def process(self, element):
        return element

with beam.Pipeline() as pipeline:
    (
        pipeline
        | "CreateExamples" >> beam.Create(["foo"])
        | "MapIncorrect" >> beam.ParDo(ReturnIndividualElement())
        | "Print" >> beam.Map(print)
    )
  # prints:
  # f
  # o
  # o
Returning a list (e.g.,
return [element1, element2]) is valid because List is Iterable This approach works well when emitting multiple outputs from a single call and is easy to read for small datasets.
# Returning a list of strings
class ReturnWordsFn(beam.DoFn):
    def process(self, element):
        # Split the sentence and return all words longer than 2 characters as a list
        return [word for word in element.split() if len(word) > 2]

with beam.Pipeline() as pipeline:
    (
        pipeline
        | "CreateSentences_Return" >> beam.Create([  # Create a collection of sentences
            "Apache Beam is powerful",               # Sentence 1
            "Try it now"                             # Sentence 2
        ])
        | "SplitWithReturn" >> beam.ParDo(ReturnWordsFn())  # Apply the custom DoFn to split words
        | "PrintWords_Return" >> beam.Map(print)  # Print each List of words
    )
  # prints:
  # Apache
  # Beam
  # powerful
  # Try
  # now
Using
yield(e.g.,yield element) is also valid This approach can be useful for generating multiple outputs more flexibly, especially in cases where conditional logic or loops are involved.
# Yielding each line one at a time
class YieldWordsFn(beam.DoFn):
    def process(self, element):
        # Splitting the sentence and yielding words that have more than 2 characters
        for word in element.split():
            if len(word) > 2:
                yield word

with beam.Pipeline() as pipeline:
    (
        pipeline
        | "CreateSentences_Yield" >> beam.Create([  # Create a collection of sentences
            "Apache Beam is powerful",              # Sentence 1
            "Try it now"                            # Sentence 2
        ])
        | "SplitWithYield" >> beam.ParDo(YieldWordsFn())  # Apply the custom DoFn to split words
        | "PrintWords_Yield" >> beam.Map(print)  # Print each word
    )
  # prints:
  # Apache
  # Beam
  # powerful
  # Try
  # now
A given DoFn instance generally gets invoked one or more times to process some
arbitrary bundle of elements. However, Beam doesn’t guarantee an exact number of
invocations; it may be invoked multiple times on a given worker node to account
for failures and retries. As such, you can cache information across multiple
calls to your processing method, but if you do so, make sure the implementation
does not depend on the number of invocations.
In your processing method, you’ll also need to meet some immutability requirements to ensure that Beam and the processing back-end can safely serialize and cache the values in your pipeline. Your method should meet the following requirements:
- You should not in any way modify an element returned by
the
@Elementannotation orProcessContext.sideInput()(the incoming elements from the input collection). - Once you output a value using
OutputReceiver.output()you should not modify that value in any way.
- You should not in any way modify the
elementargument provided to theprocessmethod, or any side inputs. - Once you output a value using
yieldorreturn, you should not modify that value in any way.
- You should not in any way modify the parameters provided to the
ProcessElementmethod, or any side inputs. - Once you output a value using an
emitter function, you should not modify that value in any way.
4.2.1.3. Lightweight DoFns and other abstractions
If your function is relatively straightforward, you can simplify your use of
ParDo by providing a lightweight DoFn in-line, as
an anonymous inner class instance
a lambda function
an anonymous function
a function passed to PCollection.map or PCollection.flatMap.
Here’s the previous example, ParDo with ComputeLengthWordsFn, with the
DoFn specified as
an anonymous inner class instance
a lambda function
an anonymous function
a function:
// The input PCollection.
PCollection<String> words = ...;

// Apply a ParDo with an anonymous DoFn to the PCollection words.
// Save the result as the PCollection wordLengths.
PCollection<Integer> wordLengths = words.apply(
  "ComputeWordLengths",                     // the transform name
  ParDo.of(new DoFn<String, Integer>() {    // a DoFn as an anonymous inner class instance
      @ProcessElement
      public void processElement(@Element String word, OutputReceiver<Integer> out) {
        out.output(word.length());
      }
    }));
# The input PCollection of strings.
words = ...
# Apply a lambda function to the PCollection words.
# Save the result as the PCollection word_lengths.
word_lengths = words | beam.FlatMap(lambda word: [len(word)])The Go SDK cannot support anonymous functions outside of the deprecated Go Direct runner.
// words is the input PCollection of strings
var words beam.PCollection = ...
lengths := beam.ParDo(s, func (word string, emit func(int)) {
emit(len(word))
}, words)// The input PCollection of strings.
words = ...
const result = words.flatMap((word) => [word.length]);If your ParDo performs a one-to-one mapping of input elements to output
elements–that is, for each input element, it applies a function that produces
exactly one output element, you can return that
element directly.you can use the higher-level
MapElementsMap
transform.MapElements can accept an anonymous
Java 8 lambda function for additional brevity.
Here’s the previous example using MapElements
Mapa direct return:
// The input PCollection.
PCollection<String> words = ...;

// Apply a MapElements with an anonymous lambda function to the PCollection words.
// Save the result as the PCollection wordLengths.
PCollection<Integer> wordLengths = words.apply(
  MapElements.into(TypeDescriptors.integers())
             .via((String word) -> word.length()));
# The input PCollection of string.
words = ...
# Apply a Map with a lambda function to the PCollection words.
# Save the result as the PCollection word_lengths.
word_lengths = words | beam.Map(len)The Go SDK cannot support anonymous functions outside of the deprecated Go Direct runner.
func wordLengths(word string) int { return len(word) }
func init() { register.Function1x1(wordLengths) }
func applyWordLenAnon(s beam.Scope, words beam.PCollection) beam.PCollection {
return beam.ParDo(s, wordLengths, words)
}// The input PCollection of string.
words = ...
const result = words.map((word) => word.length);Note: You can use Java 8 lambda functions with several other Beam transforms, including
Filter,FlatMapElements, andPartition.
Note: Anonymous function DoFns do not work on distributed runners. It’s recommended to use named functions and register them with
register.FunctionXxYin aninit()block.
4.2.1.4. DoFn lifecycle
Here is a sequence diagram that shows the lifecycle of the DoFn during the execution of the ParDo transform. The comments give useful information to pipeline developers such as the constraints that apply to the objects or particular cases such as failover or instance reuse. They also give instantiation use cases. Three key points to note are that:
- Teardown is done on a best effort basis and thus isn’t guaranteed.
- The number of DoFn instances created at runtime is runner-dependent.
- For the Python SDK, the pipeline contents such as DoFn user code,
is serialized into a bytecode. Therefore,
DoFns should not reference objects that are not serializable, such as locks. To manage a single instance of an object across multipleDoFninstances in the same process, use utilities in the shared.py module.

4.2.2. GroupByKey
GroupByKey is a Beam transform for processing collections of key/value pairs.
It’s a parallel reduction operation, analogous to the Shuffle phase of a
Map/Shuffle/Reduce-style algorithm. The input to GroupByKey is a collection of
key/value pairs that represents a multimap, where the collection contains
multiple pairs that have the same key, but different values. Given such a
collection, you use GroupByKey to collect all of the values associated with
each unique key.
GroupByKey is a good way to aggregate data that has something in common. For
example, if you have a collection that stores records of customer orders, you
might want to group together all the orders from the same postal code (wherein
the “key” of the key/value pair is the postal code field, and the “value” is the
remainder of the record).
Let’s examine the mechanics of GroupByKey with a simple example case, where
our data set consists of words from a text file and the line number on which
they appear. We want to group together all the line numbers (values) that share
the same word (key), letting us see all the places in the text where a
particular word appears.
Our input is a PCollection of key/value pairs where each word is a key, and
the value is a line number in the file where the word appears. Here’s a list of
the key/value pairs in the input collection:
cat, 1
dog, 5
and, 1
jump, 3
tree, 2
cat, 5
dog, 2
and, 2
cat, 9
and, 6
...
GroupByKey gathers up all the values with the same key and outputs a new pair
consisting of the unique key and a collection of all of the values that were
associated with that key in the input collection. If we apply GroupByKey to
our input collection above, the output collection would look like this:
cat, [1,5,9]
dog, [5,2]
and, [1,2,6]
jump, [3]
tree, [2]
...
Thus, GroupByKey represents a transform from a multimap (multiple keys to
individual values) to a uni-map (unique keys to collections of values).
Using GroupByKey is straightforward:
While all SDKs have a GroupByKey transform, using GroupBy is
generally more natural.
The GroupBy transform can be parameterized by the name(s) of properties
on which to group the elements of the PCollection, or a function taking
the each element as input that maps to a key on which to do grouping.
// The input PCollection.
 PCollection<KV<String, String>> mapped = ...;

// Apply GroupByKey to the PCollection mapped.
// Save the result as the PCollection reduced.
PCollection<KV<String, Iterable<String>>> reduced =
 mapped.apply(GroupByKey.<String, String>create());
# The input PCollection of (`string`, `int`) tuples.
words_and_counts = ...
grouped_words = words_and_counts | beam.GroupByKey()// CreateAndSplit creates and returns a PCollection with <K,V>
// from an input slice of stringPair (struct with K, V string fields).
pairs := CreateAndSplit(s, input)
keyed := beam.GroupByKey(s, pairs)// A PCollection of elements like
// {word: "cat", score: 1}, {word: "dog", score: 5}, {word: "cat", score: 5}, ...
const scores : PCollection<{word: string, score: number}> = ...
// This will produce a PCollection with elements like
// {key: "cat", value: [{ word: "cat", score: 1 },
// { word: "cat", score: 5 }, ...]}
// {key: "dog", value: [{ word: "dog", score: 5 }, ...]}
const grouped_by_word = scores.apply(beam.groupBy("word"));
// This will produce a PCollection with elements like
// {key: 3, value: [{ word: "cat", score: 1 },
// { word: "dog", score: 5 },
// { word: "cat", score: 5 }, ...]}
const by_word_length = scores.apply(beam.groupBy((x) => x.word.length));type: Combine
config:
group_by: animal
combine:
weight: group4.2.2.1 GroupByKey and unbounded PCollections
If you are using unbounded PCollections, you must use either non-global
windowing or an
aggregation trigger in order to perform a GroupByKey or
CoGroupByKey. This is because a bounded GroupByKey or
CoGroupByKey must wait for all the data with a certain key to be collected,
but with unbounded collections, the data is unlimited. Windowing and/or triggers
allow grouping to operate on logical, finite bundles of data within the
unbounded data streams.
If you do apply GroupByKey or CoGroupByKey to a group of unbounded
PCollections without setting either a non-global windowing strategy, a trigger
strategy, or both for each collection, Beam generates an IllegalStateException
error at pipeline construction time.
When using GroupByKey or CoGroupByKey to group PCollections that have a
windowing strategy applied, all of the PCollections you want to
group must use the same windowing strategy and window sizing. For example, all
of the collections you are merging must use (hypothetically) identical 5-minute
fixed windows, or 4-minute sliding windows starting every 30 seconds.
If your pipeline attempts to use GroupByKey or CoGroupByKey to merge
PCollections with incompatible windows, Beam generates an
IllegalStateException error at pipeline construction time.
4.2.3. CoGroupByKey
CoGroupByKey performs a relational join of two or more key/value
PCollections that have the same key type.
Design Your Pipeline
shows an example pipeline that uses a join.
Consider using CoGroupByKey if you have multiple data sets that provide
information about related things. For example, let’s say you have two different
files with user data: one file has names and email addresses; the other file
has names and phone numbers. You can join those two data sets, using the user
name as a common key and the other data as the associated values. After the
join, you have one data set that contains all of the information (email
addresses and phone numbers) associated with each name.
One can also consider using SqlTransform to perform a join.
If you are using unbounded PCollections, you must use either non-global
windowing or an
aggregation trigger in order to perform a CoGroupByKey. See
GroupByKey and unbounded PCollections
for more details.
In the Beam SDK for Java, CoGroupByKey accepts a tuple of keyed
PCollections (PCollection<KV<K, V>>) as input. For type safety, the SDK
requires you to pass each PCollection as part of a KeyedPCollectionTuple.
You must declare a TupleTag for each input PCollection in the
KeyedPCollectionTuple that you want to pass to CoGroupByKey. As output,
CoGroupByKey returns a PCollection<KV<K, CoGbkResult>>, which groups values
from all the input PCollections by their common keys. Each key (all of type
K) will have a different CoGbkResult, which is a map from TupleTag<T> to
Iterable<T>. You can access a specific collection in an CoGbkResult object
by using the TupleTag that you supplied with the initial collection.
In the Beam SDK for Python, CoGroupByKey accepts a dictionary of keyed
PCollections as input. As output, CoGroupByKey creates a single output
PCollection that contains one key/value tuple for each key in the input
PCollections. Each key’s value is a dictionary that maps each tag to an
iterable of the values under they key in the corresponding PCollection.
In the Beam Go SDK, CoGroupByKey accepts an arbitrary number of
PCollections as input. As output, CoGroupByKey creates a single output
PCollection that groups each key with value iterator functions for each
input PCollection. The iterator functions map to input PCollections in
the same order they were provided to the CoGroupByKey.
The following conceptual examples use two input collections to show the mechanics of
CoGroupByKey.
The first set of data has a TupleTag<String> called emailsTag and contains names
and email addresses. The second set of data has a TupleTag<String> called
phonesTag and contains names and phone numbers.
The first set of data contains names and email addresses. The second set of data contains names and phone numbers.
final List<KV<String, String>> emailsList =
    Arrays.asList(
        KV.of("amy", "amy@example.com"),
        KV.of("carl", "carl@example.com"),
        KV.of("julia", "julia@example.com"),
        KV.of("carl", "carl@email.com"));

final List<KV<String, String>> phonesList =
    Arrays.asList(
        KV.of("amy", "111-222-3333"),
        KV.of("james", "222-333-4444"),
        KV.of("amy", "333-444-5555"),
        KV.of("carl", "444-555-6666"));

PCollection<KV<String, String>> emails = p.apply("CreateEmails", Create.of(emailsList));
PCollection<KV<String, String>> phones = p.apply("CreatePhones", Create.of(phonesList));
emails_list = [
('amy', 'amy@example.com'),
('carl', 'carl@example.com'),
('julia', 'julia@example.com'),
('carl', 'carl@email.com'),
]
phones_list = [
('amy', '111-222-3333'),
('james', '222-333-4444'),
('amy', '333-444-5555'),
('carl', '444-555-6666'),
]
emails = p | 'CreateEmails' >> beam.Create(emails_list)
phones = p | 'CreatePhones' >> beam.Create(phones_list)type stringPair struct {
K, V string
}
func splitStringPair(e stringPair) (string, string) {
return e.K, e.V
}
func init() {
// Register DoFn.
register.Function1x2(splitStringPair)
}
// CreateAndSplit is a helper function that creates
func CreateAndSplit(s beam.Scope, input []stringPair) beam.PCollection {
initial := beam.CreateList(s, input)
return beam.ParDo(s, splitStringPair, initial)
}
var emailSlice = []stringPair{
{"amy", "amy@example.com"},
{"carl", "carl@example.com"},
{"julia", "julia@example.com"},
{"carl", "carl@email.com"},
}
var phoneSlice = []stringPair{
{"amy", "111-222-3333"},
{"james", "222-333-4444"},
{"amy", "333-444-5555"},
{"carl", "444-555-6666"},
}
emails := CreateAndSplit(s.Scope("CreateEmails"), emailSlice)
phones := CreateAndSplit(s.Scope("CreatePhones"), phoneSlice)const emails_list = [
{ name: "amy", email: "amy@example.com" },
{ name: "carl", email: "carl@example.com" },
{ name: "julia", email: "julia@example.com" },
{ name: "carl", email: "carl@email.com" },
];
const phones_list = [
{ name: "amy", phone: "111-222-3333" },
{ name: "james", phone: "222-333-4444" },
{ name: "amy", phone: "333-444-5555" },
{ name: "carl", phone: "444-555-6666" },
];
const emails = root.apply(
beam.withName("createEmails", beam.create(emails_list))
);
const phones = root.apply(
beam.withName("createPhones", beam.create(phones_list))
);- type: Create
name: CreateEmails
config:
elements:
- { name: "amy", email: "amy@example.com" }
- { name: "carl", email: "carl@example.com" }
- { name: "julia", email: "julia@example.com" }
- { name: "carl", email: "carl@email.com" }
- type: Create
name: CreatePhones
config:
elements:
- { name: "amy", phone: "111-222-3333" }
- { name: "james", phone: "222-333-4444" }
- { name: "amy", phone: "333-444-5555" }
- { name: "carl", phone: "444-555-6666" }After CoGroupByKey, the resulting data contains all data associated with each
unique key from any of the input collections.
final TupleTag<String> emailsTag = new TupleTag<>();
final TupleTag<String> phonesTag = new TupleTag<>();

final List<KV<String, CoGbkResult>> expectedResults =
    Arrays.asList(
        KV.of(
            "amy",
            CoGbkResult.of(emailsTag, Arrays.asList("amy@example.com"))
                .and(phonesTag, Arrays.asList("111-222-3333", "333-444-5555"))),
        KV.of(
            "carl",
            CoGbkResult.of(emailsTag, Arrays.asList("carl@email.com", "carl@example.com"))
                .and(phonesTag, Arrays.asList("444-555-6666"))),
        KV.of(
            "james",
            CoGbkResult.of(emailsTag, Arrays.asList())
                .and(phonesTag, Arrays.asList("222-333-4444"))),
        KV.of(
            "julia",
            CoGbkResult.of(emailsTag, Arrays.asList("julia@example.com"))
                .and(phonesTag, Arrays.asList())));
results = [
(
'amy',
{
'emails': ['amy@example.com'],
'phones': ['111-222-3333', '333-444-5555']
}),
(
'carl',
{
'emails': ['carl@email.com', 'carl@example.com'],
'phones': ['444-555-6666']
}),
('james', {
'emails': [], 'phones': ['222-333-4444']
}),
('julia', {
'emails': ['julia@example.com'], 'phones': []
}),
]results := beam.CoGroupByKey(s, emails, phones)
contactLines := beam.ParDo(s, formatCoGBKResults, results)
// Synthetic example results of a cogbk.
results := []struct {
Key string
Emails, Phones []string
}{
{
Key: "amy",
Emails: []string{"amy@example.com"},
Phones: []string{"111-222-3333", "333-444-5555"},
}, {
Key: "carl",
Emails: []string{"carl@email.com", "carl@example.com"},
Phones: []string{"444-555-6666"},
}, {
Key: "james",
Emails: []string{},
Phones: []string{"222-333-4444"},
}, {
Key: "julia",
Emails: []string{"julia@example.com"},
Phones: []string{},
},
}const results = [
{
name: "amy",
values: {
emails: [{ name: "amy", email: "amy@example.com" }],
phones: [
{ name: "amy", phone: "111-222-3333" },
{ name: "amy", phone: "333-444-5555" },
],
},
},
{
name: "carl",
values: {
emails: [
{ name: "carl", email: "carl@example.com" },
{ name: "carl", email: "carl@email.com" },
],
phones: [{ name: "carl", phone: "444-555-6666" }],
},
},
{
name: "james",
values: {
emails: [],
phones: [{ name: "james", phone: "222-333-4444" }],
},
},
{
name: "julia",
values: {
emails: [{ name: "julia", email: "julia@example.com" }],
phones: [],
},
},
];The following code example joins the two PCollections with CoGroupByKey,
followed by a ParDo to consume the result. Then, the code uses tags to look up
and format data from each collection.
The following code example joins the two PCollections with CoGroupByKey,
followed by a ParDo to consume the result. The ordering of the DoFn iterator
parameters maps to the ordering of the CoGroupByKey inputs.
PCollection<KV<String, CoGbkResult>> results =
    KeyedPCollectionTuple.of(emailsTag, emails)
        .and(phonesTag, phones)
        .apply(CoGroupByKey.create());

PCollection<String> contactLines =
    results.apply(
        ParDo.of(
            new DoFn<KV<String, CoGbkResult>, String>() {
              @ProcessElement
              public void processElement(
                  @Element KV<String, CoGbkResult> e, OutputReceiver<String> receiver) {
                String name = e.getKey();
                Iterable<String> emailsIter = e.getValue().getAll(emailsTag);
                Iterable<String> phonesIter = e.getValue().getAll(phonesTag);
                String formattedResult =
                    Snippets.formatCoGbkResults(name, emailsIter, phonesIter);
                receiver.output(formattedResult);
              }
            }));
# The result PCollection contains one key-value element for each key in the
# input PCollections. The key of the pair will be the key from the input and
# the value will be a dictionary with two entries: 'emails' - an iterable of
# all values for the current key in the emails PCollection and 'phones': an
# iterable of all values for the current key in the phones PCollection.
results = ({'emails': emails, 'phones': phones} | beam.CoGroupByKey())
def join_info(name_info):
(name, info) = name_info
return '%s; %s; %s' %\
(name, sorted(info['emails']), sorted(info['phones']))
contact_lines = results | beam.Map(join_info)func formatCoGBKResults(key string, emailIter, phoneIter func(*string) bool) string {
var s string
var emails, phones []string
for emailIter(&s) {
emails = append(emails, s)
}
for phoneIter(&s) {
phones = append(phones, s)
}
// Values have no guaranteed order, sort for deterministic output.
sort.Strings(emails)
sort.Strings(phones)
return fmt.Sprintf("%s; %s; %s", key, formatStringIter(emails), formatStringIter(phones))
}
func init() {
register.Function3x1(formatCoGBKResults)
// 1 input of type string => Iter1[string]
register.Iter1[string]()
}
// Synthetic example results of a cogbk.
results := []struct {
Key string
Emails, Phones []string
}{
{
Key: "amy",
Emails: []string{"amy@example.com"},
Phones: []string{"111-222-3333", "333-444-5555"},
}, {
Key: "carl",
Emails: []string{"carl@email.com", "carl@example.com"},
Phones: []string{"444-555-6666"},
}, {
Key: "james",
Emails: []string{},
Phones: []string{"222-333-4444"},
}, {
Key: "julia",
Emails: []string{"julia@example.com"},
Phones: []string{},
},
}const formatted_results_pcoll = beam
.P({ emails, phones })
.apply(beam.coGroupBy("name"))
.map(function formatResults({ key, values }) {
const emails = values.emails.map((x) => x.email).sort();
const phones = values.phones.map((x) => x.phone).sort();
return `${key}; [${emails}]; [${phones}]`;
});- type: MapToFields
name: PrepareEmails
input: CreateEmails
config:
language: python
fields:
name: name
email: "[email]"
phone: "[]"
- type: MapToFields
name: PreparePhones
input: CreatePhones
config:
language: python
fields:
name: name
email: "[]"
phone: "[phone]"
- type: Combine
name: CoGropuBy
input: [PrepareEmails, PreparePhones]
config:
group_by: [name]
combine:
email: concat
phone: concat
- type: MapToFields
name: FormatResults
input: CoGropuBy
config:
language: python
fields:
formatted:
"'%s; %s; %s' % (name, sorted(email), sorted(phone))"The formatted data looks like this:
final List<String> formattedResults =
    Arrays.asList(
        "amy; ['amy@example.com']; ['111-222-3333', '333-444-5555']",
        "carl; ['carl@email.com', 'carl@example.com']; ['444-555-6666']",
        "james; []; ['222-333-4444']",
        "julia; ['julia@example.com']; []");
formatted_results = [
"amy; ['amy@example.com']; ['111-222-3333', '333-444-5555']",
"carl; ['carl@email.com', 'carl@example.com']; ['444-555-6666']",
"james; []; ['222-333-4444']",
"julia; ['julia@example.com']; []",
]formattedResults := []string{
"amy; ['amy@example.com']; ['111-222-3333', '333-444-5555']",
"carl; ['carl@email.com', 'carl@example.com']; ['444-555-6666']",
"james; []; ['222-333-4444']",
"julia; ['julia@example.com']; []",
}const formatted_results = [
"amy; [amy@example.com]; [111-222-3333,333-444-5555]",
"carl; [carl@email.com,carl@example.com]; [444-555-6666]",
"james; []; [222-333-4444]",
"julia; [julia@example.com]; []",
];"amy; ['amy@example.com']; ['111-222-3333', '333-444-5555']",
"carl; ['carl@email.com', 'carl@example.com']; ['444-555-6666']",
"james; []; ['222-333-4444']",
"julia; ['julia@example.com']; []",4.2.4. Combine
Combine
Combine
Combine
Combine
is a Beam transform for combining collections of elements or values in your
data. Combine has variants that work on entire PCollections, and some that
combine the values for each key in PCollections of key/value pairs.
When you apply a Combine transform, you must provide the function that
contains the logic for combining the elements or values. The combining function
should be commutative and associative, as the function is not necessarily
invoked exactly once on all values with a given key. Because the input data
(including the value collection) may be distributed across multiple workers, the
combining function might be called multiple times to perform partial combining
on subsets of the value collection. The Beam SDK also provides some pre-built
combine functions for common numeric combination operations such as sum, min,
and max.
Simple combine operations, such as sums, can usually be implemented as a simple
function. More complex combination operations might require you to create a
subclass of CombineFn
that has an accumulation type distinct from the input/output type.
The associativity and commutativity of a CombineFn allows runners to
automatically apply some optimizations:
- Combiner lifting: This is the most significant optimization. Input elements are combined per key and window before they are shuffled, so the volume of data shuffled might be reduced by many orders of magnitude. Another term for this optimization is “mapper-side combine.”
- Incremental combining: When you have a
CombineFnthat reduces the data size by a lot, it is useful to combine elements as they emerge from a streaming shuffle. This spreads out the cost of doing combines over the time that your streaming computation might be idle. Incremental combining also reduces the storage of intermediate accumulators.
4.2.4.1. Simple combinations using simple functions
Beam YAML has the following buit-in CombineFns: count, sum, min, max, mean, any, all, group, and concat. CombineFns from other languages can also be referenced as described in the (full docs on aggregation)[https://beam.apache.org/documentation/sdks/yaml-combine/]. The following example code shows a simple combine function. Combining is done by modifying a grouping transform with the `combining` method. This method takes three parameters: the value to combine (either as a named property of the input elements, or a function of the entire input), the combining operation (either a binary function or a `CombineFn`), and finally a name for the combined value in the output object.// Sum a collection of Integer values. The function SumInts implements the interface SerializableFunction.
public static class SumInts implements SerializableFunction<Iterable<Integer>, Integer> {
@Override
public Integer apply(Iterable<Integer> input) {
int sum = 0;
for (int item : input) {
sum += item;
}
return sum;
}
}pc = [1, 10, 100, 1000]
def bounded_sum(values, bound=500):
return min(sum(values), bound)
small_sum = pc | beam.CombineGlobally(bounded_sum) # [500]
large_sum = pc | beam.CombineGlobally(bounded_sum, bound=5000) # [1111]func sumInts(a, v int) int {
return a + v
}
func init() {
register.Function2x1(sumInts)
}
func globallySumInts(s beam.Scope, ints beam.PCollection) beam.PCollection {
return beam.Combine(s, sumInts, ints)
}
type boundedSum struct {
Bound int
}
func (fn *boundedSum) MergeAccumulators(a, v int) int {
sum := a + v
if fn.Bound > 0 && sum > fn.Bound {
return fn.Bound
}
return sum
}
func init() {
register.Combiner1[int](&boundedSum{})
}
func globallyBoundedSumInts(s beam.Scope, bound int, ints beam.PCollection) beam.PCollection {
return beam.Combine(s, &boundedSum{Bound: bound}, ints)
}const pcoll = root.apply(beam.create([1, 10, 100, 1000]));
const result = pcoll.apply(
beam
.groupGlobally()
.combining((c) => c, (x, y) => x + y, "sum")
.combining((c) => c, (x, y) => x * y, "product")
);
const expected = { sum: 1111, product: 1000000 }type: Combine
config:
language: python
group_by: animal
combine:
biggest:
fn:
type: 'apache_beam.transforms.combiners.TopCombineFn'
config:
n: 2
value: weightAll Combiners should be registered using a generic register.CombinerX[...]
function. This allows the Go SDK to infer an encoding from any inputs/outputs,
registers the Combiner for execution on remote runners, and optimizes the runtime
execution of the Combiner via reflection.
Combiner1 should be used when your accumulator, input, and output are all of the
same type. It can be called with register.Combiner1[T](&CustomCombiner{}) where T
is the type of the input/accumulator/output.
Combiner2 should be used when your accumulator, input, and output are 2 distinct
types. It can be called with register.Combiner2[T1, T2](&CustomCombiner{}) where
T1 is the type of the accumulator and T2 is the other type.
Combiner3 should be used when your accumulator, input, and output are 3 distinct
types. It can be called with register.Combiner3[T1, T2, T3](&CustomCombiner{})
where T1 is the type of the accumulator, T2 is the type of the input, and T3 is
the type of the output.
4.2.4.2. Advanced combinations using CombineFn
For more complex combine functions, you can define a
subclass ofCombineFn.
You should use a CombineFn if the combine function requires a more sophisticated
accumulator, must perform additional pre- or post-processing, might change the
output type, or takes the key into account.
A general combining operation consists of five operations. When you create a
subclass of
CombineFn, you must provide five operations by overriding the
corresponding methods. Only MergeAccumulators is a required method. The
others will have a default interpretation based on the accumulator type. The
lifecycle methods are:
Create Accumulator creates a new “local” accumulator. In the example case, taking a mean average, a local accumulator tracks the running sum of values (the numerator value for our final average division) and the number of values summed so far (the denominator value). It may be called any number of times in a distributed fashion.
Add Input adds an input element to an accumulator, returning the accumulator value. In our example, it would update the sum and increment the count. It may also be invoked in parallel.
Merge Accumulators merges several accumulators into a single accumulator; this is how data in multiple accumulators is combined before the final calculation. In the case of the mean average computation, the accumulators representing each portion of the division are merged together. It may be called again on its outputs any number of times.
Extract Output performs the final computation. In the case of computing a mean average, this means dividing the combined sum of all the values by the number of values summed. It is called once on the final, merged accumulator.
Compact returns a more compact represenation of the accumulator. This is called before an accumulator is sent across the wire, and can be useful in cases where values are buffered or otherwise lazily kept unprocessed when added to the accumulator. Compact should return an equivalent, though possibly modified, accumulator. In most cases, Compact is not necessary. For a real world example of using Compact, see the Python SDK implementation of TopCombineFn
The following example code shows how to define a CombineFn that computes a
mean average:
public class AverageFn extends CombineFn<Integer, AverageFn.Accum, Double> {
  public static class Accum {
    int sum = 0;
    int count = 0;
  }

  @Override
  public Accum createAccumulator() { return new Accum(); }

  @Override
  public Accum addInput(Accum accum, Integer input) {
      accum.sum += input;
      accum.count++;
      return accum;
  }

  @Override
  public Accum mergeAccumulators(Iterable<Accum> accums) {
    Accum merged = createAccumulator();
    for (Accum accum : accums) {
      merged.sum += accum.sum;
      merged.count += accum.count;
    }
    return merged;
  }

  @Override
  public Double extractOutput(Accum accum) {
    return ((double) accum.sum) / accum.count;
  }

  // No-op
  @Override
  public Accum compact(Accum accum) { return accum; }
}
pc = ...
class AverageFn(beam.CombineFn):
def create_accumulator(self):
return (0.0, 0)
def add_input(self, sum_count, input):
(sum, count) = sum_count
return sum + input, count + 1
def merge_accumulators(self, accumulators):
sums, counts = zip(*accumulators)
return sum(sums), sum(counts)
def extract_output(self, sum_count):
(sum, count) = sum_count
return sum / count if count else float('NaN')
def compact(self, accumulator):
# No-op
return accumulatortype averageFn struct{}
type averageAccum struct {
Count, Sum int
}
func (fn *averageFn) CreateAccumulator() averageAccum {
return averageAccum{0, 0}
}
func (fn *averageFn) AddInput(a averageAccum, v int) averageAccum {
return averageAccum{Count: a.Count + 1, Sum: a.Sum + v}
}
func (fn *averageFn) MergeAccumulators(a, v averageAccum) averageAccum {
return averageAccum{Count: a.Count + v.Count, Sum: a.Sum + v.Sum}
}
func (fn *averageFn) ExtractOutput(a averageAccum) float64 {
if a.Count == 0 {
return math.NaN()
}
return float64(a.Sum) / float64(a.Count)
}
func (fn *averageFn) Compact(a averageAccum) averageAccum {
// No-op
return a
}
func init() {
register.Combiner3[averageAccum, int, float64](&averageFn{})
}const meanCombineFn: beam.CombineFn<number, [number, number], number> =
{
createAccumulator: () => [0, 0],
addInput: ([sum, count]: [number, number], i: number) => [
sum + i,
count + 1,
],
mergeAccumulators: (accumulators: [number, number][]) =>
accumulators.reduce(([sum0, count0], [sum1, count1]) => [
sum0 + sum1,
count0 + count1,
]),
extractOutput: ([sum, count]: [number, number]) => sum / count,
};4.2.4.3. Combining a PCollection into a single value
Use the global combine to transform all of the elements in a given PCollection
into a single value, represented in your pipeline as a new PCollection
containing one element. The following example code shows how to apply the Beam
provided sum combine function to produce a single sum value for a PCollection
of integers.
// Sum.SumIntegerFn() combines the elements in the input PCollection. The resulting PCollection, called sum,
// contains one value: the sum of all the elements in the input PCollection.
PCollection<Integer> pc = ...;
PCollection<Integer> sum = pc.apply(
   Combine.globally(new Sum.SumIntegerFn()));
# sum combines the elements in the input PCollection.
# The resulting PCollection, called result, contains one value: the sum of all
# the elements in the input PCollection.
pc = ...
result = pc | beam.CombineGlobally(sum)average := beam.Combine(s, &averageFn{}, ints)const pcoll = root.apply(beam.create([4, 5, 6]));
const result = pcoll.apply(
beam.groupGlobally().combining((c) => c, meanCombineFn, "mean")
);type: Combine
config:
group_by: []
combine:
weight: sum4.2.4.4. Combine and global windowing
If your input PCollection uses the default global windowing, the default
behavior is to return a PCollection containing one item. That item’s value
comes from the accumulator in the combine function that you specified when
applying Combine. For example, the Beam provided sum combine function returns
a zero value (the sum of an empty input), while the min combine function returns
a maximal or infinite value.
To have Combine instead return an empty PCollection if the input is empty,
specify .withoutDefaults when you apply your Combine transform, as in the
following code example:
PCollection<Integer> pc = ...;
PCollection<Integer> sum = pc.apply(
  Combine.globally(new Sum.SumIntegerFn()).withoutDefaults());
pc = ...
sum = pc | beam.CombineGlobally(sum).without_defaults()func returnSideOrDefault(d float64, iter func(*float64) bool) float64 {
var c float64
if iter(&c) {
// Side input has a value, so return it.
return c
}
// Otherwise, return the default
return d
}
func init() { register.Function2x1(returnSideOrDefault) }
func globallyAverageWithDefault(s beam.Scope, ints beam.PCollection) beam.PCollection {
// Setting combine defaults has requires no helper function in the Go SDK.
average := beam.Combine(s, &averageFn{}, ints)
// To add a default value:
defaultValue := beam.Create(s, float64(0))
return beam.ParDo(s, returnSideOrDefault, defaultValue, beam.SideInput{Input: average})
}const pcoll = root.apply(
beam.create([
{ player: "alice", accuracy: 1.0 },
{ player: "bob", accuracy: 0.99 },
{ player: "eve", accuracy: 0.5 },
{ player: "eve", accuracy: 0.25 },
])
);
const result = pcoll.apply(
beam
.groupGlobally()
.combining("accuracy", combiners.mean, "mean")
.combining("accuracy", combiners.max, "max")
);
const expected = [{ max: 1.0, mean: 0.685 }];4.2.4.5. Combine and non-global windowing
If your PCollection uses any non-global windowing function, Beam does not
provide the default behavior. You must specify one of the following options when
applying Combine:
- Specify
.withoutDefaults, where windows that are empty in the inputPCollectionwill likewise be empty in the output collection. - Specify
.asSingletonView, in which the output is immediately converted to aPCollectionView, which will provide a default value for each empty window when used as a side input. You’ll generally only need to use this option if the result of your pipeline’sCombineis to be used as a side input later in the pipeline.
If your PCollection uses any non-global windowing function, the Beam Go SDK
behaves the same way as with global windowing. Windows that are empty in the input
PCollection will likewise be empty in the output collection.
4.2.4.6. Combining values in a keyed PCollection
After creating a keyed PCollection (for example, by using a GroupByKey
transform), a common pattern is to combine the collection of values associated
with each key into a single, merged value. Drawing on the previous example from
GroupByKey, a key-grouped PCollection called groupedWords looks like this:
  cat, [1,5,9]
  dog, [5,2]
  and, [1,2,6]
  jump, [3]
  tree, [2]
  ...
In the above PCollection, each element has a string key (for example, “cat”)
and an iterable of integers for its value (in the first element, containing [1,
5, 9]). If our pipeline’s next processing step combines the values (rather than
considering them individually), you can combine the iterable of integers to
create a single, merged value to be paired with each key. This pattern of a
GroupByKey followed by merging the collection of values is equivalent to
Beam’s Combine PerKey transform. The combine function you supply to Combine
PerKey must be an associative reduction function or a
subclass of CombineFn.
// PCollection is grouped by key and the Double values associated with each key are combined into a Double.
PCollection<KV<String, Double>> salesRecords = ...;
PCollection<KV<String, Double>> totalSalesPerPerson =
  salesRecords.apply(Combine.<String, Double, Double>perKey(
    new Sum.SumDoubleFn()));

// The combined value is of a different type than the original collection of values per key. PCollection has
// keys of type String and values of type Integer, and the combined value is a Double.
PCollection<KV<String, Integer>> playerAccuracy = ...;
PCollection<KV<String, Double>> avgAccuracyPerPlayer =
  playerAccuracy.apply(Combine.<String, Integer, Double>perKey(
    new MeanInts())));
# PCollection is grouped by key and the numeric values associated with each key
# are averaged into a float.
player_accuracies = ...
avg_accuracy_per_player = (
player_accuracies
| beam.CombinePerKey(beam.combiners.MeanCombineFn()))// PCollection is grouped by key and the numeric values associated with each key
// are averaged into a float64.
playerAccuracies := ... // PCollection<string,int>
avgAccuracyPerPlayer := stats.MeanPerKey(s, playerAccuracies)
// avgAccuracyPerPlayer is a PCollection<string,float64>
const pcoll = root.apply(
  beam.create([
    { player: "alice", accuracy: 1.0 },
    { player: "bob", accuracy: 0.99 },
    { player: "eve", accuracy: 0.5 },
    { player: "eve", accuracy: 0.25 },
  ])
);
const result = pcoll.apply(
  beam
    .groupBy("player")
    .combining("accuracy", combiners.mean, "mean")
    .combining("accuracy", combiners.max, "max")
);
const expected = [
  { player: "alice", mean: 1.0, max: 1.0 },
  { player: "bob", mean: 0.99, max: 0.99 },
  { player: "eve", mean: 0.375, max: 0.5 },
];type: Combine
config:
group_by: [animal]
combine:
total_weight:
fn: sum
value: weight
average_weight:
fn: mean
value: weight4.2.5. Flatten
Flatten
Flatten
Flatten
Flatten
is a Beam transform for PCollection objects that store the same data type.
Flatten merges multiple PCollection objects into a single logical
PCollection.
The following example shows how to apply a Flatten transform to merge multiple
PCollection objects.
// Flatten takes a PCollectionList of PCollection objects of a given type.
// Returns a single PCollection that contains all of the elements in the PCollection objects in that list.
PCollection<String> pc1 = ...;
PCollection<String> pc2 = ...;
PCollection<String> pc3 = ...;
PCollectionList<String> collections = PCollectionList.of(pc1).and(pc2).and(pc3);

PCollection<String> merged = collections.apply(Flatten.<String>pCollections());
One can also use the FlattenWith
transform to merge PCollections into an output PCollection in a manner more compatible with chaining.
PCollection<String> merged = pc1
    .apply(...)
    // Merges the elements of pc2 in at this point...
    .apply(FlattenWith.of(pc2))
    .apply(...)
    // and the elements of pc3 at this point.
    .apply(FlattenWith.of(pc3))
    .apply(...);
# Flatten takes a tuple of PCollection objects.
# Returns a single PCollection that contains all of the elements in the PCollection objects in that tuple.
merged = (
(pcoll1, pcoll2, pcoll3)
# A list of tuples can be "piped" directly into a Flatten transform.
| beam.Flatten())One can also use the FlattenWith
transform to merge PCollections into an output PCollection in a manner more compatible with chaining.
merged = (
    pcoll1
    | SomeTransform()
    | beam.FlattenWith(pcoll2, pcoll3)
    | SomeOtherTransform())
FlattenWith can take root PCollection-producing transforms
(such as Create and Read) as well as already constructed PCollections,
and will apply them and flatten their outputs into the resulting output
PCollection.
merged = (
    pcoll
    | SomeTransform()
    | beam.FlattenWith(beam.Create(['x', 'y', 'z']))
    | SomeOtherTransform())
// Flatten accepts any number of PCollections of the same element type.
// Returns a single PCollection that contains all of the elements in input PCollections.
merged := beam.Flatten(s, pcol1, pcol2, pcol3)// Flatten taken an array of PCollection objects, wrapped in beam.P(...)
// Returns a single PCollection that contains a union of all of the elements in all input PCollections.
const fib = root.apply(
beam.withName("createFib", beam.create([1, 1, 2, 3, 5, 8]))
);
const pow = root.apply(
beam.withName("createPow", beam.create([1, 2, 4, 8, 16, 32]))
);
const result = beam.P([fib, pow]).apply(beam.flatten());- type: Flatten
input: [SomeProducingTransform, AnotherProducingTransform]In Beam YAML explicit flattens are not usually needed as one can list multiple inputs for any transform which will be implicitly flattened.
4.2.5.1. Data encoding in merged collections
By default, the coder for the output PCollection is the same as the coder for
the first PCollection in the input PCollectionList. However, the input
PCollection objects can each use different coders, as long as they all contain
the same data type in your chosen language.
4.2.5.2. Merging windowed collections
When using Flatten to merge PCollection objects that have a windowing
strategy applied, all of the PCollection objects you want to merge must use a
compatible windowing strategy and window sizing. For example, all the
collections you’re merging must all use (hypothetically) identical 5-minute
fixed windows or 4-minute sliding windows starting every 30 seconds.
If your pipeline attempts to use Flatten to merge PCollection objects with
incompatible windows, Beam generates an IllegalStateException error when your
pipeline is constructed.
4.2.6. Partition
Partition
Partition
Partition
Partition
is a Beam transform for PCollection objects that store the same data
type. Partition splits a single PCollection into a fixed number of smaller
collections.
Often in the Typescript SDK the Split transform is more natural to use.
Partition divides the elements of a PCollection according to a partitioning
function that you provide. The partitioning function contains the logic that
determines how to split up the elements of the input PCollection into each
resulting partition PCollection. The number of partitions must be determined
at graph construction time. You can, for example, pass the number of partitions
as a command-line option at runtime (which will then be used to build your
pipeline graph), but you cannot determine the number of partitions in
mid-pipeline (based on data calculated after your pipeline graph is constructed,
for instance).
The following example divides a PCollection into percentile groups.
// Provide an int value with the desired number of result partitions, and a PartitionFn that represents the
// partitioning function. In this example, we define the PartitionFn in-line. Returns a PCollectionList
// containing each of the resulting partitions as individual PCollection objects.
PCollection<Student> students = ...;
// Split students up into 10 partitions, by percentile:
PCollectionList<Student> studentsByPercentile =
    students.apply(Partition.of(10, new PartitionFn<Student>() {
        public int partitionFor(Student student, int numPartitions) {
            return student.getPercentile()  // 0..99
                 * numPartitions / 100;
        }}));

// You can extract each partition from the PCollectionList using the get method, as follows:
PCollection<Student> fortiethPercentile = studentsByPercentile.get(4);
# Provide an int value with the desired number of result partitions, and a partitioning function (partition_fn in this example).
# Returns a tuple of PCollection objects containing each of the resulting partitions as individual PCollection objects.
students = ...
def partition_fn(student, num_partitions):
return int(get_percentile(student) * num_partitions / 100)
by_decile = students | beam.Partition(partition_fn, 10)
# You can extract each partition from the tuple of PCollection objects as follows:
fortieth_percentile = by_decile[4]func decileFn(student Student) int {
return int(float64(student.Percentile) / float64(10))
}
func init() {
register.Function1x1(decileFn)
}
// Partition returns a slice of PCollections
studentsByPercentile := beam.Partition(s, 10, decileFn, students)
// Each partition can be extracted by indexing into the slice.
fortiethPercentile := studentsByPercentile[4]const deciles: PCollection<Student>[] = students.apply(
beam.partition(
(student, numPartitions) =>
Math.floor((getPercentile(student) / 100) * numPartitions),
10
)
);
const topDecile: PCollection<Student> = deciles[9];type: Partition
config:
by: str(percentile // 10)
language: python
outputs: ["0", "1", "2", "3", "4", "5", "6", "7", "8", "9", "10"]Note that in Beam YAML, PCollections are partitioned via string rather than integer values.
4.3. Requirements for writing user code for Beam transforms
When you build user code for a Beam transform, you should keep in mind the distributed nature of execution. For example, there might be many copies of your function running on a lot of different machines in parallel, and those copies function independently, without communicating or sharing state with any of the other copies. Depending on the Pipeline Runner and processing back-end you choose for your pipeline, each copy of your user code function may be retried or run multiple times. As such, you should be cautious about including things like state dependency in your user code.
In general, your user code must fulfill at least these requirements:
- Your function object must be serializable.
- Your function object must be thread-compatible, and be aware that the Beam SDKs are not thread-safe.
In addition, it’s recommended that you make your function object idempotent. Non-idempotent functions are supported by Beam, but require additional thought to ensure correctness when there are external side effects.
Note: These requirements apply to subclasses of
DoFn(a function object used with the ParDo transform),CombineFn(a function object used with the Combine transform), andWindowFn(a function object used with the Window transform).
Note: These requirements apply to
DoFns (a function object used with the ParDo transform),CombineFns (a function object used with the Combine transform), andWindowFns (a function object used with the Window transform).
4.3.1. Serializability
Any function object you provide to a transform must be fully serializable.
This is because a copy of the function needs to be serialized and transmitted to
a remote worker in your processing cluster.
The base classes for user code, such
as DoFn, CombineFn, and WindowFn, already implement Serializable;
however, your subclass must not add any non-serializable members.
Funcs are serializable as long as
they are registered with register.FunctionXxY (for simple functions) or
register.DoFnXxY (for structural DoFns), and are not closures. Structural
DoFns will have all exported fields serialized. Unexported fields are unable to
be serialized, and will be silently ignored.
The Typescript SDK use ts-serialize-closures
to serialize functions (and other objects).
This works out of the box for functions that are not closures, and also works
for closures as long as the function in question (and any closures it references)
are compiled with the
ts-closure-transform hooks
(e.g. by using ttsc in place of tsc).
One can alternatively call
requireForSerialization("importableModuleDefiningFunc", {func})
to register a function directly by name which can be less error-prone.
Note that if, as is often the case in Javascript, func returns objects that
contain closures, it is not sufficient to register func alone–its return
value must be registered if used.
Some other serializability factors you should keep in mind are:
- TransientUnexported fields in your function object are not transmitted to worker instances, because they are not automatically serialized.
- Avoid loading a field with a large amount of data before serialization.
- Individual instances of your function object cannot share data.
- Mutating a function object after it gets applied will have no effect.
Note: Take care when declaring your function object inline by using an anonymous inner class instance. In a non-static context, your inner class instance will implicitly contain a pointer to the enclosing class and that class’ state. That enclosing class will also be serialized, and thus the same considerations that apply to the function object itself also apply to this outer class.
Note: There’s no way to detect if a function is a closure. Closures will cause runtime errors and pipeline failures. Avoid using anonymous functions when possible.
4.3.2. Thread-compatibility
Your function object should be thread-compatible. Each instance of your function object is accessed by a single thread at a time on a worker instance, unless you explicitly create your own threads. Note, however, that the Beam SDKs are not thread-safe. If you create your own threads in your user code, you must provide your own synchronization. Note that static members in your function object are not passed to worker instances and that multiple instances of your function may be accessed from different threads.
4.3.3. Idempotence
It’s recommended that you make your function object idempotent–that is, that it can be repeated or retried as often as necessary without causing unintended side effects. Non-idempotent functions are supported, however the Beam model provides no guarantees as to the number of times your user code might be invoked or retried; as such, keeping your function object idempotent keeps your pipeline’s output deterministic, and your transforms’ behavior more predictable and easier to debug.
4.4. Side inputs
In addition to the main input PCollection, you can provide additional inputs
to a ParDo transform in the form of side inputs. A side input is an additional
input that your DoFn can access each time it processes an element in the input
PCollection. When you specify a side input, you create a view of some other
data that can be read from within the ParDo transform’s DoFn while processing
each element.
Side inputs are useful if your ParDo needs to inject additional data when
processing each element in the input PCollection, but the additional data
needs to be determined at runtime (and not hard-coded). Such values might be
determined by the input data, or depend on a different branch of your pipeline.
All side input iterables should be registered using a generic register.IterX[...]
function. This optimizes runtime execution of the iterable.
4.4.1. Passing side inputs to ParDo
  // Pass side inputs to your ParDo transform by invoking .withSideInputs.
  // Inside your DoFn, access the side input by using the method DoFn.ProcessContext.sideInput.

  // The input PCollection to ParDo.
  PCollection<String> words = ...;

  // A PCollection of word lengths that we'll combine into a single value.
  PCollection<Integer> wordLengths = ...; // Singleton PCollection

  // Create a singleton PCollectionView from wordLengths using Combine.globally and View.asSingleton.
  final PCollectionView<Integer> maxWordLengthCutOffView =
     wordLengths.apply(Combine.globally(new Max.MaxIntFn()).asSingletonView());


  // Apply a ParDo that takes maxWordLengthCutOffView as a side input.
  PCollection<String> wordsBelowCutOff =
  words.apply(ParDo
      .of(new DoFn<String, String>() {
          @ProcessElement
          public void processElement(@Element String word, OutputReceiver<String> out, ProcessContext c) {
            // In our DoFn, access the side input.
            int lengthCutOff = c.sideInput(maxWordLengthCutOffView);
            if (word.length() <= lengthCutOff) {
              out.output(word);
            }
          }
      }).withSideInputs(maxWordLengthCutOffView)
  );
# Side inputs are available as extra arguments in the DoFn's process method or Map / FlatMap's callable.
# Optional, positional, and keyword arguments are all supported. Deferred arguments are unwrapped into their
# actual values. For example, using pvalue.AsIteor(pcoll) at pipeline construction time results in an iterable
# of the actual elements of pcoll being passed into each process invocation. In this example, side inputs are
# passed to a FlatMap transform as extra arguments and consumed by filter_using_length.
words = ...
# Callable takes additional arguments.
def filter_using_length(word, lower_bound, upper_bound=float('inf')):
if lower_bound <= len(word) <= upper_bound:
yield word
# Construct a deferred side input.
avg_word_len = (
words
| beam.Map(len)
| beam.CombineGlobally(beam.combiners.MeanCombineFn()))
# Call with explicit side inputs.
small_words = words | 'small' >> beam.FlatMap(filter_using_length, 0, 3)
# A single deferred side input.
larger_than_average = (
words | 'large' >> beam.FlatMap(
filter_using_length, lower_bound=pvalue.AsSingleton(avg_word_len))
)
# Mix and match.
small_but_nontrivial = words | beam.FlatMap(
filter_using_length,
lower_bound=2,
upper_bound=pvalue.AsSingleton(avg_word_len))
# We can also pass side inputs to a ParDo transform, which will get passed to its process method.
# The first two arguments for the process method would be self and element.
class FilterUsingLength(beam.DoFn):
def process(self, element, lower_bound, upper_bound=float('inf')):
if lower_bound <= len(element) <= upper_bound:
yield element
small_words = words | beam.ParDo(FilterUsingLength(), 0, 3)
...// Side inputs are provided using `beam.SideInput` in the DoFn's ProcessElement method.
// Side inputs can be arbitrary PCollections, which can then be iterated over per element
// in a DoFn.
// Side input parameters appear after main input elements, and before any output emitters.
words = ...
// avgWordLength is a PCollection containing a single element, a singleton.
avgWordLength := stats.Mean(s, wordLengths)
// Side inputs are added as with the beam.SideInput option to beam.ParDo.
wordsAboveCutOff := beam.ParDo(s, filterWordsAbove, words, beam.SideInput{Input: avgWordLength})
wordsBelowCutOff := beam.ParDo(s, filterWordsBelow, words, beam.SideInput{Input: avgWordLength})
// filterWordsAbove is a DoFn that takes in a word,
// and a singleton side input iterator as of a length cut off
// and only emits words that are beneath that cut off.
//
// If the iterator has no elements, an error is returned, aborting processing.
func filterWordsAbove(word string, lengthCutOffIter func(*float64) bool, emitAboveCutoff func(string)) error {
var cutOff float64
ok := lengthCutOffIter(&cutOff)
if !ok {
return fmt.Errorf("no length cutoff provided")
}
if float64(len(word)) > cutOff {
emitAboveCutoff(word)
}
return nil
}
// filterWordsBelow is a DoFn that takes in a word,
// and a singleton side input of a length cut off
// and only emits words that are beneath that cut off.
//
// If the side input isn't a singleton, a runtime panic will occur.
func filterWordsBelow(word string, lengthCutOff float64, emitBelowCutoff func(string)) {
if float64(len(word)) <= lengthCutOff {
emitBelowCutoff(word)
}
}
func init() {
register.Function3x1(filterWordsAbove)
register.Function3x0(filterWordsBelow)
// 1 input of type string => Emitter1[string]
register.Emitter1[string]()
// 1 input of type float64 => Iter1[float64]
register.Iter1[float64]()
}
// The Go SDK doesn't support custom ViewFns.
// See https://github.com/apache/beam/issues/18602 for details
// on how to contribute them!
// Side inputs are provided by passing an extra context object to
// `map`, `flatMap`, or `parDo` transforms.  This object will get passed as an
// extra argument to the provided function (or `process` method of the `DoFn`).
// `SideInputParam` properties (generally created with `pardo.xxxSideInput(...)`)
// have a `lookup` method that can be invoked from within the process method.

// Let words be a PCollection of strings.
const words : PCollection<string> = ...

// meanLengthPColl will contain a single number whose value is the
// average length of the words
const meanLengthPColl: PCollection<number> = words
  .apply(
    beam
      .groupGlobally<string>()
      .combining((word) => word.length, combiners.mean, "mean")
  )
  .map(({ mean }) => mean);

// Now we use this as a side input to yield only words that are
// smaller than average.
const smallWords = words.flatMap(
  // This is the function, taking context as a second argument.
  function* keepSmall(word, context) {
    if (word.length < context.meanLength.lookup()) {
      yield word;
    }
  },
  // This is the context that will be passed as a second argument.
  { meanLength: pardo.singletonSideInput(meanLengthPColl) }
);
4.4.2. Side inputs and windowing
A windowed PCollection may be infinite and thus cannot be compressed into a
single value (or single collection class). When you create a PCollectionView
of a windowed PCollection, the PCollectionView represents a single entity
per window (one singleton per window, one list per window, etc.).
Beam uses the window(s) for the main input element to look up the appropriate window for the side input element. Beam projects the main input element’s window into the side input’s window set, and then uses the side input from the resulting window. If the main input and side inputs have identical windows, the projection provides the exact corresponding window. However, if the inputs have different windows, Beam uses the projection to choose the most appropriate side input window.
For example, if the main input is windowed using fixed-time windows of one minute, and the side input is windowed using fixed-time windows of one hour, Beam projects the main input window against the side input window set and selects the side input value from the appropriate hour-long side input window.
If the main input element exists in more than one window, then processElement
gets called multiple times, once for each window. Each call to processElement
projects the “current” window for the main input element, and thus might provide
a different view of the side input each time.
If the side input has multiple trigger firings, Beam uses the value from the latest trigger firing. This is particularly useful if you use a side input with a single global window and specify a trigger.
4.5. Additional outputs
While ParDo always produces a main output PCollection (as the return value
from apply), you can also have your ParDo produce any number of additional
output PCollections. If you choose to have multiple outputs, your ParDo
returns all of the output PCollections (including the main output) bundled
together.
While beam.ParDo always produces an output PCollection, your DoFn can produce any
number of additional output PCollectionss, or even none at all.
If you choose to have multiple outputs, your DoFn needs to be called with the ParDo
function that matches the number of outputs. beam.ParDo2 for two output PCollections,
beam.ParDo3 for three and so on until beam.ParDo7. If you need more, you can
use beam.ParDoN which will return a []beam.PCollection.
While ParDo always produces a main output PCollection (as the return value
from apply). If you want to have multiple outputs, emit an object with distinct
properties in your ParDo operation and follow this operation with a Split
to break it into multiple PCollections.
In Beam YAML, one obtains multiple outputs by emitting all outputs to a single
PCollection, possibly with an extra field, and then using Partition to
split this single PCollection into multiple distinct PCollection
outputs.
4.5.1. Tags for multiple outputs
The Split PTransform will take a PCollection of elements of the form
{tagA?: A, tagB?: B, ...} and return a object
{tagA: PCollection<A>, tagB: PCollection<B>, ...}.
The set of expected tags is passed to the operation; how multiple or
unknown tags are handled can be specified by passing a non-default
SplitOptions instance.
The Go SDK doesn’t use output tags, and instead uses positional ordering for multiple output PCollections.
// To emit elements to multiple output PCollections, create a TupleTag object to identify each collection
// that your ParDo produces. For example, if your ParDo produces three output PCollections (the main output
// and two additional outputs), you must create three TupleTags. The following example code shows how to
// create TupleTags for a ParDo with three output PCollections.

  // Input PCollection to our ParDo.
  PCollection<String> words = ...;

  // The ParDo will filter words whose length is below a cutoff and add them to
  // the main output PCollection<String>.
  // If a word is above the cutoff, the ParDo will add the word length to an
  // output PCollection<Integer>.
  // If a word starts with the string "MARKER", the ParDo will add that word to an
  // output PCollection<String>.
  final int wordLengthCutOff = 10;

  // Create three TupleTags, one for each output PCollection.
  // Output that contains words below the length cutoff.
  final TupleTag<String> wordsBelowCutOffTag =
      new TupleTag<String>(){};
  // Output that contains word lengths.
  final TupleTag<Integer> wordLengthsAboveCutOffTag =
      new TupleTag<Integer>(){};
  // Output that contains "MARKER" words.
  final TupleTag<String> markedWordsTag =
      new TupleTag<String>(){};

// Passing Output Tags to ParDo:
// After you specify the TupleTags for each of your ParDo outputs, pass the tags to your ParDo by invoking
// .withOutputTags. You pass the tag for the main output first, and then the tags for any additional outputs
// in a TupleTagList. Building on our previous example, we pass the three TupleTags for our three output
// PCollections to our ParDo. Note that all of the outputs (including the main output PCollection) are
// bundled into the returned PCollectionTuple.

  PCollectionTuple results =
      words.apply(ParDo
          .of(new DoFn<String, String>() {
            // DoFn continues here.
            ...
          })
          // Specify the tag for the main output.
          .withOutputTags(wordsBelowCutOffTag,
          // Specify the tags for the two additional outputs as a TupleTagList.
                          TupleTagList.of(wordLengthsAboveCutOffTag)
                                      .and(markedWordsTag)));
# To emit elements to multiple output PCollections, invoke with_outputs() on the ParDo, and specify the
# expected tags for the outputs. with_outputs() returns a DoOutputsTuple object. Tags specified in
# with_outputs are attributes on the returned DoOutputsTuple object. The tags give access to the
# corresponding output PCollections.
results = (
words
| beam.ParDo(ProcessWords(), cutoff_length=2, marker='x').with_outputs(
'above_cutoff_lengths',
'marked strings',
main='below_cutoff_strings'))
below = results.below_cutoff_strings
above = results.above_cutoff_lengths
marked = results['marked strings'] # indexing works as well
# The result is also iterable, ordered in the same order that the tags were passed to with_outputs(),
# the main tag (if specified) first.
below, above, marked = (words
| beam.ParDo(
ProcessWords(), cutoff_length=2, marker='x')
.with_outputs('above_cutoff_lengths',
'marked strings',
main='below_cutoff_strings'))// beam.ParDo3 returns PCollections in the same order as
// the emit function parameters in processWords.
below, above, marked := beam.ParDo3(s, processWords, words)
// processWordsMixed uses both a standard return and an emitter function.
// The standard return produces the first PCollection from beam.ParDo2,
// and the emitter produces the second PCollection.
length, mixedMarked := beam.ParDo2(s, processWordsMixed, words)# Create three PCollections from a single input PCollection.
const { below, above, marked } = to_split.apply(
beam.split(["below", "above", "marked"])
);4.5.2. Emitting to multiple outputs in your DoFn
Call emitter functions as needed to produce 0 or more elements for its matching
PCollection. The same value can be emitted with multiple emitters.
As normal, do not mutate values after emitting them from any emitter.
All emitters should be registered using a generic register.EmitterX[...]
function. This optimizes runtime execution of the emitter.
DoFns can also return a single element via the standard return. The standard return is always the first PCollection returned from beam.ParDo. Other emitters output to their own PCollections in their defined parameter order.
MapToFields is always one-to-one. To perform a one-to-many mapping one can
first map a field to an iterable type and then follow this transform with an
Explode transform that will emit multiple values, one per value of the
exploded field.
// Inside your ParDo's DoFn, you can emit an element to a specific output PCollection by providing a
// MultiOutputReceiver to your process method, and passing in the appropriate TupleTag to obtain an OutputReceiver.
// After your ParDo, extract the resulting output PCollections from the returned PCollectionTuple.
// Based on the previous example, this shows the DoFn emitting to the main output and two additional outputs.

  .of(new DoFn<String, String>() {
     public void processElement(@Element String word, MultiOutputReceiver out) {
       if (word.length() <= wordLengthCutOff) {
         // Emit short word to the main output.
         // In this example, it is the output with tag wordsBelowCutOffTag.
         out.get(wordsBelowCutOffTag).output(word);
       } else {
         // Emit long word length to the output with tag wordLengthsAboveCutOffTag.
         out.get(wordLengthsAboveCutOffTag).output(word.length());
       }
       if (word.startsWith("MARKER")) {
         // Emit word to the output with tag markedWordsTag.
         out.get(markedWordsTag).output(word);
       }
     }}));
# Inside your ParDo's DoFn, you can emit an element to a specific output by wrapping the value and the output tag (str).
# using the pvalue.OutputValue wrapper class.
# Based on the previous example, this shows the DoFn emitting to the main output and two additional outputs.
class ProcessWords(beam.DoFn):
def process(self, element, cutoff_length, marker):
if len(element) <= cutoff_length:
# Emit this short word to the main output.
yield element
else:
# Emit this word's long length to the 'above_cutoff_lengths' output.
yield pvalue.TaggedOutput('above_cutoff_lengths', len(element))
if element.startswith(marker):
# Emit this word to a different output with the 'marked strings' tag.
yield pvalue.TaggedOutput('marked strings', element)
# Producing multiple outputs is also available in Map and FlatMap.
# Here is an example that uses FlatMap and shows that the tags do not need to be specified ahead of time.
def even_odd(x):
yield pvalue.TaggedOutput('odd' if x % 2 else 'even', x)
if x % 10 == 0:
yield x
results = numbers | beam.FlatMap(even_odd).with_outputs()
evens = results.even
odds = results.odd
tens = results[None] # the undeclared main output// processWords is a DoFn that has 3 output PCollections. The emitter functions
// are matched in positional order to the PCollections returned by beam.ParDo3.
func processWords(word string, emitBelowCutoff, emitAboveCutoff, emitMarked func(string)) {
const cutOff = 5
if len(word) < cutOff {
emitBelowCutoff(word)
} else {
emitAboveCutoff(word)
}
if isMarkedWord(word) {
emitMarked(word)
}
}
// processWordsMixed demonstrates mixing an emitter, with a standard return.
// If a standard return is used, it will always be the first returned PCollection,
// followed in positional order by the emitter functions.
func processWordsMixed(word string, emitMarked func(string)) int {
if isMarkedWord(word) {
emitMarked(word)
}
return len(word)
}
func init() {
register.Function4x0(processWords)
register.Function2x1(processWordsMixed)
// 1 input of type string => Emitter1[string]
register.Emitter1[string]()
}const to_split = words.flatMap(function* (word) {
if (word.length < 5) {
yield { below: word };
} else {
yield { above: word };
}
if (isMarkedWord(word)) {
yield { marked: word };
}
});- type: MapToFields
input: SomeProducingTransform
config:
language: python
fields:
word: "line.split()"
- type: Explode
input: MapToFields
config:
fields: word4.5.3. Accessing additional parameters in your DoFn
In addition to the element and the OutputReceiver, Beam will populate other parameters to your DoFn’s @ProcessElement method.
Any combination of these parameters can be added to your process method in any order.
In addition to the element, Beam will populate other parameters to your DoFn’s process method.
Any combination of these parameters can be added to your process method in any order.
In addition to the element, Beam will populate other parameters to your DoFn’s process method.
These are available by placing accessors in the context argument, just as for side inputs.
In addition to the element, Beam will populate other parameters to your DoFn’s ProcessElement method.
Any combination of these parameters can be added to your process method in a standard order.
context.Context:
To support consolidated logging and user defined metrics, a context.Context parameter can be requested.
Per Go conventions, if present it’s required to be the first parameter of the DoFn method.
func MyDoFn(ctx context.Context, word string) string { ... }Timestamp:
To access the timestamp of an input element, add a parameter annotated with @Timestamp of type Instant. For example:
Timestamp:
To access the timestamp of an input element, add a keyword parameter default to DoFn.TimestampParam. For example:
Timestamp:
To access the timestamp of an input element, add a beam.EventTime parameter before the element. For example:
Timestamp:
To access the window an input element falls into, add a pardo.windowParam() to the context argument.
.of(new DoFn<String, String>() {
     public void processElement(@Element String word, @Timestamp Instant timestamp) {
  }})
import apache_beam as beam
class ProcessRecord(beam.DoFn):
def process(self, element, timestamp=beam.DoFn.TimestampParam):
# access timestamp of element.
passfunc MyDoFn(ts beam.EventTime, word string) string { ... }function processFn(element, context) {
return context.timestamp.lookup();
}
pcoll.map(processFn, { timestamp: pardo.timestampParam() });Window:
To access the window an input element falls into, add a parameter of the type of the window used for the input PCollection.
If the parameter is a window type (a subclass of BoundedWindow) that does not match the input PCollection, then an error
will be raised. If an element falls in multiple windows (for example, this will happen when using SlidingWindows), then the
@ProcessElement method will be invoked multiple time for the element, once for each window. For example, when fixed windows
are being used, the window is of type IntervalWindow.
Window:
To access the window an input element falls into, add a keyword parameter default to DoFn.WindowParam.
If an element falls in multiple windows (for example, this will happen when using SlidingWindows), then the
process method will be invoked multiple time for the element, once for each window.
Window:
To access the window an input element falls into, add a beam.Window parameter before the element.
If an element falls in multiple windows (for example, this will happen when using SlidingWindows),
then the ProcessElement method will be invoked multiple time for the element, once for each window.
Since beam.Window is an interface it’s possible to type assert to the concrete implementation of the window.
For example, when fixed windows are being used, the window is of type window.IntervalWindow.
Window:
To access the window an input element falls into, add a pardo.windowParam() to the context argument.
If an element falls in multiple windows (for example, this will happen when using SlidingWindows), then the
function will be invoked multiple time for the element, once for each window.
.of(new DoFn<String, String>() {
     public void processElement(@Element String word, IntervalWindow window) {
  }})
import apache_beam as beam
class ProcessRecord(beam.DoFn):
def process(self, element, window=beam.DoFn.WindowParam):
# access window e.g. window.end.micros
passfunc MyDoFn(w beam.Window, word string) string {
iw := w.(window.IntervalWindow)
...
}pcoll.map(processWithWindow, { timestamp: pardo.windowParam() });PaneInfo:
When triggers are used, Beam provides a PaneInfo object that contains information about the current firing. Using PaneInfo
you can determine whether this is an early or a late firing, and how many times this window has already fired for this key.
PaneInfo:
When triggers are used, Beam provides a DoFn.PaneInfoParam object that contains information about the current firing. Using DoFn.PaneInfoParam
you can determine whether this is an early or a late firing, and how many times this window has already fired for this key.
This feature implementation in Python SDK is not fully completed; see more at Issue 17821.
PaneInfo:
When triggers are used, Beam provides beam.PaneInfo object that contains information about the current firing. Using beam.PaneInfo
you can determine whether this is an early or a late firing, and how many times this window has already fired for this key.
Window:
To access the window an input element falls into, add a pardo.paneInfoParam() to the context argument.
Using beam.PaneInfo you can determine whether this is an early or a late firing,
and how many times this window has already fired for this key.
.of(new DoFn<String, String>() {
     public void processElement(@Element String word, PaneInfo paneInfo) {
  }})
import apache_beam as beam
class ProcessRecord(beam.DoFn):
def process(self, element, pane_info=beam.DoFn.PaneInfoParam):
# access pane info, e.g. pane_info.is_first, pane_info.is_last, pane_info.timing
passfunc extractWordsFn(pn beam.PaneInfo, line string, emitWords func(string)) {
if pn.Timing == typex.PaneEarly || pn.Timing == typex.PaneOnTime {
// ... perform operation ...
}
if pn.Timing == typex.PaneLate {
// ... perform operation ...
}
if pn.IsFirst {
// ... perform operation ...
}
if pn.IsLast {
// ... perform operation ...
}
words := strings.Split(line, " ")
for _, w := range words {
emitWords(w)
}
}pcoll.map(processWithPaneInfo, { timestamp: pardo.paneInfoParam() });PipelineOptions:
The PipelineOptions for the current pipeline can always be accessed in a process method by adding it
as a parameter:
.of(new DoFn<String, String>() {
     public void processElement(@Element String word, PipelineOptions options) {
  }})
@OnTimer methods can also access many of these parameters. Timestamp, Window, key, PipelineOptions, OutputReceiver, and
MultiOutputReceiver parameters can all be accessed in an @OnTimer method. In addition, an @OnTimer method can take
a parameter of type TimeDomain which tells whether the timer is based on event time or processing time.
Timers are explained in more detail in the
Timely (and Stateful) Processing with Apache Beam blog post.
Timer and State: In addition to aforementioned parameters, user defined Timer and State parameters can be used in a stateful DoFn. Timers and States are explained in more detail in the Timely (and Stateful) Processing with Apache Beam blog post.
Timer and State: User defined State and Timer parameters can be used in a stateful DoFn. Timers and States are explained in more detail in the Timely (and Stateful) Processing with Apache Beam blog post.
Timer and State: This feature isn’t yet implemented in the Typescript SDK, but we welcome contributions. In the meantime, Typescript pipelines wishing to use state and timers can do so using cross-language transforms.
class StatefulDoFn(beam.DoFn):
  """An example stateful DoFn with state and timer"""

  BUFFER_STATE_1 = BagStateSpec('buffer1', beam.BytesCoder())
  BUFFER_STATE_2 = BagStateSpec('buffer2', beam.VarIntCoder())
  WATERMARK_TIMER = TimerSpec('watermark_timer', TimeDomain.WATERMARK)

  def process(self,
              element,
              timestamp=beam.DoFn.TimestampParam,
              window=beam.DoFn.WindowParam,
              buffer_1=beam.DoFn.StateParam(BUFFER_STATE_1),
              buffer_2=beam.DoFn.StateParam(BUFFER_STATE_2),
              watermark_timer=beam.DoFn.TimerParam(WATERMARK_TIMER)):

    # Do your processing here
    key, value = element
    # Read all the data from buffer1
    all_values_in_buffer_1 = [x for x in buffer_1.read()]

    if StatefulDoFn._is_clear_buffer_1_required(all_values_in_buffer_1):
        # clear the buffer data if required conditions are met.
        buffer_1.clear()

    # add the value to buffer 2
    buffer_2.add(value)

    if StatefulDoFn._all_condition_met():
      # Clear the timer if certain condition met and you don't want to trigger
      # the callback method.
      watermark_timer.clear()

    yield element

  @on_timer(WATERMARK_TIMER)
  def on_expiry_1(self,
                  timestamp=beam.DoFn.TimestampParam,
                  window=beam.DoFn.WindowParam,
                  key=beam.DoFn.KeyParam,
                  buffer_1=beam.DoFn.StateParam(BUFFER_STATE_1),
                  buffer_2=beam.DoFn.StateParam(BUFFER_STATE_2)):
    # Window and key parameters are really useful especially for debugging issues.
    yield 'expired1'

  @staticmethod
  def _all_condition_met():
      # some logic
      return True

  @staticmethod
  def _is_clear_buffer_1_required(buffer_1_data):
      # Some business logic
      return True
// stateAndTimersFn is an example stateful DoFn with state and a timer.
type stateAndTimersFn struct {
Buffer1 state.Bag[string]
Buffer2 state.Bag[int64]
Watermark timers.EventTime
}
func (s *stateAndTimersFn) ProcessElement(sp state.Provider, tp timers.Provider, w beam.Window, key string, value int64, emit func(string, int64)) error {
// ... handle processing elements here, set a callback timer...
// Read all the data from Buffer1 in this window.
vals, ok, err := s.Buffer1.Read(sp)
if err != nil {
return err
}
if ok && s.shouldClearBuffer(vals) {
// clear the buffer data if required conditions are met.
s.Buffer1.Clear(sp)
}
// Add the value to Buffer2.
s.Buffer2.Add(sp, value)
if s.allConditionsMet() {
// Clear the timer if certain condition met and you don't want to trigger
// the callback method.
s.Watermark.Clear(tp)
}
emit(key, value)
return nil
}
func (s *stateAndTimersFn) OnTimer(sp state.Provider, tp timers.Provider, w beam.Window, key string, timer timers.Context, emit func(string, int64)) error {
// Window and key parameters are really useful especially for debugging issues.
switch timer.Family {
case s.Watermark.Family:
// timer expired, emit a different signal
emit(key, -1)
}
return nil
}
func (s *stateAndTimersFn) shouldClearBuffer([]string) bool {
// some business logic
return false
}
func (s *stateAndTimersFn) allConditionsMet() bool {
// other business logic
return true
}// Not yet implemented.
4.6. Composite transforms
Transforms can have a nested structure, where a complex transform performs
multiple simpler transforms (such as more than one ParDo, Combine,
GroupByKey, or even other composite transforms). These transforms are called
composite transforms. Nesting multiple transforms inside a single composite
transform can make your code more modular and easier to understand.
The Beam SDK comes packed with many useful composite transforms. See the API reference pages for a list of transforms:
- Pre-written Beam transforms for Java
- Pre-written Beam transforms for Python
- Pre-written Beam transforms for Go
4.6.1. An example composite transform
The CountWords transform in the WordCount example program
is an example of a composite transform. CountWords is a PTransform
subclass that consists
of multiple nested transforms.
In its expand method, the
The CountWords transform applies the following
transform operations:
- It applies a
ParDoon the inputPCollectionof text lines, producing an outputPCollectionof individual words. - It applies the Beam SDK library transform
Counton thePCollectionof words, producing aPCollectionof key/value pairs. Each key represents a word in the text, and each value represents the number of times that word appeared in the original data.
  public static class CountWords extends PTransform<PCollection<String>,
      PCollection<KV<String, Long>>> {
    @Override
    public PCollection<KV<String, Long>> expand(PCollection<String> lines) {

      // Convert lines of text into individual words.
      PCollection<String> words = lines.apply(
          ParDo.of(new ExtractWordsFn()));

      // Count the number of times each word occurs.
      PCollection<KV<String, Long>> wordCounts =
          words.apply(Count.<String>perElement());

      return wordCounts;
    }
  }
# The CountWords Composite Transform inside the WordCount pipeline.
@beam.ptransform_fn
def CountWords(pcoll):
return (
pcoll
# Convert lines of text into individual words.
| 'ExtractWords' >> beam.ParDo(ExtractWordsFn())
# Count the number of times each word occurs.
| beam.combiners.Count.PerElement()
# Format each word and count into a printable string.
| 'FormatCounts' >> beam.ParDo(FormatCountsFn()))// CountWords is a function that builds a composite PTransform
// to count the number of times each word appears.
func CountWords(s beam.Scope, lines beam.PCollection) beam.PCollection {
// A subscope is required for a function to become a composite transform.
// We assign it to the original scope variable s to shadow the original
// for the rest of the CountWords function.
s = s.Scope("CountWords")
// Since the same subscope is used for the following transforms,
// they are in the same composite PTransform.
// Convert lines of text into individual words.
words := beam.ParDo(s, extractWordsFn, lines)
// Count the number of times each word occurs.
wordCounts := stats.Count(s, words)
// Return any PCollections that should be available after
// the composite transform.
return wordCounts
}function countWords(lines: PCollection<string>) {
return lines //
.map((s: string) => s.toLowerCase())
.flatMap(function* splitWords(line: string) {
yield* line.split(/[^a-z]+/);
})
.apply(beam.countPerElement());
}
const counted = lines.apply(countWords);Note: Because
Countis itself a composite transform,CountWordsis also a nested composite transform.
4.6.2. Creating a composite transform
A PTransform in the Typescript SDK is simply a function that accepts and
returns PValues such as PCollections.
To create your own composite transform, create a subclass of the PTransform
class and override the expand method to specify the actual processing logic.
You can then use this transform just as you would a built-in transform from the
Beam SDK.
For the PTransform class type parameters, you pass the PCollection types
that your transform takes as input, and produces as output. To take multiple
PCollections as input, or produce multiple PCollections as output, use one
of the multi-collection types for the relevant type parameter.
To create your own composite PTransform call the Scope method on the current
pipeline scope variable. Transforms passed this new sub-Scope will be a part of
the same composite PTransform.
To be able to re-use your Composite, build it inside a normal Go function or method.
This function is passed a scope and input PCollections, and returns any
output PCollections it produces. Note: Such functions cannot be passed directly to
ParDo functions.
The following code sample shows how to declare a PTransform that accepts a
PCollection of Strings for input, and outputs a PCollection of Integers:
  static class ComputeWordLengths
    extends PTransform<PCollection<String>, PCollection<Integer>> {
    ...
  }
class ComputeWordLengths(beam.PTransform):
def expand(self, pcoll):
# Transform logic goes here.
return pcoll | beam.Map(lambda x: len(x))// CountWords is a function that builds a composite PTransform
// to count the number of times each word appears.
func CountWords(s beam.Scope, lines beam.PCollection) beam.PCollection {
// A subscope is required for a function to become a composite transform.
// We assign it to the original scope variable s to shadow the original
// for the rest of the CountWords function.
s = s.Scope("CountWords")
// Since the same subscope is used for the following transforms,
// they are in the same composite PTransform.
// Convert lines of text into individual words.
words := beam.ParDo(s, extractWordsFn, lines)
// Count the number of times each word occurs.
wordCounts := stats.Count(s, words)
// Return any PCollections that should be available after
// the composite transform.
return wordCounts
}Within your PTransform subclass, you’ll need to override the expand method.
The expand method is where you add the processing logic for the PTransform.
Your override of expand must accept the appropriate type of input
PCollection as a parameter, and specify the output PCollection as the return
value.
The following code sample shows how to override expand for the
ComputeWordLengths class declared in the previous example:
The following code sample shows how to call the CountWords composite PTransform,
adding it to your pipeline:
  static class ComputeWordLengths
      extends PTransform<PCollection<String>, PCollection<Integer>> {
    @Override
    public PCollection<Integer> expand(PCollection<String>) {
      ...
      // transform logic goes here
      ...
    }
class ComputeWordLengths(beam.PTransform):
def expand(self, pcoll):
# Transform logic goes here.
return pcoll | beam.Map(lambda x: len(x))lines := ... // a PCollection of strings.
// A Composite PTransform function is called like any other function.
wordCounts := CountWords(s, lines) // returns a PCollection<KV<string,int>>
As long as you override the expand method in your PTransform subclass to
accept the appropriate input PCollection(s) and return the corresponding
output PCollection(s), you can include as many transforms as you want. These
transforms can include core transforms, composite transforms, or the transforms
included in the Beam SDK libraries.
Your composite PTransforms can include as many transforms as you want. These
transforms can include core transforms, other composite transforms, or the transforms
included in the Beam SDK libraries. They can also consume and return as many
PCollections as are necessary.
Your composite transform’s parameters and return value must match the initial input type and final return type for the entire transform, even if the transform’s intermediate data changes type multiple times.
Note: The expand method of a PTransform is not meant to be invoked
directly by the user of a transform. Instead, you should call the apply method
on the PCollection itself, with the transform as an argument. This allows
transforms to be nested within the structure of your pipeline.
4.6.3. PTransform Style Guide
The PTransform Style Guide contains additional information not included here, such as style guidelines, logging and testing guidance, and language-specific considerations. The guide is a useful starting point when you want to write new composite PTransforms.
5. Pipeline I/O
When you create a pipeline, you often need to read data from some external source, such as a file or a database. Likewise, you may want your pipeline to output its result data to an external storage system. Beam provides read and write transforms for a number of common data storage types. If you want your pipeline to read from or write to a data storage format that isn’t supported by the built-in transforms, you can implement your own read and write transforms.
5.1. Reading input data
Read transforms read data from an external source and return a PCollection
representation of the data for use by your pipeline. You can use a read
transform at any point while constructing your pipeline to create a new
PCollection, though it will be most common at the start of your pipeline.
PCollection<String> lines = p.apply(TextIO.read().from("gs://some/inputData.txt"));lines = pipeline | beam.io.ReadFromText('gs://some/inputData.txt')lines := textio.Read(scope, 'gs://some/inputData.txt')
5.2. Writing output data
Write transforms write the data in a PCollection to an external data source.
You will most often use write transforms at the end of your pipeline to output
your pipeline’s final results. However, you can use a write transform to output
a PCollection’s data at any point in your pipeline.
output.apply(TextIO.write().to("gs://some/outputData"));output | beam.io.WriteToText('gs://some/outputData')textio.Write(scope, 'gs://some/inputData.txt', output)
5.3. File-based input and output data
5.3.1. Reading from multiple locations
Many read transforms support reading from multiple input files matching a glob
operator you provide. Note that glob operators are filesystem-specific and obey
filesystem-specific consistency models. The following TextIO example uses a glob
operator (*) to read all matching input files that have prefix “input-” and the
suffix “.csv” in the given location:
p.apply("ReadFromText",
    TextIO.read().from("protocol://my_bucket/path/to/input-*.csv"));
lines = pipeline | 'ReadFromText' >> beam.io.ReadFromText(
'path/to/input-*.csv')lines := textio.Read(scope, "path/to/input-*.csv")To read data from disparate sources into a single PCollection, read each one
independently and then use the Flatten transform to create a single
PCollection.
5.3.2. Writing to multiple output files
For file-based output data, write transforms write to multiple output files by default. When you pass an output file name to a write transform, the file name is used as the prefix for all output files that the write transform produces. You can append a suffix to each output file by specifying a suffix.
The following write transform example writes multiple output files to a location. Each file has the prefix “numbers”, a numeric tag, and the suffix “.csv”.
records.apply("WriteToText",
    TextIO.write().to("protocol://my_bucket/path/to/numbers")
                .withSuffix(".csv"));
filtered_words | 'WriteToText' >> beam.io.WriteToText(
'/path/to/numbers', file_name_suffix='.csv')// The Go SDK textio doesn't support sharding on writes yet.
// See https://github.com/apache/beam/issues/21031 for ways
// to contribute a solution.
5.4. Beam-provided I/O transforms
See the Beam-provided I/O Transforms page for a list of the currently available I/O transforms.
6. Schemas
Often, the types of the records being processed have an obvious structure. Common Beam sources produce JSON, Avro, Protocol Buffer, or database row objects; all of these types have well defined structures, structures that can often be determined by examining the type. Even within a SDK pipeline, Simple Java POJOs (or equivalent structures in other languages) are often used as intermediate types, and these also have a clear structure that can be inferred by inspecting the class. By understanding the structure of a pipeline’s records, we can provide much more concise APIs for data processing.
6.1. What is a schema?
Most structured records share some common characteristics:
- They can be subdivided into separate named fields. Fields usually have string names, but sometimes - as in the case of indexed tuples - have numerical indices instead.
- There is a confined list of primitive types that a field can have. These often match primitive types in most programming languages: int, long, string, etc.
- Often a field type can be marked as optional (sometimes referred to as nullable) or required.
Often records have a nested structure. A nested structure occurs when a field itself has subfields so the type of the field itself has a schema. Fields that are array or map types is also a common feature of these structured records.
For example, consider the following schema, representing actions in a fictitious e-commerce company:
Purchase
| Field Name | Field Type |
|---|---|
| userId | STRING |
| itemId | INT64 |
| shippingAddress | ROW(ShippingAddress) |
| cost | INT64 |
| transactions | ARRAY[ROW(Transaction)] |
ShippingAddress
| Field Name | Field Type |
|---|---|
| streetAddress | STRING |
| city | STRING |
| state | nullable STRING |
| country | STRING |
| postCode | STRING |
Transaction
| Field Name | Field Type |
|---|---|
| bank | STRING |
| purchaseAmount | DOUBLE |
Purchase event records are represented by the above purchase schema. Each purchase event contains a shipping address, which is a nested row containing its own schema. Each purchase also contains an array of credit-card transactions (a list, because a purchase might be split across multiple credit cards); each item in the transaction list is a row with its own schema.
This provides an abstract description of the types involved, one that is abstracted away from any specific programming language.
Schemas provide us a type-system for Beam records that is independent of any specific programming-language type. There might be multiple Java classes that all have the same schema (for example a Protocol-Buffer class or a POJO class), and Beam will allow us to seamlessly convert between these types. Schemas also provide a simple way to reason about types across different programming-language APIs.
A PCollection with a schema does not need to have a Coder specified, as Beam knows how to encode and decode
Schema rows; Beam uses a special coder to encode schema types.
6.2. Schemas for programming language types
While schemas themselves are language independent, they are designed to embed naturally into the programming languages of the Beam SDK being used. This allows Beam users to continue using native types while reaping the advantage of having Beam understand their element schemas.
In Java you could use the following set of classes to represent the purchase schema. Beam will automatically infer the correct schema based on the members of the class.
In Python you can use the following set of classes to represent the purchase schema. Beam will automatically infer the correct schema based on the members of the class.
In Go, schema encoding is used by default for struct types, with Exported fields becoming part of the schema. Beam will automatically infer the schema based on the fields and field tags of the struct, and their order.
In Typescript, JSON objects are used to represent schema’d data. Unfortunately type information in Typescript is not propagated to the runtime layer, so it needs to be manually specified in some places (e.g. when using cross-language pipelines).
In Beam YAML, all transforms produce and accept schema’d data which is used to validate the pipeline.
In some cases, Beam is unable to figure out the output type of a mapping function. In this case, you can specify it manually using JSON schema syntax.
@DefaultSchema(JavaBeanSchema.class)
public class Purchase {
  public String getUserId();  // Returns the id of the user who made the purchase.
  public long getItemId();  // Returns the identifier of the item that was purchased.
  public ShippingAddress getShippingAddress();  // Returns the shipping address, a nested type.
  public long getCostCents();  // Returns the cost of the item.
  public List<Transaction> getTransactions();  // Returns the transactions that paid for this purchase (returns a list, since the purchase might be spread out over multiple credit cards).

  @SchemaCreate
  public Purchase(String userId, long itemId, ShippingAddress shippingAddress, long costCents,
                  List<Transaction> transactions) {
      ...
  }
}

@DefaultSchema(JavaBeanSchema.class)
public class ShippingAddress {
  public String getStreetAddress();
  public String getCity();
  @Nullable public String getState();
  public String getCountry();
  public String getPostCode();

  @SchemaCreate
  public ShippingAddress(String streetAddress, String city, @Nullable String state, String country,
                         String postCode) {
     ...
  }
}

@DefaultSchema(JavaBeanSchema.class)
public class Transaction {
  public String getBank();
  public double getPurchaseAmount();

  @SchemaCreate
  public Transaction(String bank, double purchaseAmount) {
     ...
  }
}
import typing
class Purchase(typing.NamedTuple):
user_id: str # The id of the user who made the purchase.
item_id: int # The identifier of the item that was purchased.
shipping_address: ShippingAddress # The shipping address, a nested type.
cost_cents: int # The cost of the item
transactions: typing.Sequence[Transaction] # The transactions that paid for this purchase (a list, since the purchase might be spread out over multiple credit cards).
class ShippingAddress(typing.NamedTuple):
street_address: str
city: str
state: typing.Optional[str]
country: str
postal_code: str
class Transaction(typing.NamedTuple):
bank: str
purchase_amount: floattype Purchase struct {
// ID of the user who made the purchase.
UserID string `beam:"userId"`
// Identifier of the item that was purchased.
ItemID int64 `beam:"itemId"`
// The shipping address, a nested type.
ShippingAddress ShippingAddress `beam:"shippingAddress"`
// The cost of the item in cents.
Cost int64 `beam:"cost"`
// The transactions that paid for this purchase.
// A slice since the purchase might be spread out over multiple
// credit cards.
Transactions []Transaction `beam:"transactions"`
}
type ShippingAddress struct {
StreetAddress string `beam:"streetAddress"`
City string `beam:"city"`
State *string `beam:"state"`
Country string `beam:"country"`
PostCode string `beam:"postCode"`
}
type Transaction struct {
Bank string `beam:"bank"`
PurchaseAmount float64 `beam:"purchaseAmount"`
}const pcoll = root
.apply(
beam.create([
{ intField: 1, stringField: "a" },
{ intField: 2, stringField: "b" },
])
)
// Let beam know the type of the elements by providing an exemplar.
.apply(beam.withRowCoder({ intField: 0, stringField: "" }));type: MapToFields
config:
language: python
fields:
new_field:
expression: "hex(weight)"
output_type: { "type": "string" }Using JavaBean classes as above is one way to map a schema to Java classes. However multiple Java classes might have
the same schema, in which case the different Java types can often be used interchangeably. Beam will add implicit
conversions between types that have matching schemas. For example, the above
Transaction class has the same schema as the following class:
@DefaultSchema(JavaFieldSchema.class)
public class TransactionPojo {
  public String bank;
  public double purchaseAmount;
}
So if we had two PCollections as follows
PCollection<Transaction> transactionBeans = readTransactionsAsJavaBean();
PCollection<TransactionPojos> transactionPojos = readTransactionsAsPojo();
Then these two PCollections would have the same schema, even though their Java types would be different. This means
for example the following two code snippets are valid:
transactionBeans.apply(ParDo.of(new DoFn<...>() {
   @ProcessElement public void process(@Element TransactionPojo pojo) {
      ...
   }
}));
and
transactionPojos.apply(ParDo.of(new DoFn<...>() {
   @ProcessElement public void process(@Element Transaction row) {
    }
}));
Even though the in both cases the @Element parameter differs from the PCollection’s Java type, since the
schemas are the same Beam will automatically make the conversion. The built-in Convert transform can also be used
to translate between Java types of equivalent schemas, as detailed below.
6.3. Schema definition
The schema for a PCollection defines elements of that PCollection as an ordered list of named fields. Each field
has a name, a type, and possibly a set of user options. The type of a field can be primitive or composite. The following
are the primitive types currently supported by Beam:
| Type | Description |
|---|---|
| BYTE | An 8-bit signed value |
| INT16 | A 16-bit signed value |
| INT32 | A 32-bit signed value |
| INT64 | A 64-bit signed value |
| DECIMAL | An arbitrary-precision decimal type |
| FLOAT | A 32-bit IEEE 754 floating point number |
| DOUBLE | A 64-bit IEEE 754 floating point number |
| STRING | A string |
| DATETIME | A timestamp represented as milliseconds since the epoch |
| BOOLEAN | A boolean value |
| BYTES | A raw byte array |
A field can also reference a nested schema. In this case, the field will have type ROW, and the nested schema will be an attribute of this field type.
Three collection types are supported as field types: ARRAY, ITERABLE and MAP:
- ARRAY This represents a repeated value type, where the repeated elements can have any supported type. Arrays of nested rows are supported, as are arrays of arrays.
- ITERABLE This is very similar to the array type, it represents a repeated value, but one in which the full list of
items is not known until iterated over. This is intended for the case where an iterable might be larger than the
available memory, and backed by external storage (for example, this can happen with the iterable returned by a
GroupByKey). The repeated elements can have any supported type. - MAP This represents an associative map from keys to values. All schema types are supported for both keys and values. Values that contain map types cannot be used as keys in any grouping operation.
6.4. Logical types
Users can extend the schema type system to add custom logical types that can be used as a field. A logical type is identified by a unique identifier and an argument. A logical type also specifies an underlying schema type to be used for storage, along with conversions to and from that type. As an example, a logical union can always be represented as a row with nullable fields, where the user ensures that only one of those fields is ever set at a time. However this can be tedious and complex to manage. The OneOf logical type provides a value class that makes it easier to manage the type as a union, while still using a row with nullable fields as its underlying storage. Each logical type also has a unique identifier, so they can be interpreted by other languages as well. More examples of logical types are listed below.
6.4.1. Defining a logical type
To define a logical type you must specify a Schema type to be used to represent the underlying type as well as a unique identifier for that type. A logical type imposes additional semantics on top a schema type. For example, a logical type to represent nanosecond timestamps is represented as a schema containing an INT64 and an INT32 field. This schema alone does not say anything about how to interpret this type, however the logical type tells you that this represents a nanosecond timestamp, with the INT64 field representing seconds and the INT32 field representing nanoseconds.
Logical types are also specified by an argument, which allows creating a class of related types. For example, a limited-precision decimal type would have an integer argument indicating how many digits of precision are represented. The argument is represented by a schema type, so can itself be a complex type.
In Java, a logical type is specified as a subclass of the LogicalType class. A custom Java class can be specified to represent the logical type and conversion functions must be supplied to convert back and forth between this Java class and the underlying Schema type representation. For example, the logical type representing nanosecond timestamp might be implemented as follows
In Go, a logical type is specified with a custom implementation of the beam.SchemaProvider interface.
For example, the logical type provider representing nanosecond timestamps
might be implemented as follows
In Typescript, a logical type defined by the LogicalTypeInfo interface which associates a logical type’s URN with its representation and its conversion to and from this representation.
// A Logical type using java.time.Instant to represent the logical type.
public class TimestampNanos implements LogicalType<Instant, Row> {
  // The underlying schema used to represent rows.
  private final Schema SCHEMA = Schema.builder().addInt64Field("seconds").addInt32Field("nanos").build();
  @Override public String getIdentifier() { return "timestampNanos"; }
  @Override public FieldType getBaseType() { return schema; }

  // Convert the representation type to the underlying Row type. Called by Beam when necessary.
  @Override public Row toBaseType(Instant instant) {
    return Row.withSchema(schema).addValues(instant.getEpochSecond(), instant.getNano()).build();
  }

  // Convert the underlying Row type to an Instant. Called by Beam when necessary.
  @Override public Instant toInputType(Row base) {
    return Instant.of(row.getInt64("seconds"), row.getInt32("nanos"));
  }

     ...
}
// Define a logical provider like so:
// TimestampNanos is a logical type using time.Time, but
// encodes as a schema type.
type TimestampNanos time.Time
func (tn TimestampNanos) Seconds() int64 {
return time.Time(tn).Unix()
}
func (tn TimestampNanos) Nanos() int32 {
return int32(time.Time(tn).UnixNano() % 1000000000)
}
// tnStorage is the storage schema for TimestampNanos.
type tnStorage struct {
Seconds int64 `beam:"seconds"`
Nanos int32 `beam:"nanos"`
}
var (
// reflect.Type of the Value type of TimestampNanos
tnType = reflect.TypeOf((*TimestampNanos)(nil)).Elem()
tnStorageType = reflect.TypeOf((*tnStorage)(nil)).Elem()
)
// TimestampNanosProvider implements the beam.SchemaProvider interface.
type TimestampNanosProvider struct{}
// FromLogicalType converts checks if the given type is TimestampNanos, and if so
// returns the storage type.
func (p *TimestampNanosProvider) FromLogicalType(rt reflect.Type) (reflect.Type, error) {
if rt != tnType {
return nil, fmt.Errorf("unable to provide schema.LogicalType for type %v, want %v", rt, tnType)
}
return tnStorageType, nil
}
// BuildEncoder builds a Beam schema encoder for the TimestampNanos type.
func (p *TimestampNanosProvider) BuildEncoder(rt reflect.Type) (func(any, io.Writer) error, error) {
if _, err := p.FromLogicalType(rt); err != nil {
return nil, err
}
enc, err := coder.RowEncoderForStruct(tnStorageType)
if err != nil {
return nil, err
}
return func(iface any, w io.Writer) error {
v := iface.(TimestampNanos)
return enc(tnStorage{
Seconds: v.Seconds(),
Nanos: v.Nanos(),
}, w)
}, nil
}
// BuildDecoder builds a Beam schema decoder for the TimestampNanos type.
func (p *TimestampNanosProvider) BuildDecoder(rt reflect.Type) (func(io.Reader) (any, error), error) {
if _, err := p.FromLogicalType(rt); err != nil {
return nil, err
}
dec, err := coder.RowDecoderForStruct(tnStorageType)
if err != nil {
return nil, err
}
return func(r io.Reader) (any, error) {
s, err := dec(r)
if err != nil {
return nil, err
}
tn := s.(tnStorage)
return TimestampNanos(time.Unix(tn.Seconds, int64(tn.Nanos))), nil
}, nil
}
// Register it like so:
beam.RegisterSchemaProvider(tnType, &TimestampNanosProvider{})// Register a logical type:
class Foo {
constructor(public value: string) {}
}
requireForSerialization("apache-beam", { Foo });
row_coder.registerLogicalType({
urn: "beam:logical_type:typescript_foo:v1",
reprType: row_coder.RowCoder.inferTypeFromJSON("string", false),
toRepr: (foo) => foo.value,
fromRepr: (value) => new Foo(value),
});
// And use it as follows:
const pcoll = root
.apply(beam.create([new Foo("a"), new Foo("b")]))
// Use beamLogicalType in the exemplar to indicate its use.
.apply(
beam.withRowCoder({
beamLogicalType: "beam:logical_type:typescript_foo:v1",
} as any)
);6.4.2. Useful logical types
Currently the Python SDK provides minimal convenience logical types,
other than to handle MicrosInstant.
Currently the Go SDK provides minimal convenience logical types,
other than to handle additional integer primitives, and time.Time.
EnumerationType
This convenience builder doesn’t yet exist for the Python SDK.
This convenience builder doesn’t yet exist for the Go SDK.
This logical type allows creating an enumeration type consisting of a set of named constants.
Schema schema = Schema.builder()
               …
     .addLogicalTypeField("color", EnumerationType.create("RED", "GREEN", "BLUE"))
     .build();
The value of this field is stored in the row as an INT32 type, however the logical type defines a value type that lets you access the enumeration either as a string or a value. For example:
EnumerationType.Value enumValue = enumType.valueOf("RED");
enumValue.getValue();  // Returns 0, the integer value of the constant.
enumValue.toString();  // Returns "RED", the string value of the constant
Given a row object with an enumeration field, you can also extract the field as the enumeration value.
EnumerationType.Value enumValue = row.getLogicalTypeValue("color", EnumerationType.Value.class);Automatic schema inference from Java POJOs and JavaBeans automatically converts Java enums to EnumerationType logical types.
OneOfType
This convenience builder doesn’t yet exist for the Python SDK.
This convenience builder doesn’t yet exist for the Go SDK.
OneOfType allows creating a disjoint union type over a set of schema fields. For example:
Schema schema = Schema.builder()
               …
     .addLogicalTypeField("oneOfField",
        OneOfType.create(Field.of("intField", FieldType.INT32),
                         Field.of("stringField", FieldType.STRING),
                         Field.of("bytesField", FieldType.BYTES)))
      .build();
The value of this field is stored in the row as another Row type, where all the fields are marked as nullable. The logical type however defines a Value object that contains an enumeration value indicating which field was set and allows getting just that field:
// Returns an enumeration indicating all possible case values for the enum.
// For the above example, this will be
// EnumerationType.create("intField", "stringField", "bytesField");
EnumerationType oneOfEnum = onOfType.getCaseEnumType();

// Creates an instance of the union with the string field set.
OneOfType.Value oneOfValue = oneOfType.createValue("stringField", "foobar");

// Handle the oneof
switch (oneOfValue.getCaseEnumType().toString()) {
  case "intField":
    return processInt(oneOfValue.getValue(Integer.class));
  case "stringField":
    return processString(oneOfValue.getValue(String.class));
  case "bytesField":
    return processBytes(oneOfValue.getValue(bytes[].class));
}
In the above example we used the field names in the switch statement for clarity, however the enum integer values could also be used.
6.5. Creating Schemas
In order to take advantage of schemas, your PCollections must have a schema attached to it.
Often, the source itself will attach a schema to the PCollection.
For example, when using AvroIO to read Avro files, the source can automatically infer a Beam schema from the Avro schema and attach that to the Beam PCollection.
However not all sources produce schemas.
In addition, often Beam pipelines have intermediate stages and types, and those also can benefit from the expressiveness of schemas.
6.5.1. Inferring schemas
Unfortunately, Beam is unable to access Typescript’s type information at runtime.
Schemas must be manually declared with beam.withRowCoder.
On the other hand, schema-aware operations such as GroupBy can be used
without an explicit schema declared.
Beam is able to infer schemas from a variety of common Java types.
The @DefaultSchema annotation can be used to tell Beam to infer schemas from a specific type.
The annotation takes a SchemaProvider as an argument, and SchemaProvider classes are already built in for common Java types.
The SchemaRegistry can also be invoked programmatically for cases where it is not practical to annotate the Java type itself.
Java POJOs
A POJO (Plain Old Java Object) is a Java object that is not bound by any restriction other than the Java Language Specification. A POJO can contain member variables that are primitives, that are other POJOs, or are collections maps or arrays thereof. POJOs do not have to extend prespecified classes or extend any specific interfaces.
If a POJO class is annotated with @DefaultSchema(JavaFieldSchema.class), Beam will automatically infer a schema for
this class. Nested classes are supported as are classes with List, array, and Map fields.
For example, annotating the following class tells Beam to infer a schema from this POJO class and apply it to any
PCollection<TransactionPojo>.
@DefaultSchema(JavaFieldSchema.class)
public class TransactionPojo {
  public final String bank;
  public final double purchaseAmount;
  @SchemaCreate
  public TransactionPojo(String bank, double purchaseAmount) {
    this.bank = bank;
    this.purchaseAmount = purchaseAmount;
  }
}
// Beam will automatically infer the correct schema for this PCollection. No coder is needed as a result.
PCollection<TransactionPojo> pojos = readPojos();
The @SchemaCreate annotation tells Beam that this constructor can be used to create instances of TransactionPojo,
assuming that constructor parameters have the same names as the field names. @SchemaCreate can also be used to annotate
static factory methods on the class, allowing the constructor to remain private. If there is no @SchemaCreate
annotation then all the fields must be non-final and the class must have a zero-argument constructor.
There are a couple of other useful annotations that affect how Beam infers schemas. By default the schema field names
inferred will match that of the class field names. However @SchemaFieldName can be used to specify a different name to
be used for the schema field. @SchemaIgnore can be used to mark specific class fields as excluded from the inferred
schema. For example, it’s common to have ephemeral fields in a class that should not be included in a schema
(e.g. caching the hash value to prevent expensive recomputation of the hash), and @SchemaIgnore can be used to
exclude these fields. Note that ignored fields will not be included in the encoding of these records.
In some cases it is not convenient to annotate the POJO class, for example if the POJO is in a different package that is not owned by the Beam pipeline author. In these cases the schema inference can be triggered programmatically in pipeline’s main function as follows:
pipeline.getSchemaRegistry().registerPOJO(TransactionPOJO.class);Java Beans
Java Beans are a de-facto standard for creating reusable property classes in Java. While the full
standard has many characteristics, the key ones are that all properties are accessed via getter and setter classes, and
the name format for these getters and setters is standardized. A Java Bean class can be annotated with
@DefaultSchema(JavaBeanSchema.class) and Beam will automatically infer a schema for this class. For example:
@DefaultSchema(JavaBeanSchema.class)
public class TransactionBean {
  public TransactionBean() { … }
  public String getBank() { … }
  public void setBank(String bank) { … }
  public double getPurchaseAmount() { … }
  public void setPurchaseAmount(double purchaseAmount) { … }
}
// Beam will automatically infer the correct schema for this PCollection. No coder is needed as a result.
PCollection<TransactionBean> beans = readBeans();
The @SchemaCreate annotation can be used to specify a constructor or a static factory method, in which case the
setters and zero-argument constructor can be omitted.
@DefaultSchema(JavaBeanSchema.class)
public class TransactionBean {
  @SchemaCreate
  Public TransactionBean(String bank, double purchaseAmount) { … }
  public String getBank() { … }
  public double getPurchaseAmount() { … }
}
@SchemaFieldName and @SchemaIgnore can be used to alter the schema inferred, just like with POJO classes.
AutoValue
Java value classes are notoriously difficult to generate correctly. There is a lot of boilerplate you must create in order to properly implement a value class. AutoValue is a popular library for easily generating such classes by implementing a simple abstract base class.
Beam can infer a schema from an AutoValue class. For example:
@DefaultSchema(AutoValueSchema.class)
@AutoValue
public abstract class TransactionValue {
  public abstract String getBank();
  public abstract double getPurchaseAmount();
}
This is all that’s needed to generate a simple AutoValue class, and the above @DefaultSchema annotation tells Beam to
infer a schema from it. This also allows AutoValue elements to be used inside of PCollections.
@SchemaFieldName and @SchemaIgnore can be used to alter the schema inferred.
Beam has a few different mechanisms for inferring schemas from Python code.
NamedTuple classes
A NamedTuple
class is a Python class that wraps a tuple, assigning a name to each element
and restricting it to a particular type. Beam will automatically infer the
schema for PCollections with NamedTuple output types. For example:
class Transaction(typing.NamedTuple):
  bank: str
  purchase_amount: float

pc = input | beam.Map(lambda ...).with_output_types(Transaction)
beam.Row and Select
There are also methods for creating ad-hoc schema declarations. First, you can
use a lambda that returns instances of beam.Row:
input_pc = ... # {"bank": ..., "purchase_amount": ...}
output_pc = input_pc | beam.Map(lambda item: beam.Row(bank=item["bank"],
                                                      purchase_amount=item["purchase_amount"])
Sometimes it can be more concise to express the same logic with the
Select transform:
input_pc = ... # {"bank": ..., "purchase_amount": ...}
output_pc = input_pc | beam.Select(bank=lambda item: item["bank"],
                                   purchase_amount=lambda item: item["purchase_amount"])
Note that these declaration don’t include any specific information about the
types of the bank and purchase_amount fields, so Beam will attempt to infer
type information. If it’s unable to it will fall back to the generic type
Any. Sometimes this is not ideal, you can use casts to make sure Beam
correctly infers types with beam.Row or with Select:
input_pc = ... # {"bank": ..., "purchase_amount": ...}
output_pc = input_pc | beam.Map(lambda item: beam.Row(bank=str(item["bank"]),
                                                      purchase_amount=float(item["purchase_amount"])))
Beam currently only infers schemas for exported fields in Go structs.
Structs
Beam will automatically infer schemas for all Go structs used as PCollection elements, and default to encoding them using schema encoding.
type Transaction struct{
  Bank string
  PurchaseAmount float64

  checksum []byte // ignored
}
Unexported fields are ignored, and cannot be automatically inferred as part of the schema. Fields of type func, channel, unsafe.Pointer, or uintptr will be ignored by inference. Fields of interface types are ignored, unless a schema provider is registered for them.
By default, schema field names will match the exported struct field names. In the above example, “Bank” and “PurchaseAmount” are the schema field names. A schema field name can be overridden with a struct tag for the field.
type Transaction struct{
  Bank           string  `beam:"bank"`
  PurchaseAmount float64 `beam:"purchase_amount"`
}
Overriding schema field names is useful for compatibility cross language transforms, as schema fields may have different requirements or restrictions from Go exported fields.
6.6. Using Schema Transforms
A schema on a PCollection enables a rich variety of relational transforms. The fact that each record is composed of
named fields allows for simple and readable aggregations that reference fields by name, similar to the aggregations in
a SQL expression.
Beam does not yet support Schema transforms natively in Go. However, it will be implemented with the following behavior.
6.6.1. Field selection syntax
The advantage of schemas is that they allow referencing of element fields by name. Beam provides a selection syntax for referencing fields, including nested and repeated fields. This syntax is used by all of the schema transforms when referencing the fields they operate on. The syntax can also be used inside of a DoFn to specify which schema fields to process.
Addressing fields by name still retains type safety as Beam will check that schemas match at the time the pipeline graph is constructed. If a field is specified that does not exist in the schema, the pipeline will fail to launch. In addition, if a field is specified with a type that does not match the type of that field in the schema, the pipeline will fail to launch.
The following characters are not allowed in field names: . * [ ] { }
Top-level fields
In order to select a field at the top level of a schema, the name of the field is specified. For example, to select just
the user ids from a PCollection of purchases one would write (using the Select transform)
purchases.apply(Select.fieldNames("userId"));input_pc = ... # {"user_id": ...,"bank": ..., "purchase_amount": ...}
output_pc = input_pc | beam.Select("user_id")Nested fields
Support for Nested fields hasn’t been developed for the Python SDK yet.
Support for Nested fields hasn’t been developed for the Go SDK yet.
Individual nested fields can be specified using the dot operator. For example, to select just the postal code from the shipping address one would write
purchases.apply(Select.fieldNames("shippingAddress.postCode"));Wildcards
Support for wildcards hasn’t been developed for the Python SDK yet.
Support for wildcards hasn’t been developed for the Go SDK yet.
The * operator can be specified at any nesting level to represent all fields at that level. For example, to select all shipping-address fields one would write
purchases.apply(Select.fieldNames("shippingAddress.*"));Arrays
An array field, where the array element type is a row, can also have subfields of the element type addressed. When selected, the result is an array of the selected subfield type. For example
Support for Array fields hasn’t been developed for the Python SDK yet.
Support for Array fields hasn’t been developed for the Go SDK yet.
purchases.apply(Select.fieldNames("transactions[].bank"));Will result in a row containing an array field with element-type string, containing the list of banks for each transaction.
While the use of [] brackets in the selector is recommended, to make it clear that array elements are being selected, they can be omitted for brevity. In the future, array slicing will be supported, allowing selection of portions of the array.
Maps
A map field, where the value type is a row, can also have subfields of the value type addressed. When selected, the result is a map where the keys are the same as in the original map but the value is the specified type. Similar to arrays, the use of {} curly brackets in the selector is recommended, to make it clear that map value elements are being selected, they can be omitted for brevity. In the future, map key selectors will be supported, allowing selection of specific keys from the map. For example, given the following schema:
PurchasesByType
| Field Name | Field Type |
|---|---|
| purchases | MAP{STRING, ROW{PURCHASE} |
The following
purchasesByType.apply(Select.fieldNames("purchases{}.userId"));Support for Map fields hasn’t been developed for the Python SDK yet.
Support for Map fields hasn’t been developed for the Go SDK yet.
Will result in a row containing a map field with key-type string and value-type string. The selected map will contain all of the keys from the original map, and the values will be the userId contained in the purchase record.
While the use of {} brackets in the selector is recommended, to make it clear that map value elements are being selected, they can be omitted for brevity. In the future, map slicing will be supported, allowing selection of specific keys from the map.
6.6.2. Schema transforms
Beam provides a collection of transforms that operate natively on schemas. These transforms are very expressive, allowing selections and aggregations in terms of named schema fields. Following are some examples of useful schema transforms.
Selecting input
Often a computation is only interested in a subset of the fields in an input PCollection. The Select transform allows
one to easily project out only the fields of interest. The resulting PCollection has a schema containing each selected
field as a top-level field. Both top-level and nested fields can be selected. For example, in the Purchase schema, one
could select only the userId and streetAddress fields as follows
purchases.apply(Select.fieldNames("userId", "shippingAddress.streetAddress"));Support for Nested fields hasn’t been developed for the Python SDK yet.
Support for Nested fields hasn’t been developed for the Go SDK yet.
The resulting PCollection will have the following schema
| Field Name | Field Type |
|---|---|
| userId | STRING |
| streetAddress | STRING |
The same is true for wildcard selections. The following
purchases.apply(Select.fieldNames("userId", "shippingAddress.*"));Support for Wildcards hasn’t been developed for the Python SDK yet.
Support for Wildcards hasn’t been developed for the Go SDK yet.
Will result in the following schema
| Field Name | Field Type |
|---|---|
| userId | STRING |
| streetAddress | STRING |
| city | STRING |
| state | nullable STRING |
| country | STRING |
| postCode | STRING |
When selecting fields nested inside of an array, the same rule applies that each selected field appears separately as a top-level field in the resulting row. This means that if multiple fields are selected from the same nested row, each selected field will appear as its own array field. For example
purchases.apply(Select.fieldNames( "transactions.bank", "transactions.purchaseAmount"));Support for nested fields hasn’t been developed for the Python SDK yet.
Support for nested fields hasn’t been developed for the Go SDK yet.
Will result in the following schema
| Field Name | Field Type |
|---|---|
| bank | ARRAY[STRING] |
| purchaseAmount | ARRAY[DOUBLE] |
Wildcard selections are equivalent to separately selecting each field.
Selecting fields nested inside of maps have the same semantics as arrays. If you select multiple fields from a map , then each selected field will be expanded to its own map at the top level. This means that the set of map keys will be copied, once for each selected field.
Sometimes different nested rows will have fields with the same name. Selecting multiple of these fields would result in
a name conflict, as all selected fields are put in the same row schema. When this situation arises, the
Select.withFieldNameAs builder method can be used to provide an alternate name for the selected field.
Another use of the Select transform is to flatten a nested schema into a single flat schema. For example
purchases.apply(Select.flattenedSchema());Support for nested fields hasn’t been developed for the Python SDK yet.
Support for nested fields hasn’t been developed for the Go SDK yet.
Will result in the following schema
| Field Name | Field Type |
|---|---|
| userId | STRING |
| itemId | STRING |
| shippingAddress_streetAddress | STRING |
| shippingAddress_city | nullable STRING |
| shippingAddress_state | STRING |
| shippingAddress_country | STRING |
| shippingAddress_postCode | STRING |
| costCents | INT64 |
| transactions_bank | ARRAY[STRING] |
| transactions_purchaseAmount | ARRAY[DOUBLE] |
Grouping aggregations
The Group transform allows simply grouping data by any number of fields in the input schema, applying aggregations to
those groupings, and storing the result of those aggregations in a new schema field. The output of the Group transform
has a schema with one field corresponding to each aggregation performed.
The GroupBy transform allows simply grouping data by any number of fields in the input schema, applying aggregations to
those groupings, and storing the result of those aggregations in a new schema field. The output of the GroupBy transform
has a schema with one field corresponding to each aggregation performed.
The simplest usage of Group specifies no aggregations, in which case all inputs matching the provided set of fields
are grouped together into an ITERABLE field. For example
The simplest usage of GroupBy specifies no aggregations, in which case all inputs matching the provided set of fields
are grouped together into an ITERABLE field. For example
purchases.apply(Group.byFieldNames("userId", "bank"));input_pc = ... # {"user_id": ...,"bank": ..., "purchase_amount": ...}
output_pc = input_pc | beam.GroupBy('user_id','bank')Support for schema-aware grouping hasn’t been developed for the Go SDK yet.
The output schema of this is:
| Field Name | Field Type |
|---|---|
| key | ROW{userId:STRING, bank:STRING} |
| values | ITERABLE[ROW[Purchase]] |
The key field contains the grouping key and the values field contains a list of all the values that matched that key.
The names of the key and values fields in the output schema can be controlled using this withKeyField and withValueField builders, as follows:
purchases.apply(Group.byFieldNames("userId", "shippingAddress.streetAddress")
    .withKeyField("userAndStreet")
    .withValueField("matchingPurchases"));
It is quite common to apply one or more aggregations to the grouped result. Each aggregation can specify one or more fields to aggregate, an aggregation function, and the name of the resulting field in the output schema. For example, the following application computes three aggregations grouped by userId, with all aggregations represented in a single output schema:
purchases.apply(Group.byFieldNames("userId")
    .aggregateField("itemId", Count.combineFn(), "numPurchases")
    .aggregateField("costCents", Sum.ofLongs(), "totalSpendCents")
    .aggregateField("costCents", Top.<Long>largestLongsFn(10), "topPurchases"));
input_pc = ... # {"user_id": ..., "item_Id": ..., "cost_cents": ...}
output_pc = input_pc | beam.GroupBy("user_id")
.aggregate_field("item_id", CountCombineFn, "num_purchases")
.aggregate_field("cost_cents", sum, "total_spendcents")
.aggregate_field("cost_cents", TopCombineFn, "top_purchases")Support for schema-aware grouping hasn’t been developed for the Go SDK yet.
The result of this aggregation will have the following schema:
| Field Name | Field Type |
|---|---|
| key | ROW{userId:STRING} |
| value | ROW{numPurchases: INT64, totalSpendCents: INT64, topPurchases: ARRAY[INT64]} |
Often Selected.flattenedSchema will be use to flatten the result into a non-nested, flat schema.
Joins
Beam supports equijoins on schema PCollections - namely joins where the join condition depends on the equality of a
subset of fields. For example, the following examples uses the Purchases schema to join transactions with the reviews
that are likely associated with that transaction (both the user and product match that in the transaction). This is a
“natural join” - one in which the same field names are used on both the left-hand and right-hand sides of the join -
and is specified with the using keyword:
Support for joins hasn’t been developed for the Python SDK yet.
Support for joins hasn’t been developed for the Go SDK yet.
PCollection<Transaction> transactions = readTransactions();
PCollection<Review> reviews = readReviews();
PCollection<Row> joined = transactions.apply(
    Join.innerJoin(reviews).using("userId", "productId"));
The resulting schema is the following:
| Field Name | Field Type |
|---|---|
| lhs | ROW{Transaction} |
| rhs | ROW{Review} |
Each resulting row contains one Transaction and one Review that matched the join condition.
If the fields to match in the two schemas have different names, then the on function can be used. For example, if the Review schema named those fields differently than the Transaction schema, then we could write the following:
Support for joins hasn’t been developed for the Python SDK yet.
Support for joins hasn’t been developed for the Go SDK yet.
PCollection<Row> joined = transactions.apply(
    Join.innerJoin(reviews).on(
      FieldsEqual
         .left("userId", "productId")
         .right("reviewUserId", "reviewProductId")));
In addition to inner joins, the Join transform supports full outer joins, left outer joins, and right outer joins.
Complex joins
While most joins tend to be binary joins - joining two inputs together - sometimes you have more than two input
streams that all need to be joined on a common key. The CoGroup transform allows joining multiple PCollections
together based on equality of schema fields. Each PCollection can be marked as required or optional in the final
join record, providing a generalization of outer joins to joins with greater than two input PCollections. The output
can optionally be expanded - providing individual joined records, as in the Join transform. The output can also be
processed in unexpanded format - providing the join key along with Iterables of all records from each input that matched
that key.
Support for joins hasn’t been developed for the Python SDK yet.
Support for joins hasn’t been developed for the Go SDK yet.
Filtering events
The Filter transform can be configured with a set of predicates, each one based one specified fields. Only records for
which all predicates return true will pass the filter. For example the following
purchases.apply(Filter.create()
    .whereFieldName("costCents", c -> c > 100 * 20)
    .whereFieldName("shippingAddress.country", c -> c.equals("de"));
Will produce all purchases made from Germany with a purchase price of greater than twenty cents.
Adding fields to a schema
The AddFields transform can be used to extend a schema with new fields. Input rows will be extended to the new schema by inserting null values for the new fields, though alternate default values can be specified; if the default null value is used then the new field type will be marked as nullable. Nested subfields can be added using the field selection syntax, including nested fields inside arrays or map values.
For example, the following application
purchases.apply(AddFields.<PurchasePojo>create()
    .field("timeOfDaySeconds", FieldType.INT32)
    .field("shippingAddress.deliveryNotes", FieldType.STRING)
    .field("transactions.isFlagged", FieldType.BOOLEAN, false));
Results in a PCollection with an expanded schema. All of the rows and fields of the input, but also with the specified
fields added to the schema. All resulting rows will have null values filled in for the timeOfDaySeconds and the
shippingAddress.deliveryNotes fields, and a false value filled in for the transactions.isFlagged field.
Removing fields from a schema
DropFields allows specific fields to be dropped from a schema. Input rows will have their schemas truncated, and any
values for dropped fields will be removed from the output. Nested fields can also be dropped using the field selection
syntax.
For example, the following snippet
purchases.apply(DropFields.fields("userId", "shippingAddress.streetAddress"));Results in a copy of the input with those two fields and their corresponding values removed.
Renaming schema fields
RenameFields allows specific fields in a schema to be renamed. The field values in input rows are left unchanged, only
the schema is modified. This transform is often used to prepare records for output to a schema-aware sink, such as an
RDBMS, to make sure that the PCollection schema field names match that of the output. It can also be used to rename
fields generated by other transforms to make them more usable (similar to SELECT AS in SQL). Nested fields can also be
renamed using the field-selection syntax.
For example, the following snippet
purchases.apply(RenameFields.<PurchasePojo>create()
  .rename("userId", "userIdentifier")
  .rename("shippingAddress.streetAddress", "shippingAddress.street"));
Results in the same set of unmodified input elements, however the schema on the PCollection has been changed to rename userId to userIdentifier and shippingAddress.streetAddress to shippingAddress.street.
Converting between types
As mentioned, Beam can automatically convert between different Java types, as long as those types have equivalent
schemas. One way to do this is by using the Convert transform, as follows.
PCollection<PurchaseBean> purchaseBeans = readPurchasesAsBeans();
PCollection<PurchasePojo> pojoPurchases =
purchaseBeans.apply(Convert.to(PurchasePojo.class));Beam will validate that the inferred schema for PurchasePojo matches that of the input PCollection, and will
then cast to a PCollection<PurchasePojo>.
Since the Row class can support any schema, any PCollection with schema can be cast to a PCollection of rows, as
follows.
PCollection<Row> purchaseRows = purchaseBeans.apply(Convert.toRows());If the source type is a single-field schema, Convert will also convert to the type of the field if asked, effectively
unboxing the row. For example, give a schema with a single INT64 field, the following will convert it to a
PCollection<Long>
PCollection<Long> longs = rows.apply(Convert.to(TypeDescriptors.longs()));In all cases, type checking is done at pipeline graph construction, and if the types do not match the schema then the pipeline will fail to launch.
6.6.3. Schemas in ParDo
A PCollection with a schema can apply a ParDo, just like any other PCollection. However the Beam runner is aware
of schemas when applying a ParDo, which enables additional functionality.
Input conversion
Beam does not yet support input conversion in Go.
Since Beam knows the schema of the source PCollection, it can automatically convert the elements to any Java type for
which a matching schema is known. For example, using the above-mentioned Transaction schema, say we have the following
PCollection:
PCollection<PurchasePojo> purchases = readPurchases();If there were no schema, then the applied DoFn would have to accept an element of type TransactionPojo. However
since there is a schema, you could apply the following DoFn:
purchases.apply(ParDo.of(new DoFn<PurchasePojo, PurchasePojo>() {
@ProcessElement public void process(@Element PurchaseBean purchase) {
...
}
}));Even though the @Element parameter does not match the Java type of the PCollection, since it has a matching schema
Beam will automatically convert elements. If the schema does not match, Beam will detect this at graph-construction time
and will fail the job with a type error.
Since every schema can be represented by a Row type, Row can also be used here:
purchases.appy(ParDo.of(new DoFn<PurchasePojo, PurchasePojo>() {
@ProcessElement public void process(@Element Row purchase) {
...
}
}));Input selection
Since the input has a schema, you can also automatically select specific fields to process in the DoFn.
Given the above purchases PCollection, say you want to process just the userId and the itemId fields. You can do these
using the above-described selection expressions, as follows:
purchases.appy(ParDo.of(new DoFn<PurchasePojo, PurchasePojo>() {
@ProcessElement public void process(
@FieldAccess("userId") String userId, @FieldAccess("itemId") long itemId) {
...
}
}));You can also select nested fields, as follows.
purchases.appy(ParDo.of(new DoFn<PurchasePojo, PurchasePojo>() {
@ProcessElement public void process(
@FieldAccess("shippingAddress.street") String street) {
...
}
}));For more information, see the section on field-selection expressions. When selecting subschemas, Beam will automatically convert to any matching schema type, just like when reading the entire row.
7. Data encoding and type safety
When Beam runners execute your pipeline, they often need to materialize the
intermediate data in your PCollections, which requires converting elements to
and from byte strings. The Beam SDKs use objects called Coders to describe how
the elements of a given PCollection may be encoded and decoded.
Note that coders are unrelated to parsing or formatting data when interacting with external data sources or sinks. Such parsing or formatting should typically be done explicitly, using transforms such as
ParDoorMapElements.
In the Beam SDK for Java, the type Coder provides the methods required for
encoding and decoding data. The SDK for Java provides a number of Coder
subclasses that work with a variety of standard Java types, such as Integer,
Long, Double, StringUtf8 and more. You can find all of the available Coder
subclasses in the Coder package.
In the Beam SDK for Python, the type Coder provides the methods required for
encoding and decoding data. The SDK for Python provides a number of Coder
subclasses that work with a variety of standard Python types, such as primitive
types, Tuple, Iterable, StringUtf8 and more. You can find all of the available
Coder subclasses in the
apache_beam.coders
package.
Standard Go types like int, int64 float64, []byte, and string and more are coded using builtin coders.
Structs and pointers to structs default using Beam Schema Row encoding.
However, users can build and register custom coders with beam.RegisterCoder.
You can find available Coder functions in the
coder
package.
Standard Typescript types like number, UInt8Array and string and more are coded using builtin coders.
Json objects and arrays are encoded via a BSON encoding.
For these types, coders need not be specified unless interacting with cross-language transforms.
Users can build custom coders by extending beam.coders.Coder
for use with withCoderInternal, but generally logical types are preferred for this case.
Note that coders do not necessarily have a 1:1 relationship with types. For example, the Integer type can have multiple valid coders, and input and output data can use different Integer coders. A transform might have Integer-typed input data that uses BigEndianIntegerCoder, and Integer-typed output data that uses VarIntCoder.
7.1. Specifying coders
The Beam SDKs require a coder for every PCollection in your pipeline. In most
cases, the Beam SDK is able to automatically infer a Coder for a PCollection
based on its element type or the transform that produces it, however, in some
cases the pipeline author will need to specify a Coder explicitly, or develop
a Coder for their custom type.
You can explicitly set the coder for an existing PCollection by using the
method PCollection.setCoder. Note that you cannot call setCoder on a
PCollection that has been finalized (e.g. by calling .apply on it).
You can get the coder for an existing PCollection by using the method
getCoder. This method will fail with an IllegalStateException if a coder has
not been set and cannot be inferred for the given PCollection.
Beam SDKs use a variety of mechanisms when attempting to automatically infer the
Coder for a PCollection.
Each pipeline object has a CoderRegistry. The CoderRegistry represents a
mapping of Java types to the default coders that the pipeline should use for
PCollections of each type.
The Beam SDK for Python has a CoderRegistry that represents a mapping of
Python types to the default coder that should be used for PCollections of each
type.
The Beam SDK for Go allows users to register default coder
implementations with beam.RegisterCoder.
By default, the Beam SDK for Java automatically infers the Coder for the
elements of a PCollection produced by a PTransform using the type parameter
from the transform’s function object, such as DoFn. In the case of ParDo,
for example, a DoFn<Integer, String> function object accepts an input element
of type Integer and produces an output element of type String. In such a
case, the SDK for Java will automatically infer the default Coder for the
output PCollection<String> (in the default pipeline CoderRegistry, this is
StringUtf8Coder).
By default, the Beam SDK for Python automatically infers the Coder for the
elements of an output PCollection using the typehints from the transform’s
function object, such as DoFn. In the case of ParDo, for example a DoFn
with the typehints @beam.typehints.with_input_types(int) and
@beam.typehints.with_output_types(str) accepts an input element of type int
and produces an output element of type str. In such a case, the Beam SDK for
Python will automatically infer the default Coder for the output PCollection
(in the default pipeline CoderRegistry, this is BytesCoder).
By default, the Beam SDK for Go automatically infers the Coder for the elements of an output PCollection by the output of the transform’s function object, such as a DoFn.
In the case of ParDo, for example a DoFn
with the parameters of v int, emit func(string) accepts an input element of type int
and produces an output element of type string.
In such a case, the Beam SDK for Go will automatically infer the default Coder for the output PCollection to be the string_utf8 coder.
Note: If you create your
PCollectionfrom in-memory data by using theCreatetransform, you cannot rely on coder inference and default coders.Createdoes not have access to any typing information for its arguments, and may not be able to infer a coder if the argument list contains a value whose exact run-time class doesn’t have a default coder registered.
When using Create, the simplest way to ensure that you have the correct coder
is by invoking withCoder when you apply the Create transform.
7.2. Default coders and the CoderRegistry
Each Pipeline object has a CoderRegistry object, which maps language types to
the default coder the pipeline should use for those types. You can use the
CoderRegistry yourself to look up the default coder for a given type, or to
register a new default coder for a given type.
CoderRegistry contains a default mapping of coders to standard
JavaPython
types for any pipeline you create using the Beam SDK for
JavaPython.
The following table shows the standard mapping:
| Java Type | Default Coder |
|---|---|
| Double | DoubleCoder |
| Instant | InstantCoder |
| Integer | VarIntCoder |
| Iterable | IterableCoder |
| KV | KvCoder |
| List | ListCoder |
| Map | MapCoder |
| Long | VarLongCoder |
| String | StringUtf8Coder |
| TableRow | TableRowJsonCoder |
| Void | VoidCoder |
| byte[ ] | ByteArrayCoder |
| TimestampedValue | TimestampedValueCoder |
| Python Type | Default Coder |
|---|---|
| int | VarIntCoder |
| float | FloatCoder |
| str | BytesCoder |
| bytes | StrUtf8Coder |
| Tuple | TupleCoder |
7.2.1. Looking up a default coder
You can use the method CoderRegistry.getCoder to determine the default
Coder for a Java type. You can access the CoderRegistry for a given pipeline
by using the method Pipeline.getCoderRegistry. This allows you to determine
(or set) the default Coder for a Java type on a per-pipeline basis: i.e. “for
this pipeline, verify that Integer values are encoded using
BigEndianIntegerCoder.”
You can use the method CoderRegistry.get_coder to determine the default Coder
for a Python type. You can use coders.registry to access the CoderRegistry.
This allows you to determine (or set) the default Coder for a Python type.
You can use the beam.NewCoder function to determine the default Coder for a Go type.
7.2.2. Setting the default coder for a type
To set the default Coder for a
JavaPython
type for a particular pipeline, you obtain and modify the pipeline’s
CoderRegistry. You use the method
Pipeline.getCoderRegistry
coders.registry
to get the CoderRegistry object, and then use the method
CoderRegistry.registerCoder
CoderRegistry.register_coder
to register a new Coder for the target type.
To set the default Coder for a Go type you use the function beam.RegisterCoder to register a encoder and decoder functions for the target type.
However, built in types like int, string, float64, etc cannot have their coders override.
The following example code demonstrates how to set a default Coder, in this case
BigEndianIntegerCoder, for
Integerint
values for a pipeline.
The following example code demonstrates how to set a custom Coder for MyCustomType elements.
PipelineOptions options = PipelineOptionsFactory.create();
Pipeline p = Pipeline.create(options);
CoderRegistry cr = p.getCoderRegistry();
cr.registerCoder(Integer.class, BigEndianIntegerCoder.class);apache_beam.coders.registry.register_coder(int, BigEndianIntegerCoder)type MyCustomType struct{
...
}
// See documentation on beam.RegisterCoder for other supported coder forms.
func encode(MyCustomType) []byte { ... }
func decode(b []byte) MyCustomType { ... }
func init() {
beam.RegisterCoder(reflect.TypeOf((*MyCustomType)(nil)).Elem(), encode, decode)
}7.2.3. Annotating a custom data type with a default coder
If your pipeline program defines a custom data type, you can use the
@DefaultCoder annotation to specify the coder to use with that type.
By default, Beam will use SerializableCoder which uses Java serialization,
but it has drawbacks:
It is inefficient in encoding size and speed. See this comparison of Java serialization methods.
It is non-deterministic: it may produce different binary encodings for two equivalent objects.
For key/value pairs, the correctness of key-based operations (GroupByKey, Combine) and per-key State depends on having a deterministic coder for the key
You can use the @DefaultCoder annotation to set a new default as follows:
@DefaultCoder(AvroCoder.class)
public class MyCustomDataType {
...
}If you’ve created a custom coder to match your data type, and you want to use
the @DefaultCoder annotation, your coder class must implement a static
Coder.of(Class<T>) factory method.
public class MyCustomCoder implements Coder {
public static Coder<T> of(Class<T> clazz) {...}
...
}
@DefaultCoder(MyCustomCoder.class)
public class MyCustomDataType {
...
}The Beam SDK for PythonGo does not support annotating data types with a default coder. If you would like to set a default coder, use the method described in the previous section, Setting the default coder for a type.
8. Windowing
Windowing subdivides a PCollection according to the timestamps of its
individual elements. Transforms that aggregate multiple elements, such as
GroupByKey and Combine, work implicitly on a per-window basis — they process
each PCollection as a succession of multiple, finite windows, though the
entire collection itself may be of unbounded size.
A related concept, called triggers, determines when to emit the results of
aggregation as unbounded data arrives. You can use triggers to refine the
windowing strategy for your PCollection. Triggers allow you to deal with
late-arriving data or to provide early results. See the triggers
section for more information.
8.1. Windowing basics
Some Beam transforms, such as GroupByKey and Combine, group multiple
elements by a common key. Ordinarily, that grouping operation groups all of the
elements that have the same key within the entire data set. With an unbounded
data set, it is impossible to collect all of the elements, since new elements
are constantly being added and may be infinitely many (e.g. streaming data). If
you are working with unbounded PCollections, windowing is especially useful.
In the Beam model, any PCollection (including unbounded PCollections) can be
subdivided into logical windows. Each element in a PCollection is assigned to
one or more windows according to the PCollection’s windowing function, and
each individual window contains a finite number of elements. Grouping transforms
then consider each PCollection’s elements on a per-window basis. GroupByKey,
for example, implicitly groups the elements of a PCollection by key and
window.
Caution: Beam’s default windowing behavior is to assign all elements of a
PCollection to a single, global window and discard late data, even for
unbounded PCollections. Before you use a grouping transform such as
GroupByKey on an unbounded PCollection, you must do at least one of the
following:
- Set a non-global windowing function. See Setting your PCollection’s windowing function.
- Set a non-default trigger. This allows the global window to emit results under other conditions, since the default windowing behavior (waiting for all data to arrive) will never occur.
If you don’t set a non-global windowing function or a non-default trigger for
your unbounded PCollection and subsequently use a grouping transform such as
GroupByKey or Combine, your pipeline will generate an error upon
construction and your job will fail.
8.1.1. Windowing constraints
After you set the windowing function for a PCollection, the elements’ windows
are used the next time you apply a grouping transform to that PCollection.
Window grouping occurs on an as-needed basis. If you set a windowing function
using the Window transform, each element is assigned to a window, but the
windows are not considered until GroupByKey or Combine aggregates across a
window and key. This can have different effects on your pipeline. Consider the
example pipeline in the figure below:

Figure 3: Pipeline applying windowing
In the above pipeline, we create an unbounded PCollection by reading a set of
key/value pairs using KafkaIO, and then apply a windowing function to that
collection using the Window transform. We then apply a ParDo to the
collection, and then later group the result of that ParDo using GroupByKey.
The windowing function has no effect on the ParDo transform, because the
windows are not actually used until they’re needed for the GroupByKey.
Subsequent transforms, however, are applied to the result of the GroupByKey –
data is grouped by both key and window.
8.1.2. Windowing with bounded PCollections
You can use windowing with fixed-size data sets in bounded PCollections.
However, note that windowing considers only the implicit timestamps attached to
each element of a PCollection, and data sources that create fixed data sets
(such as TextIO) assign the same timestamp to every element. This means that
all the elements are by default part of a single, global window.
To use windowing with fixed data sets, you can assign your own timestamps to
each element. To assign timestamps to elements, use a ParDo transform with a
DoFn that outputs each element with a new timestamp (for example, the
WithTimestamps
transform in the Beam SDK for Java).
To illustrate how windowing with a bounded PCollection can affect how your
pipeline processes data, consider the following pipeline:

Figure 4: GroupByKey and ParDo without windowing, on a bounded collection.
In the above pipeline, we create a bounded PCollection by reading lines from a
file using TextIO. We then group the collection using GroupByKey,
and apply a ParDo transform to the grouped PCollection. In this example, the
GroupByKey creates a collection of unique keys, and then ParDo gets applied
exactly once per key.
Note that even if you don’t set a windowing function, there is still a window –
all elements in your PCollection are assigned to a single global window.
Now, consider the same pipeline, but using a windowing function:

Figure 5: GroupByKey and ParDo with windowing, on a bounded collection.
As before, the pipeline creates a bounded PCollection by reading lines from a
file. We then set a windowing function
for that PCollection. The GroupByKey transform groups the elements of the
PCollection by both key and window, based on the windowing function. The
subsequent ParDo transform gets applied multiple times per key, once for each
window.
8.2. Provided windowing functions
You can define different kinds of windows to divide the elements of your
PCollection. Beam provides several windowing functions, including:
- Fixed Time Windows
- Sliding Time Windows
- Per-Session Windows
- Single Global Window
- Calendar-based Windows (not supported by the Beam SDK for Python or Go)
You can also define your own WindowFn if you have a more complex need.
Note that each element can logically belong to more than one window, depending
on the windowing function you use. Sliding time windowing, for example, can
create overlapping windows wherein a single element can be assigned to multiple
windows. However, each element in a PCollection can only be in one window, so
if an element is assigned to multiple windows, the element is conceptually
duplicated into each of the windows and each element is identical except for its
window.
8.2.1. Fixed time windows
The simplest form of windowing is using fixed time windows: given a
timestamped PCollection which might be continuously updating, each window
might capture (for example) all elements with timestamps that fall into a 30
second interval.
A fixed time window represents a consistent duration, non overlapping time
interval in the data stream. Consider windows with a 30 second duration: all
of the elements in your unbounded PCollection with timestamp values from
0:00:00 up to (but not including) 0:00:30 belong to the first window, elements
with timestamp values from 0:00:30 up to (but not including) 0:01:00 belong to
the second window, and so on.
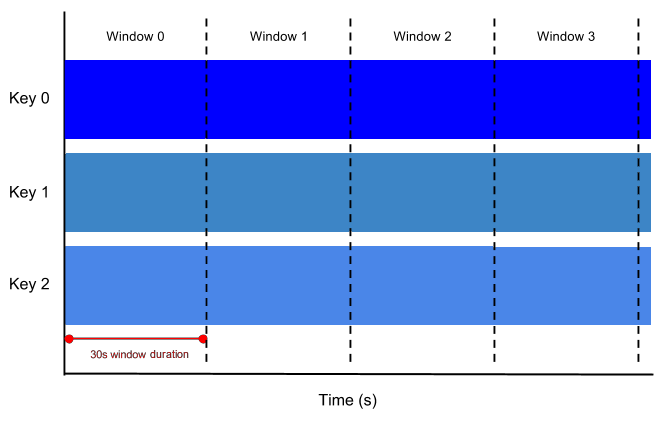
Figure 6: Fixed time windows, 30s in duration.
8.2.2. Sliding time windows
A sliding time window also represents time intervals in the data stream; however, sliding time windows can overlap. For example, each window might capture 60 seconds worth of data, but a new window starts every 30 seconds. The frequency with which sliding windows begin is called the period. Therefore, our example would have a window duration of 60 seconds and a period of 30 seconds.
Because multiple windows overlap, most elements in a data set will belong to more than one window. This kind of windowing is useful for taking running averages of data; using sliding time windows, you can compute a running average of the past 60 seconds’ worth of data, updated every 30 seconds, in our example.
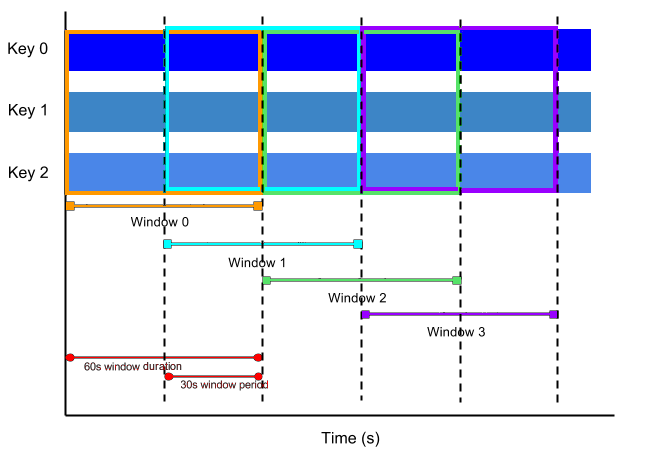
Figure 7: Sliding time windows, with 1 minute window duration and 30s window period.
8.2.3. Session windows
A session window function defines windows that contain elements that are within a certain gap duration of another element. Session windowing applies on a per-key basis and is useful for data that is irregularly distributed with respect to time. For example, a data stream representing user mouse activity may have long periods of idle time interspersed with high concentrations of clicks. If data arrives after the minimum specified gap duration time, this initiates the start of a new window.
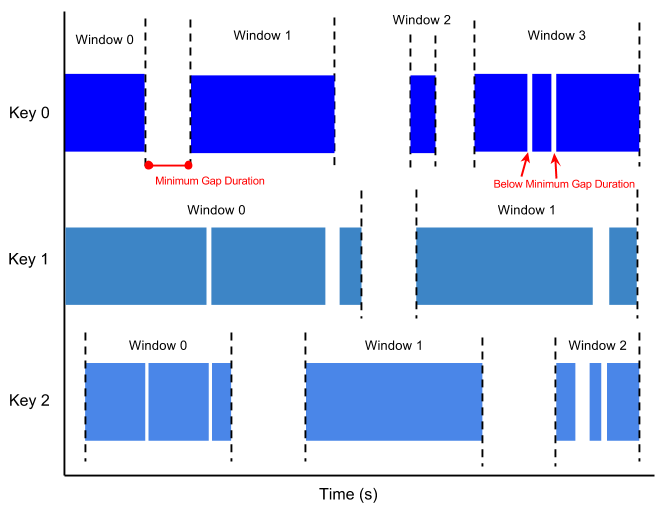
Figure 8: Session windows, with a minimum gap duration. Note how each data key has different windows, according to its data distribution.
8.2.4. The single global window
By default, all data in a PCollection is assigned to the single global window,
and late data is discarded. If your data set is of a fixed size, you can use the
global window default for your PCollection.
You can use the single global window if you are working with an unbounded data set
(e.g. from a streaming data source) but use caution when applying aggregating
transforms such as GroupByKey and Combine. The single global window with a
default trigger generally requires the entire data set to be available before
processing, which is not possible with continuously updating data. To perform
aggregations on an unbounded PCollection that uses global windowing, you
should specify a non-default trigger for that PCollection.
8.3. Setting your PCollection’s windowing function
You can set the windowing function for a PCollection by applying the Window
transform. When you apply the Window transform, you must provide a WindowFn.
The WindowFn determines the windowing function your PCollection will use for
subsequent grouping transforms, such as a fixed or sliding time window.
When you set a windowing function, you may also want to set a trigger for your
PCollection. The trigger determines when each individual window is aggregated
and emitted, and helps refine how the windowing function performs with respect
to late data and computing early results. See the triggers section
for more information.
In Beam YAML windowing specifications can also be placed directly on any
transform rather than requiring an explicit WindowInto transform.
8.3.1. Fixed-time windows
The following example code shows how to apply Window to divide a PCollection
into fixed windows, each 60 seconds in length:
PCollection<String> items = ...;
PCollection<String> fixedWindowedItems = items.apply(
Window.<String>into(FixedWindows.of(Duration.standardSeconds(60))));from apache_beam import window
fixed_windowed_items = (
items | 'window' >> beam.WindowInto(window.FixedWindows(60)))fixedWindowedItems := beam.WindowInto(s,
window.NewFixedWindows(60*time.Second),
items)pcoll
.apply(beam.windowInto(windowings.fixedWindows(60)))type: WindowInto
windowing:
type: fixed
size: 60s8.3.2. Sliding time windows
The following example code shows how to apply Window to divide a PCollection
into sliding time windows. Each window is 30 seconds in length, and a new window
begins every five seconds:
PCollection<String> items = ...;
PCollection<String> slidingWindowedItems = items.apply(
Window.<String>into(SlidingWindows.of(Duration.standardSeconds(30)).every(Duration.standardSeconds(5))));from apache_beam import window
sliding_windowed_items = (
items | 'window' >> beam.WindowInto(window.SlidingWindows(30, 5)))slidingWindowedItems := beam.WindowInto(s,
window.NewSlidingWindows(5*time.Second, 30*time.Second),
items)pcoll
.apply(beam.windowInto(windowings.slidingWindows(30, 5)))type: WindowInto
windowing:
type: sliding
size: 5m
period: 30s8.3.3. Session windows
The following example code shows how to apply Window to divide a PCollection
into session windows, where each session must be separated by a time gap of at
least 10 minutes (600 seconds):
PCollection<String> items = ...;
PCollection<String> sessionWindowedItems = items.apply(
Window.<String>into(Sessions.withGapDuration(Duration.standardSeconds(600))));from apache_beam import window
session_windowed_items = (
items | 'window' >> beam.WindowInto(window.Sessions(10 * 60)))sessionWindowedItems := beam.WindowInto(s,
window.NewSessions(600*time.Second),
items)pcoll
.apply(beam.windowInto(windowings.sessions(10 * 60)))type: WindowInto
windowing:
type: sessions
gap: 60sNote that the sessions are per-key — each key in the collection will have its own session groupings depending on the data distribution.
8.3.4. Single global window
If your PCollection is bounded (the size is fixed), you can assign all the
elements to a single global window. The following example code shows how to set
a single global window for a PCollection:
PCollection<String> items = ...;
PCollection<String> batchItems = items.apply(
Window.<String>into(new GlobalWindows()));from apache_beam import window
global_windowed_items = (
items | 'window' >> beam.WindowInto(window.GlobalWindows()))globalWindowedItems := beam.WindowInto(s,
window.NewGlobalWindows(),
items)pcoll
.apply(beam.windowInto(windowings.globalWindows()))type: WindowInto
windowing:
type: global8.4. Watermarks and late data
In any data processing system, there is a certain amount of lag between the time a data event occurs (the “event time”, determined by the timestamp on the data element itself) and the time the actual data element gets processed at any stage in your pipeline (the “processing time”, determined by the clock on the system processing the element). In addition, there are no guarantees that data events will appear in your pipeline in the same order that they were generated.
For example, let’s say we have a PCollection that’s using fixed-time
windowing, with windows that are five minutes long. For each window, Beam must
collect all the data with an event time timestamp in the given window range
(between 0:00 and 4:59 in the first window, for instance). Data with timestamps
outside that range (data from 5:00 or later) belong to a different window.
However, data isn’t always guaranteed to arrive in a pipeline in time order, or to always arrive at predictable intervals. Beam tracks a watermark, which is the system’s notion of when all data in a certain window can be expected to have arrived in the pipeline. Once the watermark progresses past the end of a window, any further element that arrives with a timestamp in that window is considered late data.
From our example, suppose we have a simple watermark that assumes approximately 30s of lag time between the data timestamps (the event time) and the time the data appears in the pipeline (the processing time), then Beam would close the first window at 5:30. If a data record arrives at 5:34, but with a timestamp that would put it in the 0:00-4:59 window (say, 3:38), then that record is late data.
Note: For simplicity, we’ve assumed that we’re using a very straightforward
watermark that estimates the lag time. In practice, your PCollection’s data
source determines the watermark, and watermarks can be more precise or complex.
Beam’s default windowing configuration tries to determine when all data has
arrived (based on the type of data source) and then advances the watermark past
the end of the window. This default configuration does not allow late data.
Triggers allow you to modify and refine the windowing strategy for
a PCollection. You can use triggers to decide when each individual window
aggregates and reports its results, including how the window emits late
elements.
8.4.1. Managing late data
You can allow late data by invoking the .withAllowedLateness operation when
you set your PCollection’s windowing strategy. The following code example
demonstrates a windowing strategy that will allow late data up to two days after
the end of a window.
PCollection<String> items = ...;
PCollection<String> fixedWindowedItems = items.apply(
Window.<String>into(FixedWindows.of(Duration.standardMinutes(1)))
.withAllowedLateness(Duration.standardDays(2))); pc = [Initial PCollection]
pc | beam.WindowInto(
FixedWindows(60),
trigger=trigger_fn,
accumulation_mode=accumulation_mode,
timestamp_combiner=timestamp_combiner,
allowed_lateness=Duration(seconds=2*24*60*60)) # 2 dayswindowedItems := beam.WindowInto(s,
window.NewFixedWindows(1*time.Minute), items,
beam.AllowedLateness(2*24*time.Hour), // 2 days
)When you set .withAllowedLateness on a PCollection, that allowed lateness
propagates forward to any subsequent PCollection derived from the first
PCollection you applied allowed lateness to. If you want to change the allowed
lateness later in your pipeline, you must do so explicitly by applying
Window.configure().withAllowedLateness().
8.5. Adding timestamps to a PCollection’s elements
An unbounded source provides a timestamp for each element. Depending on your unbounded source, you may need to configure how the timestamp is extracted from the raw data stream.
However, bounded sources (such as a file from TextIO) do not provide
timestamps. If you need timestamps, you must add them to your PCollection’s
elements.
You can assign new timestamps to the elements of a PCollection by applying a
ParDo transform that outputs new elements with timestamps that you
set.
An example might be if your pipeline reads log records from an input file, and
each log record includes a timestamp field; since your pipeline reads the
records in from a file, the file source doesn’t assign timestamps automatically.
You can parse the timestamp field from each record and use a ParDo transform
with a DoFn to attach the timestamps to each element in your PCollection.
PCollection<LogEntry> unstampedLogs = ...;
PCollection<LogEntry> stampedLogs =
unstampedLogs.apply(ParDo.of(new DoFn<LogEntry, LogEntry>() {
public void processElement(@Element LogEntry element, OutputReceiver<LogEntry> out) {
// Extract the timestamp from log entry we're currently processing.
Instant logTimeStamp = extractTimeStampFromLogEntry(element);
// Use OutputReceiver.outputWithTimestamp (rather than
// OutputReceiver.output) to emit the entry with timestamp attached.
out.outputWithTimestamp(element, logTimeStamp);
}
}));class AddTimestampDoFn(beam.DoFn):
def process(self, element):
# Extract the numeric Unix seconds-since-epoch timestamp to be
# associated with the current log entry.
unix_timestamp = extract_timestamp_from_log_entry(element)
# Wrap and emit the current entry and new timestamp in a
# TimestampedValue.
yield beam.window.TimestampedValue(element, unix_timestamp)
timestamped_items = items | 'timestamp' >> beam.ParDo(AddTimestampDoFn())// AddTimestampDoFn extracts an event time from a LogEntry.
func AddTimestampDoFn(element LogEntry, emit func(beam.EventTime, LogEntry)) {
et := extractEventTime(element)
// Defining an emitter with beam.EventTime as the first parameter
// allows the DoFn to set the event time for the emitted element.
emit(mtime.FromTime(et), element)
}
// Use the DoFn with ParDo as normal.
stampedLogs := beam.ParDo(s, AddTimestampDoFn, unstampedLogs)type: AssignTimestamps
config:
language: python
timestamp:
callable: |
import datetime
def extract_timestamp(x):
raw = datetime.datetime.strptime(
x.external_timestamp_field, "%Y-%m-%d")
return raw.astimezone(datetime.timezone.utc) 9. Triggers
Note: The Trigger API in the Beam SDK for Go is currently experimental and subject to change.
When collecting and grouping data into windows, Beam uses triggers to determine when to emit the aggregated results of each window (referred to as a pane). If you use Beam’s default windowing configuration and default trigger, Beam outputs the aggregated result when it estimates all data has arrived, and discards all subsequent data for that window.
You can set triggers for your PCollections to change this default behavior.
Beam provides a number of pre-built triggers that you can set:
- Event time triggers. These triggers operate on the event time, as indicated by the timestamp on each data element. Beam’s default trigger is event time-based.
- Processing time triggers. These triggers operate on the processing time – the time when the data element is processed at any given stage in the pipeline.
- Data-driven triggers. These triggers operate by examining the data as it arrives in each window, and firing when that data meets a certain property. Currently, data-driven triggers only support firing after a certain number of data elements.
- Composite triggers. These triggers combine multiple triggers in various ways.
At a high level, triggers provide two additional capabilities compared to simply outputting at the end of a window:
- Triggers allow Beam to emit early results, before all the data in a given window has arrived. For example, emitting after a certain amount of time elapses, or after a certain number of elements arrives.
- Triggers allow processing of late data by triggering after the event time watermark passes the end of the window.
These capabilities allow you to control the flow of your data and balance between different factors depending on your use case:
- Completeness: How important is it to have all of your data before you compute your result?
- Latency: How long do you want to wait for data? For example, do you wait until you think you have all data? Do you process data as it arrives?
- Cost: How much compute power/money are you willing to spend to lower the latency?
For example, a system that requires time-sensitive updates might use a strict time-based trigger that emits a window every N seconds, valuing promptness over data completeness. A system that values data completeness more than the exact timing of results might choose to use Beam’s default trigger, which fires at the end of the window.
You can also set a trigger for an unbounded PCollection that uses a single
global window for its windowing function. This can be useful when
you want your pipeline to provide periodic updates on an unbounded data set —
for example, a running average of all data provided to the present time, updated
every N seconds or every N elements.
9.1. Event time triggers
The AfterWatermark trigger operates on event time. The AfterWatermark
trigger emits the contents of a window after the
watermark passes the end of the window, based on the
timestamps attached to the data elements. The watermark is a global progress
metric, and is Beam’s notion of input completeness within your pipeline at any
given point. AfterWatermark.pastEndOfWindow()
AfterWatermark
trigger.AfterEndOfWindow only fires when the
watermark passes the end of the window.
In addition, you can configure triggers that fire if your pipeline receives data before or after the end of the window.
The following example shows a billing scenario, and uses both early and late firings:
// Create a bill at the end of the month.
AfterWatermark.pastEndOfWindow()
// During the month, get near real-time estimates.
.withEarlyFirings(
AfterProcessingTime
.pastFirstElementInPane()
.plusDuration(Duration.standardMinutes(1))
// Fire on any late data so the bill can be corrected.
.withLateFirings(AfterPane.elementCountAtLeast(1))AfterWatermark(
early=AfterProcessingTime(delay=1 * 60), late=AfterCount(1))trigger := trigger.AfterEndOfWindow().
EarlyFiring(trigger.AfterProcessingTime().
PlusDelay(60 * time.Second)).
LateFiring(trigger.Repeat(trigger.AfterCount(1)))9.1.1. Default trigger
The default trigger for a PCollection is based on event time, and emits the
results of the window when the Beam’s watermark passes the end of the window,
and then fires each time late data arrives.
However, if you are using both the default windowing configuration and the default trigger, the default trigger emits exactly once, and late data is discarded. This is because the default windowing configuration has an allowed lateness value of 0. See the Handling Late Data section for information about modifying this behavior.
9.2. Processing time triggers
The AfterProcessingTime trigger operates on processing time. For example,
the AfterProcessingTime.pastFirstElementInPane()
AfterProcessingTime
trigger.AfterProcessingTime() trigger emits a window
after a certain amount of processing time has passed since data was received.
The processing time is determined by the system clock, rather than the data
element’s timestamp.
The AfterProcessingTime trigger is useful for triggering early results from a
window, particularly a window with a large time frame such as a single global
window.
9.3. Data-driven triggers
Beam provides one data-driven trigger,
AfterPane.elementCountAtLeast()
AfterCount
trigger.AfterCount(). This trigger works on an element
count; it fires after the current pane has collected at least N elements. This
allows a window to emit early results (before all the data has accumulated),
which can be particularly useful if you are using a single global window.
It is important to note that if, for example, you specify
.elementCountAtLeast(50)
AfterCount(50)
trigger.AfterCount(50) and only 32 elements arrive,
those 32 elements sit around forever. If the 32 elements are important to you,
consider using composite triggers to combine multiple
conditions. This allows you to specify multiple firing conditions such as “fire
either when I receive 50 elements, or every 1 second”.
9.4. Setting a trigger
When you set a windowing function for a PCollection by using the
WindowWindowIntobeam.WindowInto
transform, you can also specify a trigger.
You set the trigger(s) for a PCollection by invoking the method
.triggering() on the result of your Window.into() transform. This code
sample sets a time-based trigger for a PCollection, which emits results one
minute after the first element in that window has been processed. The last line
in the code sample, .discardingFiredPanes(), sets the window’s accumulation
mode.
You set the trigger(s) for a PCollection by setting the trigger parameter
when you use the WindowInto transform. This code sample sets a time-based
trigger for a PCollection, which emits results one minute after the first
element in that window has been processed. The accumulation_mode parameter
sets the window’s accumulation mode.
You set the trigger(s) for a PCollection by passing in the beam.Trigger parameter
when you use the beam.WindowInto transform. This code sample sets a time-based
trigger for a PCollection, which emits results one minute after the first
element in that window has been processed.
The beam.AccumulationMode parameter sets the window’s accumulation mode.
PCollection<String> pc = ...;
pc.apply(Window.<String>into(FixedWindows.of(1, TimeUnit.MINUTES))
.triggering(AfterProcessingTime.pastFirstElementInPane()
.plusDelayOf(Duration.standardMinutes(1)))
.discardingFiredPanes()); pcollection | WindowInto(
FixedWindows(1 * 60),
trigger=AfterProcessingTime(1 * 60),
accumulation_mode=AccumulationMode.DISCARDING)windowedItems := beam.WindowInto(s,
window.NewFixedWindows(1*time.Minute), pcollection,
beam.Trigger(trigger.AfterProcessingTime().
PlusDelay(1*time.Minute)),
beam.AllowedLateness(30*time.Minute),
beam.PanesDiscard(),
)9.4.1. Window accumulation modes
When you specify a trigger, you must also set the window’s accumulation mode. When a trigger fires, it emits the current contents of the window as a pane. Since a trigger can fire multiple times, the accumulation mode determines whether the system accumulates the window panes as the trigger fires, or discards them.
To set a window to accumulate the panes that are produced when the trigger
fires, invoke.accumulatingFiredPanes() when you set the trigger. To set a
window to discard fired panes, invoke .discardingFiredPanes().
To set a window to accumulate the panes that are produced when the trigger
fires, set the accumulation_mode parameter to ACCUMULATING when you set the
trigger. To set a window to discard fired panes, set accumulation_mode to
DISCARDING.
To set a window to accumulate the panes that are produced when the trigger
fires, set the beam.AccumulationMode parameter to beam.PanesAccumulate() when you set the
trigger. To set a window to discard fired panes, set beam.AccumulationMode to
beam.PanesDiscard().
Let’s look an example that uses a PCollection with fixed-time windowing and a
data-based trigger. This is something you might do if, for example, each window
represented a ten-minute running average, but you wanted to display the current
value of the average in a UI more frequently than every ten minutes. We’ll
assume the following conditions:
- The
PCollectionuses 10-minute fixed-time windows. - The
PCollectionhas a repeating trigger that fires every time 3 elements arrive.
The following diagram shows data events for key X as they arrive in the PCollection and are assigned to windows. To keep the diagram a bit simpler, we’ll assume that the events all arrive in the pipeline in order.

9.4.1.1. Accumulating mode
If our trigger is set to accumulating mode, the trigger emits the following values each time it fires. Keep in mind that the trigger fires every time three elements arrive:
First trigger firing: [5, 8, 3]
Second trigger firing: [5, 8, 3, 15, 19, 23]
Third trigger firing: [5, 8, 3, 15, 19, 23, 9, 13, 10]
9.4.1.2. Discarding mode
If our trigger is set to discarding mode, the trigger emits the following values on each firing:
First trigger firing: [5, 8, 3]
Second trigger firing: [15, 19, 23]
Third trigger firing: [9, 13, 10]
9.4.2. Handling late data
If you want your pipeline to process data that arrives after the watermark passes the end of the window, you can apply an allowed lateness when you set your windowing configuration. This gives your trigger the opportunity to react to the late data. If allowed lateness is set, the default trigger will emit new results immediately whenever late data arrives.
You set the allowed lateness by using .withAllowedLateness()
allowed_lateness
beam.AllowedLateness()
when you set your windowing function:
PCollection<String> pc = ...;
pc.apply(Window.<String>into(FixedWindows.of(1, TimeUnit.MINUTES))
.triggering(AfterProcessingTime.pastFirstElementInPane()
.plusDelayOf(Duration.standardMinutes(1)))
.withAllowedLateness(Duration.standardMinutes(30)); pc = [Initial PCollection]
pc | beam.WindowInto(
FixedWindows(60),
trigger=AfterProcessingTime(60),
allowed_lateness=1800) # 30 minutes
| ...allowedToBeLateItems := beam.WindowInto(s,
window.NewFixedWindows(1*time.Minute), pcollection,
beam.Trigger(trigger.AfterProcessingTime().
PlusDelay(1*time.Minute)),
beam.AllowedLateness(30*time.Minute),
)This allowed lateness propagates to all PCollections derived as a result of
applying transforms to the original PCollection. If you want to change the
allowed lateness later in your pipeline, you can apply
Window.configure().withAllowedLateness()
allowed_lateness
beam.AllowedLateness()
again, explicitly.
9.5. Composite triggers
You can combine multiple triggers to form composite triggers, and can specify a trigger to emit results repeatedly, at most once, or under other custom conditions.
9.5.1. Composite trigger types
Beam includes the following composite triggers:
- You can add additional early firings or late firings to
AfterWatermark.pastEndOfWindowvia.withEarlyFiringsand.withLateFirings. Repeatedly.foreverspecifies a trigger that executes forever. Any time the trigger’s conditions are met, it causes a window to emit results and then resets and starts over. It can be useful to combineRepeatedly.foreverwith.orFinallyto specify a condition that causes the repeating trigger to stop.AfterEach.inOrdercombines multiple triggers to fire in a specific sequence. Each time a trigger in the sequence emits a window, the sequence advances to the next trigger.AfterFirsttakes multiple triggers and emits the first time any of its argument triggers is satisfied. This is equivalent to a logical OR operation for multiple triggers.AfterAlltakes multiple triggers and emits when all of its argument triggers are satisfied. This is equivalent to a logical AND operation for multiple triggers.orFinallycan serve as a final condition to cause any trigger to fire one final time and never fire again.
9.5.2. Composition with AfterWatermark
Some of the most useful composite triggers fire a single time when Beam estimates that all the data has arrived (i.e. when the watermark passes the end of the window) combined with either, or both, of the following:
Speculative firings that precede the watermark passing the end of the window to allow faster processing of partial results.
Late firings that happen after the watermark passes the end of the window, to allow for handling late-arriving data
You can express this pattern using AfterWatermark. For example, the following
example trigger code fires on the following conditions:
On Beam’s estimate that all the data has arrived (the watermark passes the end of the window)
Any time late data arrives, after a ten-minute delay
- After two days, we assume no more data of interest will arrive, and the trigger stops executing
.apply(Window
.configure()
.triggering(AfterWatermark
.pastEndOfWindow()
.withLateFirings(AfterProcessingTime
.pastFirstElementInPane()
.plusDelayOf(Duration.standardMinutes(10))))
.withAllowedLateness(Duration.standardDays(2)));pcollection | WindowInto(
FixedWindows(1 * 60),
trigger=AfterWatermark(late=AfterProcessingTime(10 * 60)),
allowed_lateness=2 * 24 * 60 * 60,
accumulation_mode=AccumulationMode.DISCARDING)compositeTriggerItems := beam.WindowInto(s,
window.NewFixedWindows(1*time.Minute), pcollection,
beam.Trigger(trigger.AfterEndOfWindow().
LateFiring(trigger.AfterProcessingTime().
PlusDelay(10*time.Minute))),
beam.AllowedLateness(2*24*time.Hour),
)9.5.3. Other composite triggers
You can also build other sorts of composite triggers. The following example code shows a simple composite trigger that fires whenever the pane has at least 100 elements, or after a minute.
Repeatedly.forever(AfterFirst.of(
AfterPane.elementCountAtLeast(100),
AfterProcessingTime.pastFirstElementInPane().plusDelayOf(Duration.standardMinutes(1))))pcollection | WindowInto(
FixedWindows(1 * 60),
trigger=Repeatedly(
AfterAny(AfterCount(100), AfterProcessingTime(1 * 60))),
accumulation_mode=AccumulationMode.DISCARDING)10. Metrics
In the Beam model, metrics provide some insight into the current state of a user pipeline, potentially while the pipeline is running. There could be different reasons for that, for instance:
- Check the number of errors encountered while running a specific step in the pipeline;
- Monitor the number of RPCs made to backend service;
- Retrieve an accurate count of the number of elements that have been processed;
- …and so on.
10.1. The main concepts of Beam metrics
- Named. Each metric has a name which consists of a namespace and an actual name. The namespace can be used to differentiate between multiple metrics with the same name and also allows querying for all metrics within a specific namespace.
- Scoped. Each metric is reported against a specific step in the pipeline, indicating what code was running when the metric was incremented.
- Dynamically Created. Metrics may be created during runtime without pre-declaring them, in much the same way a logger could be created. This makes it easier to produce metrics in utility code and have them usefully reported.
- Degrade Gracefully. If a runner doesn’t support some part of reporting metrics, the fallback behavior is to drop the metric updates rather than failing the pipeline. If a runner doesn’t support some part of querying metrics, the runner will not return the associated data.
Reported metrics are implicitly scoped to the transform within the pipeline that reported them. This allows reporting the same metric name in multiple places and identifying the value each transform reported, as well as aggregating the metric across the entire pipeline.
Note: It is runner-dependent whether metrics are accessible during pipeline execution or only after jobs have completed.
10.2. Types of metrics
There are three types of metrics that are supported for the moment: Counter, Distribution and
Gauge.
In the Beam SDK for Go, a context.Context provided by the framework must be passed to the metric
or the metric value will not be recorded. The framework will automatically provide a valid
context.Context to ProcessElement and similar methods when it’s the first parameter.
Counter: A metric that reports a single long value and can be incremented or decremented.
Counter counter = Metrics.counter( "namespace", "counter1");
@ProcessElement
public void processElement(ProcessContext context) {
// count the elements
counter.inc();
...
}var counter = beam.NewCounter("namespace", "counter1")
func (fn *MyDoFn) ProcessElement(ctx context.Context, ...) {
// count the elements
counter.Inc(ctx, 1)
...
}from apache_beam import metrics
class MyDoFn(beam.DoFn):
def __init__(self):
self.counter = metrics.Metrics.counter("namespace", "counter1")
def process(self, element):
self.counter.inc()
yield elementDistribution: A metric that reports information about the distribution of reported values.
Distribution distribution = Metrics.distribution( "namespace", "distribution1");
@ProcessElement
public void processElement(ProcessContext context) {
Integer element = context.element();
// create a distribution (histogram) of the values
distribution.update(element);
...
}var distribution = beam.NewDistribution("namespace", "distribution1")
func (fn *MyDoFn) ProcessElement(ctx context.Context, v int64, ...) {
// create a distribution (histogram) of the values
distribution.Update(ctx, v)
...
}class MyDoFn(beam.DoFn):
def __init__(self):
self.distribution = metrics.Metrics.distribution("namespace", "distribution1")
def process(self, element):
self.distribution.update(element)
yield elementGauge: A metric that reports the latest value out of reported values. Since metrics are collected from many workers the value may not be the absolute last, but one of the latest values.
Gauge gauge = Metrics.gauge( "namespace", "gauge1");
@ProcessElement
public void processElement(ProcessContext context) {
Integer element = context.element();
// create a gauge (latest value received) of the values
gauge.set(element);
...
}var gauge = beam.NewGauge("namespace", "gauge1")
func (fn *MyDoFn) ProcessElement(ctx context.Context, v int64, ...) {
// create a gauge (latest value received) of the values
gauge.Set(ctx, v)
...
}class MyDoFn(beam.DoFn):
def __init__(self):
self.gauge = metrics.Metrics.gauge("namespace", "gauge1")
def process(self, element):
self.gauge.set(element)
yield element10.3. Querying metrics
PipelineResult has a method metrics() which returns a MetricResults object that allows
accessing metrics. The main method available in MetricResults allows querying for all metrics
matching a given filter.
beam.PipelineResult has a method Metrics() which returns a metrics.Results object that allows
accessing metrics. The main method available in metrics.Results allows querying for all metrics
matching a given filter. It takes in a predicate with a SingleResult parameter type, which can
be used for custom filters.
PipelineResult has a metrics method that returns a MetricResults object. The MetricResults object lets you
access metrics. The main method available in the MetricResults object, query, lets you
query all metrics that match a given filter. The query method takes in a MetricsFilter object that you can
use to filter by several different criteria. Querying a MetricResults object returns
a dictionary of lists of MetricResult objects, with the dictionary organizing them by type,
for example, Counter, Distribution, and Gauge. The MetricResult object contains a result function
that gets the value of the metric and contains a key property. The key property contains information about
the namespace and the name of the metric.
public interface PipelineResult {
MetricResults metrics();
}
public abstract class MetricResults {
public abstract MetricQueryResults queryMetrics(@Nullable MetricsFilter filter);
}
public interface MetricQueryResults {
Iterable<MetricResult<Long>> getCounters();
Iterable<MetricResult<DistributionResult>> getDistributions();
Iterable<MetricResult<GaugeResult>> getGauges();
}
public interface MetricResult<T> {
MetricName getName();
String getStep();
T getCommitted();
T getAttempted();
}func queryMetrics(pr beam.PipelineResult, ns, n string) metrics.QueryResults {
return pr.Metrics().Query(func(r beam.MetricResult) bool {
return r.Namespace() == ns && r.Name() == n
})
}class PipelineResult:
def metrics(self) -> MetricResults:
"""Returns a the metric results from the pipeline."""
class MetricResults:
def query(self, filter: MetricsFilter) -> Dict[str, List[MetricResult]]:
"""Filters the results against the specified filter."""
class MetricResult:
def result(self):
"""Returns the value of the metric."""10.4. Using metrics in pipeline
Below, there is a simple example of how to use a Counter metric in a user pipeline.
// creating a pipeline with custom metrics DoFn
pipeline
.apply(...)
.apply(ParDo.of(new MyMetricsDoFn()));
pipelineResult = pipeline.run().waitUntilFinish(...);
// request the metric called "counter1" in namespace called "namespace"
MetricQueryResults metrics =
pipelineResult
.metrics()
.queryMetrics(
MetricsFilter.builder()
.addNameFilter(MetricNameFilter.named("namespace", "counter1"))
.build());
// print the metric value - there should be only one line because there is only one metric
// called "counter1" in the namespace called "namespace"
for (MetricResult<Long> counter: metrics.getCounters()) {
System.out.println(counter.getName() + ":" + counter.getAttempted());
}
public class MyMetricsDoFn extends DoFn<Integer, Integer> {
private final Counter counter = Metrics.counter( "namespace", "counter1");
@ProcessElement
public void processElement(ProcessContext context) {
// count the elements
counter.inc();
context.output(context.element());
}
}func addMetricDoFnToPipeline(s beam.Scope, input beam.PCollection) beam.PCollection {
return beam.ParDo(s, &MyMetricsDoFn{}, input)
}
func executePipelineAndGetMetrics(ctx context.Context, p *beam.Pipeline) (metrics.QueryResults, error) {
pr, err := beam.Run(ctx, runner, p)
if err != nil {
return metrics.QueryResults{}, err
}
// Request the metric called "counter1" in namespace called "namespace"
ms := pr.Metrics().Query(func(r beam.MetricResult) bool {
return r.Namespace() == "namespace" && r.Name() == "counter1"
})
// Print the metric value - there should be only one line because there is
// only one metric called "counter1" in the namespace called "namespace"
for _, c := range ms.Counters() {
fmt.Println(c.Namespace(), "-", c.Name(), ":", c.Committed)
}
return ms, nil
}
type MyMetricsDoFn struct {
counter beam.Counter
}
func init() {
beam.RegisterType(reflect.TypeOf((*MyMetricsDoFn)(nil)))
}
func (fn *MyMetricsDoFn) Setup() {
// While metrics can be defined in package scope or dynamically
// it's most efficient to include them in the DoFn.
fn.counter = beam.NewCounter("namespace", "counter1")
}
func (fn *MyMetricsDoFn) ProcessElement(ctx context.Context, v beam.V, emit func(beam.V)) {
// count the elements
fn.counter.Inc(ctx, 1)
emit(v)
}class MyMetricsDoFn(beam.DoFn):
def __init__(self):
super().__init__()
self.counter = metrics.Metrics.counter("namespace", "counter1")
def process(self, element):
self.counter.inc()
yield element
with beam.Pipeline() as p:
p | beam.Create([1, 2, 3]) | beam.ParDo(MyMetricsDoFn())
metrics_filter = metrics.MetricsFilter().with_name("counter1")
query_result = p.result.metrics().query(metrics_filter)
for metric in query_result["counters"]:
print(metric)10.5. Export metrics
Beam metrics can be exported to external sinks. If a metrics sink is set up in the configuration, the runner will push metrics to it at a default 5s period. The configuration is held in the MetricsOptions class. It contains push period configuration and also sink specific options such as type and URL. As for now only the REST HTTP and the Graphite sinks are supported and only Flink and Spark runners support metrics export.
Also Beam metrics are exported to inner Spark and Flink dashboards to be consulted in their respective UI.
11. State and Timers
Beam’s windowing and triggering facilities provide a powerful abstraction for grouping and aggregating unbounded input data based on timestamps. However there are aggregation use cases for which developers may require a higher degree of control than provided by windows and triggers. Beam provides an API for manually managing per-key state, allowing for fine-grained control over aggregations.
Beam’s state API models state per key. To use the state API, you start out with a keyed PCollection, which in Java
is modeled as a PCollection<KV<K, V>>. A ParDo processing this PCollection can now declare state variables. Inside
the ParDo these state variables can be used to write or update state for the current key or to read previous state
written for that key. State is always fully scoped only to the current processing key.
Windowing can still be used together with stateful processing. All state for a key is scoped to the current window. This means that the first time a key is seen for a given window any state reads will return empty, and that a runner can garbage collect state when a window is completed. It’s also often useful to use Beam’s windowed aggregations prior to the stateful operator. For example, using a combiner to preaggregate data, and then storing aggregated data inside of state. Merging windows are not currently supported when using state and timers.
Sometimes stateful processing is used to implement state-machine style processing inside a DoFn. When doing this,
care must be taken to remember that the elements in input PCollection have no guaranteed order and to ensure that the
program logic is resilient to this. Unit tests written using the DirectRunner will shuffle the order of element
processing, and are recommended to test for correctness.
In Java, DoFn declares states to be accessed by creating final StateSpec member variables representing each state. Each
state must be named using the StateId annotation; this name is unique to a ParDo in the graph and has no relation
to other nodes in the graph. A DoFn can declare multiple state variables.
In Python, DoFn declares states to be accessed by creating StateSpec class member variables representing each state. Each
StateSpec is initialized with a name, this name is unique to a ParDo in the graph and has no relation
to other nodes in the graph. A DoFn can declare multiple state variables.
In Go, DoFn declares states to be accessed by creating state struct member variables representing each state. Each
state variable is initialized with a key, this key is unique to a ParDo in the graph and has no relation
to other nodes in the graph. If no name is supplied, the key defaults to the member variable’s name.
A DoFn can declare multiple state variables.
Note: The Beam SDK for Typescript does not yet support a State and Timer API, but it is possible to use these features from cross-language pipelines (see below).
11.1. Types of state
Beam provides several types of state:
ValueState
A ValueState is a scalar state value. For each key in the input, a ValueState will store a typed value that can be
read and modified inside the DoFn’s @ProcessElement or @OnTimer methods. If the type of the ValueState has a coder
registered, then Beam will automatically infer the coder for the state value. Otherwise, a coder can be explicitly
specified when creating the ValueState. For example, the following ParDo creates a single state variable that
accumulates the number of elements seen.
Note: ValueState is called ReadModifyWriteState in the Python SDK.
PCollection<KV<String, ValueT>> perUser = readPerUser();
perUser.apply(ParDo.of(new DoFn<KV<String, ValueT>, OutputT>() {
@StateId("state") private final StateSpec<ValueState<Integer>> numElements = StateSpecs.value();
@ProcessElement public void process(@StateId("state") ValueState<Integer> state) {
// Read the number element seen so far for this user key.
// state.read() returns null if it was never set. The below code allows us to have a default value of 0.
int currentValue = MoreObjects.firstNonNull(state.read(), 0);
// Update the state.
state.write(currentValue + 1);
}
}));// valueStateFn keeps track of the number of elements seen.
type valueStateFn struct {
Val state.Value[int]
}
func (s *valueStateFn) ProcessElement(p state.Provider, book string, word string, emitWords func(string)) error {
// Get the value stored in our state
val, ok, err := s.Val.Read(p)
if err != nil {
return err
}
if !ok {
s.Val.Write(p, 1)
} else {
s.Val.Write(p, val+1)
}
if val > 10000 {
// Example of clearing and starting again with an empty bag
s.Val.Clear(p)
}
return nil
}Beam also allows explicitly specifying a coder for ValueState values. For example:
PCollection<KV<String, ValueT>> perUser = readPerUser();
perUser.apply(ParDo.of(new DoFn<KV<String, ValueT>, OutputT>() {
@StateId("state") private final StateSpec<ValueState<MyType>> numElements = StateSpecs.value(new MyTypeCoder());
...
}));class ReadModifyWriteStateDoFn(DoFn):
STATE_SPEC = ReadModifyWriteStateSpec('num_elements', VarIntCoder())
def process(self, element, state=DoFn.StateParam(STATE_SPEC)):
# Read the number element seen so far for this user key.
current_value = state.read() or 0
state.write(current_value+1)
_ = (p | 'Read per user' >> ReadPerUser()
| 'state pardo' >> beam.ParDo(ReadModifyWriteStateDoFn()))type valueStateDoFn struct {
Val state.Value[MyCustomType]
}
func encode(m MyCustomType) []byte {
return m.Bytes()
}
func decode(b []byte) MyCustomType {
return MyCustomType{}.FromBytes(b)
}
func init() {
beam.RegisterCoder(reflect.TypeOf((*MyCustomType)(nil)).Elem(), encode, decode)
}const pcoll = root.apply(
beam.create([
{ key: "a", value: 1 },
{ key: "b", value: 10 },
{ key: "a", value: 100 },
])
);
const result: PCollection<number> = await pcoll
.apply(
withCoderInternal(
new KVCoder(new StrUtf8Coder(), new VarIntCoder())
)
)
.applyAsync(
pythonTransform(
// Construct a new Transform from source.
"__constructor__",
[
pythonCallable(`
# Define a DoFn to be used below.
class ReadModifyWriteStateDoFn(beam.DoFn):
STATE_SPEC = beam.transforms.userstate.ReadModifyWriteStateSpec(
'num_elements', beam.coders.VarIntCoder())
def process(self, element, state=beam.DoFn.StateParam(STATE_SPEC)):
current_value = state.read() or 0
state.write(current_value + 1)
yield current_value + 1
class MyPythonTransform(beam.PTransform):
def expand(self, pcoll):
return pcoll | beam.ParDo(ReadModifyWriteStateDoFn())
`),
],
// Keyword arguments to pass to the transform, if any.
{},
// Output type if it cannot be inferred
{ requestedOutputCoders: { output: new VarIntCoder() } }
)
);CombiningState
CombiningState allows you to create a state object that is updated using a Beam combiner. For example, the previous
ValueState example could be rewritten to use CombiningState
PCollection<KV<String, ValueT>> perUser = readPerUser();
perUser.apply(ParDo.of(new DoFn<KV<String, ValueT>, OutputT>() {
@StateId("state") private final StateSpec<CombiningState<Integer, int[], Integer>> numElements =
StateSpecs.combining(Sum.ofIntegers());
@ProcessElement public void process(@StateId("state") ValueState<Integer> state) {
state.add(1);
}
}));class CombiningStateDoFn(DoFn):
SUM_TOTAL = CombiningValueStateSpec('total', sum)
def process(self, element, state=DoFn.StateParam(SUM_TOTAL)):
state.add(1)
_ = (p | 'Read per user' >> ReadPerUser()
| 'Combine state pardo' >> beam.ParDo(CombiningStateDofn()))// combiningStateFn keeps track of the number of elements seen.
type combiningStateFn struct {
// types are the types of the accumulator, input, and output respectively
Val state.Combining[int, int, int]
}
func (s *combiningStateFn) ProcessElement(p state.Provider, book string, word string, emitWords func(string)) error {
// Get the value stored in our state
val, _, err := s.Val.Read(p)
if err != nil {
return err
}
s.Val.Add(p, 1)
if val > 10000 {
// Example of clearing and starting again with an empty bag
s.Val.Clear(p)
}
return nil
}
func combineState(s beam.Scope, input beam.PCollection) beam.PCollection {
// ...
// CombineFn param can be a simple fn like this or a structural CombineFn
cFn := state.MakeCombiningState[int, int, int]("stateKey", func(a, b int) int {
return a + b
})
combined := beam.ParDo(s, combiningStateFn{Val: cFn}, input)
// ...
BagState
A common use case for state is to accumulate multiple elements. BagState allows for accumulating an unordered set
of elements. This allows for addition of elements to the collection without requiring the reading of the entire
collection first, which is an efficiency gain. In addition, runners that support paged reads can allow individual
bags larger than available memory.
PCollection<KV<String, ValueT>> perUser = readPerUser();
perUser.apply(ParDo.of(new DoFn<KV<String, ValueT>, OutputT>() {
@StateId("state") private final StateSpec<BagState<ValueT>> numElements = StateSpecs.bag();
@ProcessElement public void process(
@Element KV<String, ValueT> element,
@StateId("state") BagState<ValueT> state) {
// Add the current element to the bag for this key.
state.add(element.getValue());
if (shouldFetch()) {
// Occasionally we fetch and process the values.
Iterable<ValueT> values = state.read();
processValues(values);
state.clear(); // Clear the state for this key.
}
}
}));class BagStateDoFn(DoFn):
ALL_ELEMENTS = BagStateSpec('buffer', coders.VarIntCoder())
def process(self, element_pair, state=DoFn.StateParam(ALL_ELEMENTS)):
state.add(element_pair[1])
if should_fetch():
all_elements = list(state.read())
process_values(all_elements)
state.clear()
_ = (p | 'Read per user' >> ReadPerUser()
| 'Bag state pardo' >> beam.ParDo(BagStateDoFn()))// bagStateFn only emits words that haven't been seen
type bagStateFn struct {
Bag state.Bag[string]
}
func (s *bagStateFn) ProcessElement(p state.Provider, book, word string, emitWords func(string)) error {
// Get all values we've written to this bag state in this window.
vals, ok, err := s.Bag.Read(p)
if err != nil {
return err
}
if !ok || !contains(vals, word) {
emitWords(word)
s.Bag.Add(p, word)
}
if len(vals) > 10000 {
// Example of clearing and starting again with an empty bag
s.Bag.Clear(p)
}
return nil
}SetState
A common use case for state is to accumulate unique elements. SetState allows for accumulating an unordered set
of elements.
PCollection<KV<String, ValueT>> perUser = readPerUser();
perUser.apply(ParDo.of(new DoFn<KV<String, ValueT>, OutputT>() {
@StateId("state") private final StateSpec<SetState<ValueT>> uniqueElements = StateSpecs.bag();
@ProcessElement public void process(
@Element KV<String, ValueT> element,
@StateId("state") SetState<ValueT> state) {
// Add the current element to the set state for this key.
state.add(element.getValue());
if (shouldFetch()) {
// Occasionally we fetch and process the values.
Iterable<ValueT> values = state.read();
processValues(values);
state.clear(); // Clear the state for this key.
}
}
}));class SetStateDoFn(DoFn):
UNIQUE_ELEMENTS = SetStateSpec('buffer', coders.VarIntCoder())
def process(self, element_pair, state=DoFn.StateParam(UNIQUE_ELEMENTS)):
state.add(element_pair[1])
if should_fetch():
unique_elements = list(state.read())
process_values(unique_elements)
state.clear()
_ = (p | 'Read per user' >> ReadPerUser()
| 'Set state pardo' >> beam.ParDo(SetStateDoFn()))OrderListState
OrderListState state that accumulate elements in an ordered List.
PCollection<KV<String, ValueT>> perUser = readPerUser();
perUser.apply(ParDo.of(new DoFn<KV<String, ValueT>, OutputT>() {
@StateId("state") private final StateSpec<OrderedListState<ValueT>> uniqueElements = StateSpecs.bag();
@ProcessElement public void process(
@Element KV<String, ValueT> element,
@StateId("state") SetState<ValueT> state) {
// Add the current element to the set state for this key.
state.add(element.getValue());
if (shouldFetch()) {
// Occasionally we fetch and process the values.
Iterable<ValueT> values = state.read();
processValues(values);
state.clear(); // Clear the state for this key.
}
}
}));class OrderedListStateDoFn(DoFn):
STATE_ELEMENTS = OrderedListStateSpec('buffer', coders.ListCoder())
def process(self, element_pair, state=DoFn.StateParam(STATE_ELEMENTS)):
state.add(element_pair[1])
if should_fetch():
elements = list(state.read())
process_values(elements)
state.clear()
_ = (p | 'Read per user' >> ReadPerUser()
| 'Set state pardo' >> beam.ParDo(OrderedListStateDoFn()))// orderedListStateFn tracks timestamped events per key and reads a sub-range.
type orderedListStateFn struct {
Events state.OrderedList[string]
}
func (s *orderedListStateFn) ProcessElement(p state.Provider, key string, event string, emit func(string)) error {
// Add the event with the current timestamp as the sort key.
now := time.Now().UnixMilli()
s.Events.Add(p, now, event)
// Read a sub-range of events (e.g. the last hour).
oneHourAgo := now - 3600000
entries, ok, err := s.Events.ReadRange(p, oneHourAgo, now+1)
if err != nil {
return err
}
if ok {
for _, e := range entries {
emit(fmt.Sprintf("%s@%d", e.Value, e.SortKey))
}
}
// Clear events older than one hour.
s.Events.ClearRange(p, 0, oneHourAgo)
return nil
}MultimapState
MultimapState allow one key mapped to different values but the key value could be unordered.
@StateId(stateId)
private final StateSpec<MultimapState<String, Integer>> multimapState =
StateSpecs.multimap(StringUtf8Coder.of(), VarIntCoder.of());
@ProcessElement
public void processElement(
ProcessContext c,
@Element KV<String, KV<String, Integer>> element,
@StateId(stateId) MultimapState<String, Integer> state,
@StateId(countStateId) CombiningState<Integer, int[], Integer> count,
OutputReceiver<KV<String, Integer>> r) {
ReadableState<Boolean> isEmptyView = state.isEmpty();
boolean isEmpty = state.isEmpty().read();
KV<String, Integer> value = element.getValue();
state.put(value.getKey(), value.getValue());
}11.2. Deferred state reads
When a DoFn contains multiple state specifications, reading each one in order can be slow. Calling the read() function
on a state can cause the runner to perform a blocking read. Performing multiple blocking reads in sequence adds latency
to element processing. If you know that a state will always be read, you can annotate it as @AlwaysFetched, and then the
runner can prefetch all of the states necessary. For example:
PCollection<KV<String, ValueT>> perUser = readPerUser();
perUser.apply(ParDo.of(new DoFn<KV<String, ValueT>, OutputT>() {
@StateId("state1") private final StateSpec<ValueState<Integer>> state1 = StateSpecs.value();
@StateId("state2") private final StateSpec<ValueState<String>> state2 = StateSpecs.value();
@StateId("state3") private final StateSpec<BagState<ValueT>> state3 = StateSpecs.bag();
@ProcessElement public void process(
@AlwaysFetched @StateId("state1") ValueState<Integer> state1,
@AlwaysFetched @StateId("state2") ValueState<String> state2,
@AlwaysFetched @StateId("state3") BagState<ValueT> state3) {
state1.read();
state2.read();
state3.read();
}
}));This is not supported yet, see https://github.com/apache/beam/issues/20739.This is not supported yet, see https://github.com/apache/beam/issues/22964.
If however there are code paths in which the states are not fetched, then annotating with @AlwaysFetched will add unnecessary fetching for those paths. In this case, the readLater method allows the runner to know that the state will be read in the future, allowing multiple state reads to be batched together.
PCollection<KV<String, ValueT>> perUser = readPerUser();
perUser.apply(ParDo.of(new DoFn<KV<String, ValueT>, OutputT>() {
@StateId("state1") private final StateSpec<ValueState<Integer>> state1 = StateSpecs.value();
@StateId("state2") private final StateSpec<ValueState<String>> state2 = StateSpecs.value();
@StateId("state3") private final StateSpec<BagState<ValueT>> state3 = StateSpecs.bag();
@ProcessElement public void process(
@StateId("state1") ValueState<Integer> state1,
@StateId("state2") ValueState<String> state2,
@StateId("state3") BagState<ValueT> state3) {
if (/* should read state */) {
state1.readLater();
state2.readLater();
state3.readLater();
}
// The runner can now batch all three states into a single read, reducing latency.
processState1(state1.read());
processState2(state2.read());
processState3(state3.read());
}
}));11.3. Timers
Beam provides a per-key timer callback API. This allows for delayed processing of data stored using the state API. Timers can be set to callback at either an event-time or a processing-time timestamp. Every timer is identified with a TimerId. A given timer for a key can only be set for a single timestamp. Calling set on a timer overwrites the previous firing time for that key’s timer.
11.3.1. Event-time timers
Event-time timers fire when the input watermark for the DoFn passes the time at which the timer is set, meaning that the runner believes that there are no more elements to be processed with timestamps before the timer timestamp. This allows for event-time aggregations.
PCollection<KV<String, ValueT>> perUser = readPerUser();
perUser.apply(ParDo.of(new DoFn<KV<String, ValueT>, OutputT>() {
@StateId("state") private final StateSpec<ValueState<Integer>> state = StateSpecs.value();
@TimerId("timer") private final TimerSpec timer = TimerSpecs.timer(TimeDomain.EVENT_TIME);
@ProcessElement public void process(
@Element KV<String, ValueT> element,
@Timestamp Instant elementTs,
@StateId("state") ValueState<Integer> state,
@TimerId("timer") Timer timer) {
...
// Set an event-time timer to the element timestamp.
timer.set(elementTs);
}
@OnTimer("timer") public void onTimer() {
//Process timer.
}
}));class EventTimerDoFn(DoFn):
ALL_ELEMENTS = BagStateSpec('buffer', coders.VarIntCoder())
TIMER = TimerSpec('timer', TimeDomain.WATERMARK)
def process(self,
element_pair,
t = DoFn.TimestampParam,
buffer = DoFn.StateParam(ALL_ELEMENTS),
timer = DoFn.TimerParam(TIMER)):
buffer.add(element_pair[1])
# Set an event-time timer to the element timestamp.
timer.set(t)
@on_timer(TIMER)
def expiry_callback(self, buffer = DoFn.StateParam(ALL_ELEMENTS)):
buffer.clear()
_ = (p | 'Read per user' >> ReadPerUser()
| 'EventTime timer pardo' >> beam.ParDo(EventTimerDoFn()))type eventTimerDoFn struct {
State state.Value[int64]
Timer timers.EventTime
}
func (fn *eventTimerDoFn) ProcessElement(ts beam.EventTime, sp state.Provider, tp timers.Provider, book, word string, emitWords func(string)) {
// ...
// Set an event-time timer to the element timestamp.
fn.Timer.Set(tp, ts.ToTime())
// ...
}
func (fn *eventTimerDoFn) OnTimer(sp state.Provider, tp timers.Provider, w beam.Window, key string, timer timers.Context, emitWords func(string)) {
switch timer.Family {
case fn.Timer.Family:
// process callback for this timer
}
}
func AddEventTimeDoFn(s beam.Scope, in beam.PCollection) beam.PCollection {
return beam.ParDo(s, &eventTimerDoFn{
// Timers are given family names so their callbacks can be handled independantly.
Timer: timers.InEventTime("processWatermark"),
State: state.MakeValueState[int64]("latest"),
}, in)
}11.3.2. Processing-time timers
Processing-time timers fire when the real wall-clock time passes. This is often used to create larger batches of data before processing. It can also be used to schedule events that should occur at a specific time. Just like with event-time timers, processing-time timers are per key - each key has a separate copy of the timer.
While processing-time timers can be set to an absolute timestamp, it is very common to set them to an offset relative
to the current time. In Java, the Timer.offset and Timer.setRelative methods can be used to accomplish this.
PCollection<KV<String, ValueT>> perUser = readPerUser();
perUser.apply(ParDo.of(new DoFn<KV<String, ValueT>, OutputT>() {
@TimerId("timer") private final TimerSpec timer = TimerSpecs.timer(TimeDomain.PROCESSING_TIME);
@ProcessElement public void process(@TimerId("timer") Timer timer) {
...
// Set a timer to go off 30 seconds in the future.
timer.offset(Duration.standardSeconds(30)).setRelative();
}
@OnTimer("timer") public void onTimer() {
//Process timer.
}
}));class ProcessingTimerDoFn(DoFn):
ALL_ELEMENTS = BagStateSpec('buffer', coders.VarIntCoder())
TIMER = TimerSpec('timer', TimeDomain.REAL_TIME)
def process(self,
element_pair,
buffer = DoFn.StateParam(ALL_ELEMENTS),
timer = DoFn.TimerParam(TIMER)):
buffer.add(element_pair[1])
# Set a timer to go off 30 seconds in the future.
timer.set(Timestamp.now() + Duration(seconds=30))
@on_timer(TIMER)
def expiry_callback(self, buffer = DoFn.StateParam(ALL_ELEMENTS)):
# Process timer.
buffer.clear()
_ = (p | 'Read per user' >> ReadPerUser()
| 'ProcessingTime timer pardo' >> beam.ParDo(ProcessingTimerDoFn()))type processingTimerDoFn struct {
Timer timers.ProcessingTime
}
func (fn *processingTimerDoFn) ProcessElement(sp state.Provider, tp timers.Provider, book, word string, emitWords func(string)) {
// ...
// Set a timer to go off 30 seconds in the future.
fn.Timer.Set(tp, time.Now().Add(30*time.Second))
// ...
}
func (fn *processingTimerDoFn) OnTimer(sp state.Provider, tp timers.Provider, w beam.Window, key string, timer timers.Context, emitWords func(string)) {
switch timer.Family {
case fn.Timer.Family:
// process callback for this timer
}
}
func AddProcessingTimeDoFn(s beam.Scope, in beam.PCollection) beam.PCollection {
return beam.ParDo(s, &processingTimerDoFn{
// Timers are given family names so their callbacks can be handled independantly.
Timer: timers.InProcessingTime("timer"),
}, in)
}11.3.3. Dynamic timer tags
Beam also supports dynamically setting a timer tag using TimerMap in the Java SDK. This allows for setting multiple different timers
in a DoFn and allowing for the timer tags to be dynamically chosen - e.g. based on data in the input elements. A
timer with a specific tag can only be set to a single timestamp, so setting the timer again has the effect of
overwriting the previous expiration time for the timer with that tag. Each TimerMap is identified with a timer family
id, and timers in different timer families are independent.
In the Python SDK, a dynamic timer tag can be specified while calling set() or clear(). By default, the timer
tag is an empty string if not specified.
PCollection<KV<String, ValueT>> perUser = readPerUser();
perUser.apply(ParDo.of(new DoFn<KV<String, ValueT>, OutputT>() {
@TimerFamily("actionTimers") private final TimerSpec timer =
TimerSpecs.timerMap(TimeDomain.EVENT_TIME);
@ProcessElement public void process(
@Element KV<String, ValueT> element,
@Timestamp Instant elementTs,
@TimerFamily("actionTimers") TimerMap timers) {
timers.set(element.getValue().getActionType(), elementTs);
}
@OnTimerFamily("actionTimers") public void onTimer(@TimerId String timerId) {
LOG.info("Timer fired with id " + timerId);
}
}));class TimerDoFn(DoFn):
ALL_ELEMENTS = BagStateSpec('buffer', coders.VarIntCoder())
TIMER = TimerSpec('timer', TimeDomain.REAL_TIME)
def process(self,
element_pair,
buffer = DoFn.StateParam(ALL_ELEMENTS),
timer = DoFn.TimerParam(TIMER)):
buffer.add(element_pair[1])
# Set a timer to go off 30 seconds in the future with dynamic timer tag 'first_timer'.
# And set a timer to go off 60 seconds in the future with dynamic timer tag 'second_timer'.
timer.set(Timestamp.now() + Duration(seconds=30), dynamic_timer_tag='first_timer')
timer.set(Timestamp.now() + Duration(seconds=60), dynamic_timer_tag='second_timer')
# Note that a timer can also be explicitly cleared if previously set with a dynamic timer tag:
# timer.clear(dynamic_timer_tag=...)
@on_timer(TIMER)
def expiry_callback(self, buffer = DoFn.StateParam(ALL_ELEMENTS), timer_tag=DoFn.DynamicTimerTagParam):
# Process timer, the dynamic timer tag associated with expiring timer can be read back with DoFn.DynamicTimerTagParam.
buffer.clear()
yield (timer_tag, 'fired')
_ = (p | 'Read per user' >> ReadPerUser()
| 'ProcessingTime timer pardo' >> beam.ParDo(TimerDoFn()))type hasAction interface {
Action() string
}
type dynamicTagsDoFn[V hasAction] struct {
Timer timers.EventTime
}
func (fn *dynamicTagsDoFn[V]) ProcessElement(ts beam.EventTime, tp timers.Provider, key string, value V, emitWords func(string)) {
// ...
// Set a timer to go off 30 seconds in the future.
fn.Timer.Set(tp, ts.ToTime(), timers.WithTag(value.Action()))
// ...
}
func (fn *dynamicTagsDoFn[V]) OnTimer(tp timers.Provider, w beam.Window, key string, timer timers.Context, emitWords func(string)) {
switch timer.Family {
case fn.Timer.Family:
tag := timer.Tag // Do something with fired tag
_ = tag
}
}
func AddDynamicTimerTagsDoFn[V hasAction](s beam.Scope, in beam.PCollection) beam.PCollection {
return beam.ParDo(s, &dynamicTagsDoFn[V]{
Timer: timers.InEventTime("actionTimers"),
}, in)
}11.3.4. Timer output timestamps
By default, event-time timers will hold the output watermark of the ParDo to the timestamp of the timer. This means
that if a timer is set to 12pm, any windowed aggregations or event-time timers later in the pipeline graph that finish
after 12pm will not expire. The timestamp of the timer is also the default output timestamp for the timer callback. This
means that any elements output from the onTimer method will have a timestamp equal to the timestamp of the timer firing.
For processing-time timers, the default output timestamp and watermark hold is the value of the input watermark at the
time the timer was set.
In some cases, a DoFn needs to output timestamps earlier than the timer expiration time, and therefore also needs to hold its output watermark to those timestamps. For example, consider the following pipeline that temporarily batches records into state, and sets a timer to drain the state. This code may appear correct, but will not work properly.
PCollection<KV<String, ValueT>> perUser = readPerUser();
perUser.apply(ParDo.of(new DoFn<KV<String, ValueT>, OutputT>() {
@StateId("elementBag") private final StateSpec<BagState<ValueT>> elementBag = StateSpecs.bag();
@StateId("timerSet") private final StateSpec<ValueState<Boolean>> timerSet = StateSpecs.value();
@TimerId("outputState") private final TimerSpec timer = TimerSpecs.timer(TimeDomain.PROCESSING_TIME);
@ProcessElement public void process(
@Element KV<String, ValueT> element,
@StateId("elementBag") BagState<ValueT> elementBag,
@StateId("timerSet") ValueState<Boolean> timerSet,
@TimerId("outputState") Timer timer) {
// Add the current element to the bag for this key.
elementBag.add(element.getValue());
if (!MoreObjects.firstNonNull(timerSet.read(), false)) {
// If the timer is not current set, then set it to go off in a minute.
timer.offset(Duration.standardMinutes(1)).setRelative();
timerSet.write(true);
}
}
@OnTimer("outputState") public void onTimer(
@StateId("elementBag") BagState<ValueT> elementBag,
@StateId("timerSet") ValueState<Boolean> timerSet,
OutputReceiver<ValueT> output) {
for (ValueT bufferedElement : elementBag.read()) {
// Output each element.
output.outputWithTimestamp(bufferedElement, bufferedElement.timestamp());
}
elementBag.clear();
// Note that the timer has now fired.
timerSet.clear();
}
}));type badTimerOutputTimestampsFn[V any] struct {
ElementBag state.Bag[V]
TimerSet state.Value[bool]
OutputState timers.ProcessingTime
}
func (fn *badTimerOutputTimestampsFn[V]) ProcessElement(sp state.Provider, tp timers.Provider, key string, value V, emit func(string)) error {
// Add the current element to the bag for this key.
if err := fn.ElementBag.Add(sp, value); err != nil {
return err
}
set, _, err := fn.TimerSet.Read(sp)
if err != nil {
return err
}
if !set {
fn.OutputState.Set(tp, time.Now().Add(1*time.Minute))
fn.TimerSet.Write(sp, true)
}
return nil
}
func (fn *badTimerOutputTimestampsFn[V]) OnTimer(sp state.Provider, tp timers.Provider, w beam.Window, key string, timer timers.Context, emit func(string)) error {
switch timer.Family {
case fn.OutputState.Family:
vs, _, err := fn.ElementBag.Read(sp)
if err != nil {
return err
}
for _, v := range vs {
// Output each element
emit(fmt.Sprintf("%v", v))
}
fn.ElementBag.Clear(sp)
// Note that the timer has now fired.
fn.TimerSet.Clear(sp)
}
return nil
}The problem with this code is that the ParDo is buffering elements, however nothing is preventing the watermark from advancing past the timestamp of those elements, so all those elements might be dropped as late data. In order to prevent this from happening, an output timestamp needs to be set on the timer to prevent the watermark from advancing past the timestamp of the minimum element. The following code demonstrates this.
PCollection<KV<String, ValueT>> perUser = readPerUser();
perUser.apply(ParDo.of(new DoFn<KV<String, ValueT>, OutputT>() {
// The bag of elements accumulated.
@StateId("elementBag") private final StateSpec<BagState<ValueT>> elementBag = StateSpecs.bag();
// The timestamp of the timer set.
@StateId("timerTimestamp") private final StateSpec<ValueState<Long>> timerTimestamp = StateSpecs.value();
// The minimum timestamp stored in the bag.
@StateId("minTimestampInBag") private final StateSpec<CombiningState<Long, long[], Long>>
minTimestampInBag = StateSpecs.combining(Min.ofLongs());
@TimerId("outputState") private final TimerSpec timer = TimerSpecs.timer(TimeDomain.PROCESSING_TIME);
@ProcessElement public void process(
@Element KV<String, ValueT> element,
@StateId("elementBag") BagState<ValueT> elementBag,
@AlwaysFetched @StateId("timerTimestamp") ValueState<Long> timerTimestamp,
@AlwaysFetched @StateId("minTimestampInBag") CombiningState<Long, long[], Long> minTimestamp,
@TimerId("outputState") Timer timer) {
// Add the current element to the bag for this key.
elementBag.add(element.getValue());
// Keep track of the minimum element timestamp currently stored in the bag.
minTimestamp.add(element.getValue().timestamp());
// If the timer is already set, then reset it at the same time but with an updated output timestamp (otherwise
// we would keep resetting the timer to the future). If there is no timer set, then set one to expire in a minute.
Long timerTimestampMs = timerTimestamp.read();
Instant timerToSet = (timerTimestamp.isEmpty().read())
? Instant.now().plus(Duration.standardMinutes(1)) : new Instant(timerTimestampMs);
// Setting the outputTimestamp to the minimum timestamp in the bag holds the watermark to that timestamp until the
// timer fires. This allows outputting all the elements with their timestamp.
timer.withOutputTimestamp(minTimestamp.read()).s et(timerToSet).
timerTimestamp.write(timerToSet.getMillis());
}
@OnTimer("outputState") public void onTimer(
@StateId("elementBag") BagState<ValueT> elementBag,
@StateId("timerTimestamp") ValueState<Long> timerTimestamp,
OutputReceiver<ValueT> output) {
for (ValueT bufferedElement : elementBag.read()) {
// Output each element.
output.outputWithTimestamp(bufferedElement, bufferedElement.timestamp());
}
// Note that the timer has now fired.
timerTimestamp.clear();
}
}));Timer output timestamps is not yet supported in Python SDK. See https://github.com/apache/beam/issues/20705.type element[V any] struct {
Timestamp int64
Value V
}
type goodTimerOutputTimestampsFn[V any] struct {
ElementBag state.Bag[element[V]] // The bag of elements accumulated.
TimerTimerstamp state.Value[int64] // The timestamp of the timer set.
MinTimestampInBag state.Combining[int64, int64, int64] // The minimum timestamp stored in the bag.
OutputState timers.ProcessingTime // The timestamp of the timer.
}
func (fn *goodTimerOutputTimestampsFn[V]) ProcessElement(et beam.EventTime, sp state.Provider, tp timers.Provider, key string, value V, emit func(beam.EventTime, string)) error {
// ...
// Add the current element to the bag for this key, and preserve the event time.
if err := fn.ElementBag.Add(sp, element[V]{Timestamp: et.Milliseconds(), Value: value}); err != nil {
return err
}
// Keep track of the minimum element timestamp currently stored in the bag.
fn.MinTimestampInBag.Add(sp, et.Milliseconds())
// If the timer is already set, then reset it at the same time but with an updated output timestamp (otherwise
// we would keep resetting the timer to the future). If there is no timer set, then set one to expire in a minute.
ts, ok, _ := fn.TimerTimerstamp.Read(sp)
var tsToSet time.Time
if ok {
tsToSet = time.UnixMilli(ts)
} else {
tsToSet = time.Now().Add(1 * time.Minute)
}
minTs, _, _ := fn.MinTimestampInBag.Read(sp)
outputTs := time.UnixMilli(minTs)
// Setting the outputTimestamp to the minimum timestamp in the bag holds the watermark to that timestamp until the
// timer fires. This allows outputting all the elements with their timestamp.
fn.OutputState.Set(tp, tsToSet, timers.WithOutputTimestamp(outputTs))
fn.TimerTimerstamp.Write(sp, tsToSet.UnixMilli())
return nil
}
func (fn *goodTimerOutputTimestampsFn[V]) OnTimer(sp state.Provider, tp timers.Provider, w beam.Window, key string, timer timers.Context, emit func(beam.EventTime, string)) error {
switch timer.Family {
case fn.OutputState.Family:
vs, _, err := fn.ElementBag.Read(sp)
if err != nil {
return err
}
for _, v := range vs {
// Output each element with their timestamp
emit(beam.EventTime(v.Timestamp), fmt.Sprintf("%v", v.Value))
}
fn.ElementBag.Clear(sp)
// Note that the timer has now fired.
fn.TimerTimerstamp.Clear(sp)
}
return nil
}
func AddTimedOutputBatching[V any](s beam.Scope, in beam.PCollection) beam.PCollection {
return beam.ParDo(s, &goodTimerOutputTimestampsFn[V]{
ElementBag: state.MakeBagState[element[V]]("elementBag"),
TimerTimerstamp: state.MakeValueState[int64]("timerTimestamp"),
MinTimestampInBag: state.MakeCombiningState[int64, int64, int64]("minTimestampInBag", func(a, b int64) int64 {
if a < b {
return a
}
return b
}),
OutputState: timers.InProcessingTime("outputState"),
}, in)
}11.3.5 Timer Callback Parameters
The following parameters are provided for the timer callback methods which could be used for debuging.
- Window: This can provide the window object to access the window start and end time.
- Timestamp: This can provide the timestamp at which the timer was set to fire.
- Key: The key was associated with the element.
@OnTimer(END_OF_WINDOW_ID)
public void onWindowTimer(
OutputReceiver<KV<K, Iterable<InputT>>> receiver,
@Timestamp Instant timestamp,
@Key K key,
@StateId(BATCH_ID) BagState<InputT> batch,
BoundedWindow window) {
// You can write your debug code here.
LOG.debug(
"*** END OF WINDOW *** for key {} and timer timestamp {} in windows {}",
key.toString(),
timestamp.toString(),
window.toString());
}class TimerDoFn(DoFn):
BAG_STATE = BagStateSpec('buffer', coders.VarIntCoder())
TIMER = TimerSpec('timer', TimeDomain.REAL_TIME)
def process(self,
element_pair,
bag_state=DoFn.StateParam(BAG_STATE),
timer=DoFn.TimerParam(TIMER)):
...
@on_timer(TIMER)
def expiry_callback(self,
bag_state=DoFn.StateParam(BAG_STATE),
window=DoFn.WindowParam,
timestamp=DoFn.TimestampParam,
key=DoFn.KeyParam):
# You can potentlly print these parameter to get more information for debugging.
bag_state.clear()
log.info(f"Key: {key}, timestamp: {timestamp}, window: {window}")
yield (timer_tag, 'fired')func (s *Stateful) ProcessElement(ctx context.Context, ts beam.EventTime, sp state.Provider, tp timers.Provider, key, word string, _ func(beam.EventTime, string, string)) error {
s.ElementBag.Add(sp, word)
s.MinTime.Add(sp, int64(ts))
// Process the element here.
}
func (s *Stateful) OnTimer(ctx context.Context, ts beam.EventTime, sp state.Provider, tp timers.Provider, key string, timer timers.Context, emit func(beam.EventTime, string, string)) {
log.Infof(ctx, "Timer fired for key %q, for family %q and tag %q", key, timer.Family, timer.Tag)
}11.4. Garbage collecting state
Per-key state needs to be garbage collected, or eventually the increasing size of state may negatively impact performance. There are two common strategies for garbage collecting state.
11.4.1. Using windows for garbage collection
All state and timers for a key is scoped to the window it is in. This means that depending on the timestamp of the input element the ParDo will see different values for the state depending on the window that element falls into. In addition, once the input watermark passes the end of the window, the runner should garbage collect all state for that window. (note: if allowed lateness is set to a positive value for the window, the runner must wait for the watermark to pass the end of the window plus the allowed lateness before garbage collecting state). This can be used as a garbage-collection strategy.
For example, given the following:
PCollection<KV<String, ValueT>> perUser = readPerUser();
perUser.apply(Window.into(CalendarWindows.days(1)
.withTimeZone(DateTimeZone.forID("America/Los_Angeles"))));
.apply(ParDo.of(new DoFn<KV<String, ValueT>, OutputT>() {
@StateId("state") private final StateSpec<ValueState<Integer>> state = StateSpecs.value();
...
@ProcessElement public void process(@Timestamp Instant ts, @StateId("state") ValueState<Integer> state) {
// The state is scoped to a calendar day window. That means that if the input timestamp ts is after
// midnight PST, then a new copy of the state will be seen for the next day.
}
}));class StateDoFn(DoFn):
ALL_ELEMENTS = BagStateSpec('buffer', coders.VarIntCoder())
def process(self,
element_pair,
buffer = DoFn.StateParam(ALL_ELEMENTS)):
...
_ = (p | 'Read per user' >> ReadPerUser()
| 'Windowing' >> beam.WindowInto(FixedWindows(60 * 60 * 24))
| 'DoFn' >> beam.ParDo(StateDoFn())) items := beam.ParDo(s, statefulDoFn{
S: state.MakeValueState[int]("S"),
}, elements)
out := beam.WindowInto(s, window.NewFixedWindows(24*time.Hour), items)This ParDo stores state per day. Once the pipeline is done processing data for a given day, all the state for that
day is garbage collected.
11.4.1. Using timers For garbage collection
In some cases, it is difficult to find a windowing strategy that models the desired garbage-collection strategy. For example, a common desire is to garbage collect state for a key once no activity has been seen on the key for some time. This can be done by updating a timer that garbage collects state. For example
PCollection<KV<String, ValueT>> perUser = readPerUser();
perUser.apply(ParDo.of(new DoFn<KV<String, ValueT>, OutputT>() {
// The state for the key.
@StateId("state") private final StateSpec<ValueState<ValueT>> state = StateSpecs.value();
// The maximum element timestamp seen so far.
@StateId("maxTimestampSeen") private final StateSpec<CombiningState<Long, long[], Long>>
maxTimestamp = StateSpecs.combining(Max.ofLongs());
@TimerId("gcTimer") private final TimerSpec gcTimer = TimerSpecs.timer(TimeDomain.EVENT_TIME);
@ProcessElement public void process(
@Element KV<String, ValueT> element,
@Timestamp Instant ts,
@StateId("state") ValueState<ValueT> state,
@StateId("maxTimestampSeen") CombiningState<Long, long[], Long> maxTimestamp,
@TimerId("gcTimer") gcTimer) {
updateState(state, element);
maxTimestamp.add(ts.getMillis());
// Set the timer to be one hour after the maximum timestamp seen. This will keep overwriting the same timer, so
// as long as there is activity on this key the state will stay active. Once the key goes inactive for one hour's
// worth of event time (as measured by the watermark), then the gc timer will fire.
Instant expirationTime = new Instant(maxTimestamp.read()).plus(Duration.standardHours(1));
timer.set(expirationTime);
}
@OnTimer("gcTimer") public void onTimer(
@StateId("state") ValueState<ValueT> state,
@StateId("maxTimestampSeen") CombiningState<Long, long[], Long> maxTimestamp) {
// Clear all state for the key.
state.clear();
maxTimestamp.clear();
}
}class UserDoFn(DoFn):
ALL_ELEMENTS = BagStateSpec('state', coders.VarIntCoder())
MAX_TIMESTAMP = CombiningValueStateSpec('max_timestamp_seen', max)
TIMER = TimerSpec('gc-timer', TimeDomain.WATERMARK)
def process(self,
element,
t = DoFn.TimestampParam,
state = DoFn.StateParam(ALL_ELEMENTS),
max_timestamp = DoFn.StateParam(MAX_TIMESTAMP),
timer = DoFn.TimerParam(TIMER)):
update_state(state, element)
max_timestamp.add(t.micros)
# Set the timer to be one hour after the maximum timestamp seen. This will keep overwriting the same timer, so
# as long as there is activity on this key the state will stay active. Once the key goes inactive for one hour's
# worth of event time (as measured by the watermark), then the gc timer will fire.
expiration_time = Timestamp(micros=max_timestamp.read()) + Duration(seconds=60*60)
timer.set(expiration_time)
@on_timer(TIMER)
def expiry_callback(self,
state = DoFn.StateParam(ALL_ELEMENTS),
max_timestamp = DoFn.StateParam(MAX_TIMESTAMP)):
state.clear()
max_timestamp.clear()
_ = (p | 'Read per user' >> ReadPerUser()
| 'User DoFn' >> beam.ParDo(UserDoFn()))type timerGarbageCollectionFn[V any] struct {
State state.Value[V] // The state for the key.
MaxTimestampInBag state.Combining[int64, int64, int64] // The maximum element timestamp seen so far.
GcTimer timers.EventTime // The timestamp of the timer.
}
func (fn *timerGarbageCollectionFn[V]) ProcessElement(et beam.EventTime, sp state.Provider, tp timers.Provider, key string, value V, emit func(beam.EventTime, string)) {
updateState(sp, fn.State, key, value)
fn.MaxTimestampInBag.Add(sp, et.Milliseconds())
// Set the timer to be one hour after the maximum timestamp seen. This will keep overwriting the same timer, so
// as long as there is activity on this key the state will stay active. Once the key goes inactive for one hour's
// worth of event time (as measured by the watermark), then the gc timer will fire.
maxTs, _, _ := fn.MaxTimestampInBag.Read(sp)
expirationTime := time.UnixMilli(maxTs).Add(1 * time.Hour)
fn.GcTimer.Set(tp, expirationTime)
}
func (fn *timerGarbageCollectionFn[V]) OnTimer(sp state.Provider, tp timers.Provider, w beam.Window, key string, timer timers.Context, emit func(beam.EventTime, string)) {
switch timer.Family {
case fn.GcTimer.Family:
// Clear all the state for the key
fn.State.Clear(sp)
fn.MaxTimestampInBag.Clear(sp)
}
}
func AddTimerGarbageCollection[V any](s beam.Scope, in beam.PCollection) beam.PCollection {
return beam.ParDo(s, &timerGarbageCollectionFn[V]{
State: state.MakeValueState[V]("timerTimestamp"),
MaxTimestampInBag: state.MakeCombiningState[int64, int64, int64]("maxTimestampInBag", func(a, b int64) int64 {
if a > b {
return a
}
return b
}),
GcTimer: timers.InEventTime("gcTimer"),
}, in)
}11.5. State and timers examples
Following are some example uses of state and timers
11.5.1. Joining clicks and views
In this example, the pipeline is processing data from an e-commerce site’s home page. There are two input streams: a stream of views, representing suggested product links displayed to the user on the home page, and a stream of clicks, representing actual user clicks on these links. The goal of the pipeline is to join click events with view events, outputting a new joined event that contains information from both events. Each link has a unique identifier that is present in both the view event and the join event.
Many view events will never be followed up with clicks. This pipeline will wait one hour for a click, after which it will give up on this join. While every click event should have a view event, some small number of view events may be lost and never make it to the Beam pipeline; the pipeline will similarly wait one hour after seeing a click event, and give up if the view event does not arrive in that time. Input events are not ordered - it is possible to see the click event before the view event. The one hour join timeout should be based on event time, not on processing time.
// Read the event stream and key it by the link id.
PCollection<KV<String, Event>> eventsPerLinkId =
readEvents()
.apply(WithKeys.of(Event::getLinkId).withKeyType(TypeDescriptors.strings()));
eventsPerLinkId.apply(ParDo.of(new DoFn<KV<String, Event>, JoinedEvent>() {
// Store the view event.
@StateId("view") private final StateSpec<ValueState<Event>> viewState = StateSpecs.value();
// Store the click event.
@StateId("click") private final StateSpec<ValueState<Event>> clickState = StateSpecs.value();
// The maximum element timestamp seen so far.
@StateId("maxTimestampSeen") private final StateSpec<CombiningState<Long, long[], Long>>
maxTimestamp = StateSpecs.combining(Max.ofLongs());
// Timer that fires when an hour goes by with an incomplete join.
@TimerId("gcTimer") private final TimerSpec gcTimer = TimerSpecs.timer(TimeDomain.EVENT_TIME);
@ProcessElement public void process(
@Element KV<String, Event> element,
@Timestamp Instant ts,
@AlwaysFetched @StateId("view") ValueState<Event> viewState,
@AlwaysFetched @StateId("click") ValueState<Event> clickState,
@AlwaysFetched @StateId("maxTimestampSeen") CombiningState<Long, long[], Long> maxTimestampState,
@TimerId("gcTimer") gcTimer,
OutputReceiver<JoinedEvent> output) {
// Store the event into the correct state variable.
Event event = element.getValue();
ValueState<Event> valueState = event.getType().equals(VIEW) ? viewState : clickState;
valueState.write(event);
Event view = viewState.read();
Event click = clickState.read();
(if view != null && click != null) {
// We've seen both a view and a click. Output a joined event and clear state.
output.output(JoinedEvent.of(view, click));
clearState(viewState, clickState, maxTimestampState);
} else {
// We've only seen on half of the join.
// Set the timer to be one hour after the maximum timestamp seen. This will keep overwriting the same timer, so
// as long as there is activity on this key the state will stay active. Once the key goes inactive for one hour's
// worth of event time (as measured by the watermark), then the gc timer will fire.
maxTimestampState.add(ts.getMillis());
Instant expirationTime = new Instant(maxTimestampState.read()).plus(Duration.standardHours(1));
gcTimer.set(expirationTime);
}
}
@OnTimer("gcTimer") public void onTimer(
@StateId("view") ValueState<Event> viewState,
@StateId("click") ValueState<Event> clickState,
@StateId("maxTimestampSeen") CombiningState<Long, long[], Long> maxTimestampState) {
// An hour has gone by with an incomplete join. Give up and clear the state.
clearState(viewState, clickState, maxTimestampState);
}
private void clearState(
@StateId("view") ValueState<Event> viewState,
@StateId("click") ValueState<Event> clickState,
@StateId("maxTimestampSeen") CombiningState<Long, long[], Long> maxTimestampState) {
viewState.clear();
clickState.clear();
maxTimestampState.clear();
}
}));class JoinDoFn(DoFn):
# stores the view event.
VIEW_STATE_SPEC = ReadModifyWriteStateSpec('view', EventCoder())
# stores the click event.
CLICK_STATE_SPEC = ReadModifyWriteStateSpec('click', EventCoder())
# The maximum element timestamp value seen so far.
MAX_TIMESTAMP = CombiningValueStateSpec('max_timestamp_seen', max)
# Timer that fires when an hour goes by with an incomplete join.
GC_TIMER = TimerSpec('gc', TimeDomain.WATERMARK)
def process(self,
element,
view=DoFn.StateParam(VIEW_STATE_SPEC),
click=DoFn.StateParam(CLICK_STATE_SPEC),
max_timestamp_seen=DoFn.StateParam(MAX_TIMESTAMP),
ts=DoFn.TimestampParam,
gc=DoFn.TimerParam(GC_TIMER)):
event = element
if event.type == 'view':
view.write(event)
else:
click.write(event)
previous_view = view.read()
previous_click = click.read()
# We've seen both a view and a click. Output a joined event and clear state.
if previous_view and previous_click:
yield (previous_view, previous_click)
view.clear()
click.clear()
max_timestamp_seen.clear()
else:
max_timestamp_seen.add(ts)
gc.set(max_timestamp_seen.read() + Duration(seconds=3600))
@on_timer(GC_TIMER)
def gc_callback(self,
view=DoFn.StateParam(VIEW_STATE_SPEC),
click=DoFn.StateParam(CLICK_STATE_SPEC),
max_timestamp_seen=DoFn.StateParam(MAX_TIMESTAMP)):
view.clear()
click.clear()
max_timestamp_seen.clear()
_ = (p | 'EventsPerLinkId' >> ReadPerLinkEvents()
| 'Join DoFn' >> beam.ParDo(JoinDoFn()))type JoinedEvent struct {
View, Click *Event
}
type joinDoFn struct {
View state.Value[*Event] // Store the view event.
Click state.Value[*Event] // Store the click event.
MaxTimestampSeen state.Combining[int64, int64, int64] // The maximum element timestamp seen so far.
GcTimer timers.EventTime // The timestamp of the timer.
}
func (fn *joinDoFn) ProcessElement(et beam.EventTime, sp state.Provider, tp timers.Provider, key string, event *Event, emit func(JoinedEvent)) {
valueState := fn.View
if event.isClick() {
valueState = fn.Click
}
valueState.Write(sp, event)
view, _, _ := fn.View.Read(sp)
click, _, _ := fn.Click.Read(sp)
if view != nil && click != nil {
emit(JoinedEvent{View: view, Click: click})
fn.clearState(sp)
return
}
fn.MaxTimestampSeen.Add(sp, et.Milliseconds())
expTs, _, _ := fn.MaxTimestampSeen.Read(sp)
fn.GcTimer.Set(tp, time.UnixMilli(expTs).Add(1*time.Hour))
}
func (fn *joinDoFn) OnTimer(sp state.Provider, tp timers.Provider, w beam.Window, key string, timer timers.Context, emit func(beam.EventTime, string)) {
switch timer.Family {
case fn.GcTimer.Family:
fn.clearState(sp)
}
}
func (fn *joinDoFn) clearState(sp state.Provider) {
fn.View.Clear(sp)
fn.Click.Clear(sp)
fn.MaxTimestampSeen.Clear(sp)
}
func AddJoinDoFn(s beam.Scope, in beam.PCollection) beam.PCollection {
return beam.ParDo(s, &joinDoFn{
View: state.MakeValueState[*Event]("view"),
Click: state.MakeValueState[*Event]("click"),
MaxTimestampSeen: state.MakeCombiningState[int64, int64, int64]("maxTimestampSeen", func(a, b int64) int64 {
if a > b {
return a
}
return b
}),
GcTimer: timers.InEventTime("gcTimer"),
}, in)
}11.5.2. Batching RPCs
In this example, input elements are being forwarded to an external RPC service. The RPC accepts batch requests - multiple events for the same user can be batched in a single RPC call. Since this RPC service also imposes rate limits, we want to batch ten seconds worth of events together in order to reduce the number of calls.
PCollection<KV<String, ValueT>> perUser = readPerUser();
perUser.apply(ParDo.of(new DoFn<KV<String, ValueT>, OutputT>() {
// Store the elements buffered so far.
@StateId("state") private final StateSpec<BagState<ValueT>> elements = StateSpecs.bag();
// Keep track of whether a timer is currently set or not.
@StateId("isTimerSet") private final StateSpec<ValueState<Boolean>> isTimerSet = StateSpecs.value();
// The processing-time timer user to publish the RPC.
@TimerId("outputState") private final TimerSpec timer = TimerSpecs.timer(TimeDomain.PROCESSING_TIME);
@ProcessElement public void process(
@Element KV<String, ValueT> element,
@StateId("state") BagState<ValueT> elementsState,
@StateId("isTimerSet") ValueState<Boolean> isTimerSetState,
@TimerId("outputState") Timer timer) {
// Add the current element to the bag for this key.
state.add(element.getValue());
if (!MoreObjects.firstNonNull(isTimerSetState.read(), false)) {
// If there is no timer currently set, then set one to go off in 10 seconds.
timer.offset(Duration.standardSeconds(10)).setRelative();
isTimerSetState.write(true);
}
}
@OnTimer("outputState") public void onTimer(
@StateId("state") BagState<ValueT> elementsState,
@StateId("isTimerSet") ValueState<Boolean> isTimerSetState) {
// Send an RPC containing the batched elements and clear state.
sendRPC(elementsState.read());
elementsState.clear();
isTimerSetState.clear();
}
}));class BufferDoFn(DoFn):
BUFFER = BagStateSpec('buffer', EventCoder())
IS_TIMER_SET = ReadModifyWriteStateSpec('is_timer_set', BooleanCoder())
OUTPUT = TimerSpec('output', TimeDomain.REAL_TIME)
def process(self,
buffer=DoFn.StateParam(BUFFER),
is_timer_set=DoFn.StateParam(IS_TIMER_SET),
timer=DoFn.TimerParam(OUTPUT)):
buffer.add(element)
if not is_timer_set.read():
timer.set(Timestamp.now() + Duration(seconds=10))
is_timer_set.write(True)
@on_timer(OUTPUT)
def output_callback(self,
buffer=DoFn.StateParam(BUFFER),
is_timer_set=DoFn.StateParam(IS_TIMER_SET)):
send_rpc(list(buffer.read()))
buffer.clear()
is_timer_set.clear()type bufferDoFn[V any] struct {
Elements state.Bag[V] // Store the elements buffered so far.
IsTimerSet state.Value[bool] // Keep track of whether a timer is currently set or not.
OutputElements timers.ProcessingTime // The processing-time timer user to publish the RPC.
}
func (fn *bufferDoFn[V]) ProcessElement(et beam.EventTime, sp state.Provider, tp timers.Provider, key string, value V) {
fn.Elements.Add(sp, value)
isSet, _, _ := fn.IsTimerSet.Read(sp)
if !isSet {
fn.OutputElements.Set(tp, time.Now().Add(10*time.Second))
fn.IsTimerSet.Write(sp, true)
}
}
func (fn *bufferDoFn[V]) OnTimer(sp state.Provider, tp timers.Provider, w beam.Window, key string, timer timers.Context) {
switch timer.Family {
case fn.OutputElements.Family:
elements, _, _ := fn.Elements.Read(sp)
sendRpc(elements)
fn.Elements.Clear(sp)
fn.IsTimerSet.Clear(sp)
}
}
func AddBufferDoFn[V any](s beam.Scope, in beam.PCollection) beam.PCollection {
return beam.ParDo(s, &bufferDoFn[V]{
Elements: state.MakeBagState[V]("elements"),
IsTimerSet: state.MakeValueState[bool]("isTimerSet"),
OutputElements: timers.InProcessingTime("outputElements"),
}, in)
}11.5.3. Looping timers
Looping timers are a pattern where a timer sets another timer for a future time, creating a loop. This is useful for producing periodic outputs or heartbeats in the absence of data for a specific key.
When draining a pipeline, it is important to terminate these loops to allow the pipeline to finish. In the Java SDK, you can use the CausedByDrain parameter in the @OnTimer method to check if the timer firing was induced by a drain operation. Note: CausedByDrain will be set only in certain runners. Check the capability matrix for more details.
public static class LoopingStatefulTimer extends DoFn<KV<String, Integer>, KV<String, Integer>> {
@TimerId("loopingTimer") private final TimerSpec loopingTimer = TimerSpecs.timer(TimeDomain.EVENT_TIME);
@ProcessElement
public void process(
@Element KV<String, Integer> element,
@TimerId("loopingTimer") Timer timer,
OutputReceiver<KV<String, Integer>> output) {
// Set initial timer
timer.offset(Duration.standardMinutes(1)).setRelative();
output.output(element);
}
@OnTimer("loopingTimer")
public void onTimer(
@Key String key,
@TimerId("loopingTimer") Timer timer,
OutputReceiver<KV<String, Integer>> output,
CausedByDrain drain) {
output.output(KV.of(key, 0));
// Cancel looping timer if drain is in progress
if (drain == CausedByDrain.CAUSED_BY_DRAIN) {
return;
}
// Set next timer
timer.offset(Duration.standardMinutes(1)).setRelative();
}
}# Python does not currently support detecting drain in OnTimer.
# The following example demonstrates a looping timer without drain support,
# using event time.
class LoopingTimerDoFn(DoFn):
TIMER = TimerSpec('timer', TimeDomain.WATERMARK)
def process(self, element, ts=DoFn.TimestampParam, timer=DoFn.TimerParam(TIMER)):
timer.set(ts + Duration(seconds=60))
yield element
@on_timer(TIMER)
def on_timer(self, key=DoFn.KeyParam, timestamp=DoFn.TimestampParam, timer=DoFn.TimerParam(TIMER)):
yield (key, 0)
# Loops forever, cannot handle drain safely if it never stops.
timer.set(timestamp + Duration(seconds=60))// Go does not currently support detecting drain in OnTimer.
// The following example demonstrates a looping timer without drain support,
// using event time.
type LoopingTimerFn struct {
Timer timers.EventTime
}
func (fn *LoopingTimerFn) ProcessElement(et beam.EventTime, sp state.Provider, tp timers.Provider, key string, value int, emit func(string, int)) {
nextTime := et.ToTime().Add(60 * time.Second)
fn.Timer.Set(tp, nextTime)
emit(key, value)
}
func (fn *LoopingTimerFn) OnTimer(et beam.EventTime, sp state.Provider, tp timers.Provider, key string, timer timers.Context, emit func(string, int)) {
emit(key, 0)
// Loops forever, cannot handle drain safely if it never stops.
nextTime := et.ToTime().Add(60 * time.Second)
fn.Timer.Set(tp, nextTime)
}12. Splittable DoFns
A Splittable DoFn (SDF) enables users to create modular components containing I/Os (and some advanced
non I/O use cases). Having modular
I/O components that can be connected to each other simplify typical patterns that users want.
For example, a popular use case is to read filenames from a message queue followed by parsing those
files. Traditionally, users were required to either write a single I/O connector that contained the
logic for the message queue and the file reader (increased complexity) or choose to reuse a message
queue I/O followed by a regular DoFn that read the file (decreased performance). With SDF,
we bring the richness of Apache Beam’s I/O APIs to a DoFn enabling modularity while maintaining the
performance of traditional I/O connectors.
12.1. SDF basics
At a high level, an SDF is responsible for processing element and restriction pairs. A restriction represents a subset of work that would have been necessary to have been done when processing the element.
Executing an SDF follows the following steps:
- Each element is paired with a restriction (e.g. filename is paired with offset range representing the whole file).
- Each element and restriction pair is split (e.g. offset ranges are broken up into smaller pieces).
- The runner redistributes the element and restriction pairs to several workers.
- Element and restriction pairs are processed in parallel (e.g. the file is read). Within this last step, the element and restriction pair can pause its own processing and/or be split into further element and restriction pairs.

12.1.1. A basic SDF
A basic SDF is composed of three parts: a restriction, a restriction provider, and a restriction tracker. If you want to control the watermark, especially in a streaming pipeline, two more components are needed: a watermark estimator provider and a watermark estimator.
The restriction is a user-defined object that is used to represent a subset of
work for a given element. For example, we defined OffsetRange as a restriction to represent offset
positions in Java
and Python.
The restriction provider lets SDF authors override default implementations, including the ones for
splitting and sizing. In Java
and Go,
this is the DoFn. Python
has a dedicated RestrictionProvider type.
The restriction tracker is responsible for tracking which subset of the restriction has been completed during processing. For APIs details, read the Java and Python reference documentation.
There are some built-in RestrictionTracker implementations defined in Java:
The SDF also has a built-in RestrictionTracker implementation in Python:
Go also has a built-in RestrictionTracker type:
The watermark state is a user-defined object which is used to create a WatermarkEstimator from a
WatermarkEstimatorProvider. The simplest watermark state could be a timestamp.
The watermark estimator provider lets SDF authors define how to initialize the watermark state and
create a watermark estimator. In Java and Go
this is the DoFn. Python
has a dedicated WatermarkEstimatorProvider type.
The watermark estimator tracks the watermark when an element-restriction pair is in progress. For APIs details, read the Java, Python, and Go reference documentation.
There are some built-in WatermarkEstimator implementations in Java:
Along with the default WatermarkEstimatorProvider, there are the same set of built-in
WatermarkEstimator implementations in Python:
The following WatermarkEstimator types are implemented in Go:
To define an SDF, you must choose whether the SDF is bounded (default) or unbounded and define a way to initialize an initial restriction for an element. The distinction is based on how the amount of work is represented:
- Bounded DoFns are those where the work represented by an element is well-known beforehand and has an end. Examples of bounded elements include a file or group of files.
- Unbounded DoFns are those where the amount of work does not have a specific end or the amount of work is not known beforehand. Examples of unbounded elements include a Kafka or a PubSub topic.
In Java, you can use @UnboundedPerElement
or @BoundedPerElement
to annotate your DoFn. In Python, you can use @unbounded_per_element
to annotate the DoFn.
@BoundedPerElement
private static class FileToWordsFn extends DoFn<String, Integer> {
@GetInitialRestriction
public OffsetRange getInitialRestriction(@Element String fileName) throws IOException {
return new OffsetRange(0, new File(fileName).length());
}
@ProcessElement
public void processElement(
@Element String fileName,
RestrictionTracker<OffsetRange, Long> tracker,
OutputReceiver<Integer> outputReceiver)
throws IOException {
RandomAccessFile file = new RandomAccessFile(fileName, "r");
seekToNextRecordBoundaryInFile(file, tracker.currentRestriction().getFrom());
while (tracker.tryClaim(file.getFilePointer())) {
outputReceiver.output(readNextRecord(file));
}
}
// Providing the coder is only necessary if it can not be inferred at runtime.
@GetRestrictionCoder
public Coder<OffsetRange> getRestrictionCoder() {
return OffsetRange.Coder.of();
}
}class FileToWordsRestrictionProvider(beam.transforms.core.RestrictionProvider
):
def initial_restriction(self, file_name):
return OffsetRange(0, os.stat(file_name).st_size)
def create_tracker(self, restriction):
return beam.io.restriction_trackers.OffsetRestrictionTracker()
class FileToWordsFn(beam.DoFn):
def process(
self,
file_name,
# Alternatively, we can let FileToWordsFn itself inherit from
# RestrictionProvider, implement the required methods and let
# tracker=beam.DoFn.RestrictionParam() which will use self as
# the provider.
tracker=beam.DoFn.RestrictionParam(FileToWordsRestrictionProvider())):
with open(file_name) as file_handle:
file_handle.seek(tracker.current_restriction.start())
while tracker.try_claim(file_handle.tell()):
yield read_next_record(file_handle)
# Providing the coder is only necessary if it can not be inferred at
# runtime.
def restriction_coder(self):
return ...func (fn *splittableDoFn) CreateInitialRestriction(filename string) offsetrange.Restriction {
return offsetrange.Restriction{
Start: 0,
End: getFileLength(filename),
}
}
func (fn *splittableDoFn) CreateTracker(rest offsetrange.Restriction) *sdf.LockRTracker {
return sdf.NewLockRTracker(offsetrange.NewTracker(rest))
}
func (fn *splittableDoFn) ProcessElement(rt *sdf.LockRTracker, filename string, emit func(int)) error {
file, err := os.Open(filename)
if err != nil {
return err
}
offset, err := seekToNextRecordBoundaryInFile(file, rt.GetRestriction().(offsetrange.Restriction).Start)
if err != nil {
return err
}
for rt.TryClaim(offset) {
record, newOffset := readNextRecord(file)
emit(record)
offset = newOffset
}
return nil
}At this point, we have an SDF that supports runner-initiated splits enabling dynamic work rebalancing. To increase the rate at which initial parallelization of work occurs or for those runners that do not support runner-initiated splitting, we recommend providing a set of initial splits:
void splitRestriction(
@Restriction OffsetRange restriction, OutputReceiver<OffsetRange> splitReceiver) {
long splitSize = 64 * (1 << 20);
long i = restriction.getFrom();
while (i < restriction.getTo() - splitSize) {
// Compute and output 64 MiB size ranges to process in parallel
long end = i + splitSize;
splitReceiver.output(new OffsetRange(i, end));
i = end;
}
// Output the last range
splitReceiver.output(new OffsetRange(i, restriction.getTo()));
}class FileToWordsRestrictionProvider(beam.transforms.core.RestrictionProvider
):
def split(self, file_name, restriction):
# Compute and output 64 MiB size ranges to process in parallel
split_size = 64 * (1 << 20)
i = restriction.start
while i < restriction.end - split_size:
yield OffsetRange(i, i + split_size)
i += split_size
yield OffsetRange(i, restriction.end)func (fn *splittableDoFn) SplitRestriction(filename string, rest offsetrange.Restriction) (splits []offsetrange.Restriction) {
size := 64 * (1 << 20)
i := rest.Start
for i < rest.End - size {
// Compute and output 64 MiB size ranges to process in parallel
end := i + size
splits = append(splits, offsetrange.Restriction{i, end})
i = end
}
// Output the last range
splits = append(splits, offsetrange.Restriction{i, rest.End})
return splits
}12.2. Sizing and progress
Sizing and progress are used during execution of an SDF to inform runners so that they may perform intelligent decisions about which restrictions to split and how to parallelize work.
Before processing an element and restriction, an initial size may be used by a runner to choose how and who processes the restrictions attempting to improve initial balancing and parallelization of work. During the processing of an element and restriction, sizing and progress are used to choose which restrictions to split and who should process them.
By default, we use the restriction tracker’s estimate for work remaining falling back to assuming that all restrictions have an equal cost. To override the default, SDF authors can provide the appropriate method within the restriction provider. SDF authors need to be aware that the sizing method will be invoked concurrently during bundle processing due to runner initiated splitting and progress estimation.
@GetSize
double getSize(@Element String fileName, @Restriction OffsetRange restriction) {
return (fileName.contains("expensiveRecords") ? 2 : 1) * restriction.getTo()
- restriction.getFrom();
}# The RestrictionProvider is responsible for calculating the size of given
# restriction.
class MyRestrictionProvider(beam.transforms.core.RestrictionProvider):
def restriction_size(self, file_name, restriction):
weight = 2 if "expensiveRecords" in file_name else 1
return restriction.size() * weightfunc (fn *splittableDoFn) RestrictionSize(filename string, rest offsetrange.Restriction) float64 {
weight := float64(1)
if strings.Contains(filename, “expensiveRecords”) {
weight = 2
}
return weight * (rest.End - rest.Start)
}12.3. User-initiated checkpoint
Some I/Os cannot produce all of the data necessary to complete a restriction within the lifetime of a single bundle. This typically happens with unbounded restrictions, but can also happen with bounded restrictions. For example, there could be more data that needs to be ingested but is not available yet. Another cause of this scenario is the source system throttling your data.
Your SDF can signal to you that you are not done processing the current restriction. This signal can suggest a time to resume at. While the runner tries to honor the resume time, this is not guaranteed. This allows execution to continue on a restriction that has available work improving resource utilization.
@ProcessElement
public ProcessContinuation processElement(
RestrictionTracker<OffsetRange, Long> tracker,
OutputReceiver<RecordPosition> outputReceiver) {
long currentPosition = tracker.currentRestriction().getFrom();
Service service = initializeService();
try {
while (true) {
List<RecordPosition> records = service.readNextRecords(currentPosition);
if (records.isEmpty()) {
// Return a short delay if there is no data to process at the moment.
return ProcessContinuation.resume().withResumeDelay(Duration.standardSeconds(10));
}
for (RecordPosition record : records) {
if (!tracker.tryClaim(record.getPosition())) {
return ProcessContinuation.stop();
}
currentPosition = record.getPosition() + 1;
outputReceiver.output(record);
}
}
} catch (ThrottlingException exception) {
// Return a longer delay in case we are being throttled.
return ProcessContinuation.resume().withResumeDelay(Duration.standardSeconds(60));
}
}class MySplittableDoFn(beam.DoFn):
def process(
self,
element,
restriction_tracker=beam.DoFn.RestrictionParam(
MyRestrictionProvider())):
current_position = restriction_tracker.current_restriction.start()
while True:
# Pull records from an external service.
try:
records = external_service.fetch(current_position)
if records.empty():
# Set a shorter delay in case we are being throttled.
restriction_tracker.defer_remainder(timestamp.Duration(second=10))
return
for record in records:
if restriction_tracker.try_claim(record.position):
current_position = record.position
yield record
else:
return
except TimeoutError:
# Set a longer delay in case we are being throttled.
restriction_tracker.defer_remainder(timestamp.Duration(seconds=60))
returnfunc (fn *checkpointingSplittableDoFn) ProcessElement(rt *sdf.LockRTracker, emit func(Record)) (sdf.ProcessContinuation, error) {
position := rt.GetRestriction().(offsetrange.Restriction).Start
for {
records, err := fn.ExternalService.readNextRecords(position)
if err != nil {
if err == fn.ExternalService.ThrottlingErr {
// Resume at a later time to avoid throttling.
return sdf.ResumeProcessingIn(60 * time.Second), nil
}
return sdf.StopProcessing(), err
}
if len(records) == 0 {
// Wait for data to be available.
return sdf.ResumeProcessingIn(10 * time.Second), nil
}
for _, record := range records {
if !rt.TryClaim(position) {
// Records have been claimed, finish processing.
return sdf.StopProcessing(), nil
}
position += 1
emit(record)
}
}
}12.4. Runner-initiated split
A runner at any time may attempt to split a restriction while it is being processed. This allows the runner to either pause processing of the restriction so that other work may be done (common for unbounded restrictions to limit the amount of output and/or improve latency) or split the restriction into two pieces, increasing the available parallelism within the system. Different runners (e.g., Dataflow, Flink, Spark) have different strategies to issue splits under batch and streaming execution.
Author an SDF with this in mind since the end of the restriction may change. When writing the processing loop, use the result from trying to claim a piece of the restriction instead of assuming you can process until the end.
One incorrect example could be:
@ProcessElement
public void badTryClaimLoop(
@Element String fileName,
RestrictionTracker<OffsetRange, Long> tracker,
OutputReceiver<Integer> outputReceiver)
throws IOException {
RandomAccessFile file = new RandomAccessFile(fileName, "r");
seekToNextRecordBoundaryInFile(file, tracker.currentRestriction().getFrom());
// The restriction tracker can be modified by another thread in parallel
// so storing state locally is ill advised.
long end = tracker.currentRestriction().getTo();
while (file.getFilePointer() < end) {
// Only after successfully claiming should we produce any output and/or
// perform side effects.
tracker.tryClaim(file.getFilePointer());
outputReceiver.output(readNextRecord(file));
}
}class BadTryClaimLoop(beam.DoFn):
def process(
self,
file_name,
tracker=beam.DoFn.RestrictionParam(FileToWordsRestrictionProvider())):
with open(file_name) as file_handle:
file_handle.seek(tracker.current_restriction.start())
# The restriction tracker can be modified by another thread in parallel
# so storing state locally is ill advised.
end = tracker.current_restriction.end()
while file_handle.tell() < end:
# Only after successfully claiming should we produce any output and/or
# perform side effects.
tracker.try_claim(file_handle.tell())
yield read_next_record(file_handle)func (fn *badTryClaimLoop) ProcessElement(rt *sdf.LockRTracker, filename string, emit func(int)) error {
file, err := os.Open(filename)
if err != nil {
return err
}
offset, err := seekToNextRecordBoundaryInFile(file, rt.GetRestriction().(offsetrange.Restriction).Start)
if err != nil {
return err
}
// The restriction tracker can be modified by another thread in parallel
// so storing state locally is ill advised.
end = rt.GetRestriction().(offsetrange.Restriction).End
for offset < end {
// Only after successfully claiming should we produce any output and/or
// perform side effects.
rt.TryClaim(offset)
record, newOffset := readNextRecord(file)
emit(record)
offset = newOffset
}
return nil
}12.5. Watermark estimation
The default watermark estimator does not produce a watermark estimate. Therefore, the output watermark is solely computed by the minimum of upstream watermarks.
An SDF can advance the output watermark by specifying a lower bound for all future output that this element and restriction pair will produce. The runner computes the minimum output watermark by taking the minimum over all upstream watermarks and the minimum reported by each element and restriction pair. The reported watermark must monotonically increase for each element and restriction pair across bundle boundaries. When an element and restriction pair stops processing its watermark, it is no longer considered part of the above calculation.
Tips:
- If you author an SDF that outputs records with timestamps, you should expose ways to allow users of this SDF to configure which watermark estimator to use.
- Any data produced before the watermark may be considered late. See watermarks and late data for more details.
12.5.1. Controlling the watermark
There are two general types of watermark estimators: timestamp observing and external clock observing. Timestamp observing watermark estimators use the output timestamp of each record to compute the watermark estimate while external clock observing watermark estimators control the watermark by using a clock that is not associated to any individual output, such as the local clock of the machine or a clock exposed through an external service.
The watermark estimator provider lets you override the default watermark estimation logic and use an existing watermark estimator implementation. You can also provide your own watermark estimator implementation.
// (Optional) Define a custom watermark state type to save information between bundle
// processing rounds.
public static class MyCustomWatermarkState {
public MyCustomWatermarkState(String element, OffsetRange restriction) {
// Store data necessary for future watermark computations
}
}
// (Optional) Choose which coder to use to encode the watermark estimator state.
@GetWatermarkEstimatorStateCoder
public Coder<MyCustomWatermarkState> getWatermarkEstimatorStateCoder() {
return AvroCoder.of(MyCustomWatermarkState.class);
}
// Define a WatermarkEstimator
public static class MyCustomWatermarkEstimator
implements TimestampObservingWatermarkEstimator<MyCustomWatermarkState> {
public MyCustomWatermarkEstimator(MyCustomWatermarkState type) {
// Initialize watermark estimator state
}
@Override
public void observeTimestamp(Instant timestamp) {
// Will be invoked on each output from the SDF
}
@Override
public Instant currentWatermark() {
// Return a monotonically increasing value
return currentWatermark;
}
@Override
public MyCustomWatermarkState getState() {
// Return state to resume future watermark estimation after a checkpoint/split
return null;
}
}
// Then, update the DoFn to generate the initial watermark estimator state for all new element
// and restriction pairs and to create a new instance given watermark estimator state.
@GetInitialWatermarkEstimatorState
public MyCustomWatermarkState getInitialWatermarkEstimatorState(
@Element String element, @Restriction OffsetRange restriction) {
// Compute and return the initial watermark estimator state for each element and
// restriction. All subsequent processing of an element and restriction will be restored
// from the existing state.
return new MyCustomWatermarkState(element, restriction);
}
@NewWatermarkEstimator
public WatermarkEstimator<MyCustomWatermarkState> newWatermarkEstimator(
@WatermarkEstimatorState MyCustomWatermarkState oldState) {
return new MyCustomWatermarkEstimator(oldState);
}
}# (Optional) Define a custom watermark state type to save information between
# bundle processing rounds.
class MyCustomerWatermarkEstimatorState(object):
def __init__(self, element, restriction):
# Store data necessary for future watermark computations
pass
# Define a WatermarkEstimator
class MyCustomWatermarkEstimator(WatermarkEstimator):
def __init__(self, estimator_state):
self.state = estimator_state
def observe_timestamp(self, timestamp):
# Will be invoked on each output from the SDF
pass
def current_watermark(self):
# Return a monotonically increasing value
return current_watermark
def get_estimator_state(self):
# Return state to resume future watermark estimation after a
# checkpoint/split
return self.state
# Then, a WatermarkEstimatorProvider needs to be created for this
# WatermarkEstimator
class MyWatermarkEstimatorProvider(WatermarkEstimatorProvider):
def initial_estimator_state(self, element, restriction):
return MyCustomerWatermarkEstimatorState(element, restriction)
def create_watermark_estimator(self, estimator_state):
return MyCustomWatermarkEstimator(estimator_state)
# Finally, define the SDF using your estimator.
class MySplittableDoFn(beam.DoFn):
def process(
self,
element,
restriction_tracker=beam.DoFn.RestrictionParam(MyRestrictionProvider()),
watermark_estimator=beam.DoFn.WatermarkEstimatorParam(
MyWatermarkEstimatorProvider())):
# The current watermark can be inspected.
watermark_estimator.current_watermark()// WatermarkState is a custom type.`
//
// It is optional to write your own state type when making a custom estimator.
type WatermarkState struct {
Watermark time.Time
}
// CustomWatermarkEstimator is a custom watermark estimator.
// You may use any type here, including some of Beam's built in watermark estimator types,
// e.g. sdf.WallTimeWatermarkEstimator, sdf.TimestampObservingWatermarkEstimator, and sdf.ManualWatermarkEstimator
type CustomWatermarkEstimator struct {
state WatermarkState
}
// CurrentWatermark returns the current watermark and is invoked on DoFn splits and self-checkpoints.
// Watermark estimators must implement CurrentWatermark() time.Time
func (e *CustomWatermarkEstimator) CurrentWatermark() time.Time {
return e.state.Watermark
}
// ObserveTimestamp is called on the output timestamps of all
// emitted elements to update the watermark. It is optional
func (e *CustomWatermarkEstimator) ObserveTimestamp(ts time.Time) {
e.state.Watermark = ts
}
// InitialWatermarkEstimatorState defines an initial state used to initialize the watermark
// estimator. It is optional. If this is not defined, WatermarkEstimatorState may not be
// defined and CreateWatermarkEstimator must not take in parameters.
func (fn *weDoFn) InitialWatermarkEstimatorState(et beam.EventTime, rest offsetrange.Restriction, element string) WatermarkState {
// Return some watermark state
return WatermarkState{Watermark: time.Now()}
}
// CreateWatermarkEstimator creates the watermark estimator used by this Splittable DoFn.
// Must take in a state parameter if InitialWatermarkEstimatorState is defined, otherwise takes no parameters.
func (fn *weDoFn) CreateWatermarkEstimator(initialState WatermarkState) *CustomWatermarkEstimator {
return &CustomWatermarkEstimator{state: initialState}
}
// WatermarkEstimatorState returns the state used to resume future watermark estimation
// after a checkpoint/split. It is required if InitialWatermarkEstimatorState is defined,
// otherwise it must not be defined.
func (fn *weDoFn) WatermarkEstimatorState(e *CustomWatermarkEstimator) WatermarkState {
return e.state
}
// ProcessElement is the method to execute for each element.
// It can optionally take in a watermark estimator.
func (fn *weDoFn) ProcessElement(e *CustomWatermarkEstimator, element string) {
// ...
e.state.Watermark = time.Now()
}12.6. Truncating during drain
Runners which support draining pipelines need the ability to drain SDFs; otherwise, the pipeline may never stop. By default, bounded restrictions process the remainder of the restriction while unbounded restrictions finish processing at the next SDF-initiated checkpoint or runner-initiated split. You are able to override this default behavior by defining the appropriate method on the restriction provider.
Note: Once the pipeline drain starts and truncate restriction transform is triggered, the sdf.ProcessContinuation
will not be rescheduled.
@TruncateRestriction
@Nullable
TruncateResult<OffsetRange> truncateRestriction(
@Element String fileName, @Restriction OffsetRange restriction) {
if (fileName.contains("optional")) {
// Skip optional files
return null;
}
return TruncateResult.of(restriction);
}class MyRestrictionProvider(beam.transforms.core.RestrictionProvider):
def truncate(self, file_name, restriction):
if "optional" in file_name:
# Skip optional files
return None
return restriction// TruncateRestriction is a transform that is triggered when pipeline starts to drain. It helps to finish a
// pipeline quicker by truncating the restriction.
func (fn *splittableDoFn) TruncateRestriction(rt *sdf.LockRTracker, element string) offsetrange.Restriction {
start := rt.GetRestriction().(offsetrange.Restriction).Start
prevEnd := rt.GetRestriction().(offsetrange.Restriction).End
// truncate the restriction by half.
newEnd := prevEnd / 2
return offsetrange.Restriction{
Start: start,
End: newEnd,
}
}12.7. Bundle finalization
Bundle finalization enables a DoFn to perform side effects by registering a callback.
The callback is invoked once the runner has acknowledged that it has durably persisted the output.
For example, a message queue might need to acknowledge messages that it has ingested into the pipeline.
Bundle finalization is not limited to SDFs but is called out here since this is the primary
use case.
@ProcessElement
public void processElement(
@Element String element,
OutputReceiver<Integer> receiver,
BundleFinalizer bundleFinalizer) {
// ... produce output ...
bundleFinalizer.afterBundleCommit(
Instant.now().plus(Duration.standardMinutes(5)),
() -> {
// ... perform a side effect ...
});
}class MySplittableDoFn(beam.DoFn):
def process(self, element, bundle_finalizer=beam.DoFn.BundleFinalizerParam):
# ... produce output ...
# Register callback function for this bundle that performs the side
# effect.
bundle_finalizer.register(my_callback_func)func (fn *splittableDoFn) ProcessElement(bf beam.BundleFinalization, rt *sdf.LockRTracker, element string) {
// ... produce output ...
bf.RegisterCallback(5*time.Minute, func() error {
// ... perform a side effect ...
return nil
})
}13. Multi-language pipelines
This section provides comprehensive documentation of multi-language pipelines. To get started creating a multi-language pipeline, see:
Beam lets you combine transforms written in any supported SDK language (currently, Java and Python) and use them in one multi-language pipeline. This capability makes it easy to provide new functionality simultaneously in different Apache Beam SDKs through a single cross-language transform. For example, the Apache Kafka connector and SQL transform from the Java SDK can be used in Python pipelines.
Pipelines that use transforms from more than one SDK-language are known as multi-language pipelines.
Beam YAML is built entirely on top of cross-language transforms. In addition to the built in transforms, you can author your own transforms (using the full expressivity of the Beam API) and surface them via a concept called providers.
13.1. Creating cross-language transforms
To make transforms written in one language available to pipelines written in another language, Beam uses an expansion service, which creates and injects the appropriate language-specific pipeline fragments into the pipeline.
In the following example, a Beam Python pipeline starts up a local Java expansion service to create and inject the appropriate Java pipeline fragments for executing the Java Kafka cross-language transform into the Python pipeline. The SDK then downloads and stages the necessary Java dependencies needed to execute these transforms.

At runtime, the Beam runner will execute both Python and Java transforms to run the pipeline.
In this section, we will use KafkaIO.Read to illustrate how to create a cross-language transform for Java and a test example for Python.
13.1.1. Creating cross-language Java transforms
There are two ways to make Java transforms available to other SDKs.
- Option 1: In some cases, you can use existing Java transforms from other SDKs without writing any additional Java code.
- Option 2: You can use arbitrary Java transforms from other SDKs by adding a few Java classes.
13.1.1.1 Using existing Java transforms without writing more Java code
Starting with Beam 2.34.0, Python SDK users can use some Java transforms without writing additional Java code. This can be useful in many cases. For example:
- A developer not familiar with Java may need to use an existing Java transform from a Python pipeline.
- A developer may need to make an existing Java transform available to a Python pipeline without writing/releasing more Java code.
Note: This feature is currently only available when using Java transforms from a Python pipeline.
To be eligible for direct usage, the API of the Java transform has to meet the following requirements:
- The Java transform can be constructed using an available public constructor or a public static method (a constructor method) in the same Java class.
- The Java transform can be configured using one or more builder methods. Each builder method should be public and should return an instance of the Java transform.
Here’s an example Java class that can be directly used from the Python API.
public class JavaDataGenerator extends PTransform<PBegin, PCollection<String>> {
. . .
// The following method satisfies requirement 1.
// Note that you could use a class constructor instead of a static method.
public static JavaDataGenerator create(Integer size) {
return new JavaDataGenerator(size);
}
static class JavaDataGeneratorConfig implements Serializable {
public String prefix;
public long length;
public String suffix;
. . .
}
// The following method conforms to requirement 2.
public JavaDataGenerator withJavaDataGeneratorConfig(JavaDataGeneratorConfig dataConfig) {
return new JavaDataGenerator(this.size, javaDataGeneratorConfig);
}
. . .
}
For a complete example, see JavaDataGenerator.
To use a Java class that conforms to the above requirements from a Python SDK pipeline, follow these steps:
- Create a yaml allowlist that describes the Java transform classes and methods that will be directly accessed from Python.
- Start an expansion service, using the
javaClassLookupAllowlistFileoption to pass the path to the allowlist. - Use the Python JavaExternalTransform API to directly access Java transforms defined in the allowlist from the Python side.
Starting with Beam 2.36.0, steps 1 and 2 can be skipped, as described in the corresponding sections below.
Step 1
To use an eligible Java transform from Python, define a yaml allowlist. This allowlist lists the class names, constructor methods, and builder methods that are directly available to be used from the Python side.
Starting with Beam 2.35.0, you have the option to pass * to the javaClassLookupAllowlistFile option instead of defining an actual allowlist. The * specifies that all supported transforms in the classpath of the expansion service can be accessed through the API. We encourage using an actual allowlist for production, because allowing clients to access arbitrary Java classes can pose a security risk.
version: v1
allowedClasses:
- className: my.beam.transforms.JavaDataGenerator
allowedConstructorMethods:
- create
allowedBuilderMethods:
- withJavaDataGeneratorConfigStep 2
Provide the allowlist as an argument when starting up the Java expansion service. For example, you can start the expansion service as a local Java process using the following command:
java -jar <jar file> <port> --javaClassLookupAllowlistFile=<path to the allowlist file>Starting with Beam 2.36.0, the JavaExternalTransform API will automatically start up an expansion service with a given jar file dependency if an expansion service address was not provided.
Step 3
You can use the Java class directly from your Python pipeline using a stub transform created from the JavaExternalTransform API. This API allows you to construct the transform using the Java class name and allows you to invoke builder methods to configure the class.
Constructor and method parameter types are mapped between Python and Java using a Beam schema. The schema is auto-generated using the object types
provided on the Python side. If the Java class constructor method or builder method accepts any complex object types, make sure that the Beam schema
for these objects is registered and available for the Java expansion service. If a schema has not been registered, the Java expansion service will
try to register a schema using JavaFieldSchema. In Python, arbitrary objects
can be represented using NamedTuples, which will be represented as Beam rows in the schema. Here is a Python stub transform that represents the above
mentioned Java transform:
JavaDataGeneratorConfig = typing.NamedTuple(
'JavaDataGeneratorConfig', [('prefix', str), ('length', int), ('suffix', str)])
data_config = JavaDataGeneratorConfig(prefix='start', length=20, suffix='end')
java_transform = JavaExternalTransform(
'my.beam.transforms.JavaDataGenerator', expansion_service='localhost:<port>').create(numpy.int32(100)).withJavaDataGeneratorConfig(data_config)
You can use this transform in a Python pipeline along with other Python transforms. For a complete example, see javadatagenerator.py.
13.1.1.2 Using the API to make existing Java transforms available to other SDKs
To make your Beam Java SDK transform portable across SDK languages, you must implement two interfaces: ExternalTransformBuilder and ExternalTransformRegistrar. The ExternalTransformBuilder interface constructs the cross-language transform using configuration values passed in from the pipeline, and the ExternalTransformRegistrar interface registers the cross-language transform for use with the expansion service.
Implementing the interfaces
Define a Builder class for your transform that implements the
ExternalTransformBuilderinterface and overrides thebuildExternalmethod that will be used to build your transform object. Initial configuration values for your transform should be defined in thebuildExternalmethod. In most cases, it’s convenient to make the Java transform builder class implementExternalTransformBuilder.Note:
ExternalTransformBuilderrequires you to define a configuration object (a simple POJO) to capture a set of parameters sent by external SDKs to initiate the Java transform. Usually these parameters directly map to constructor parameters of the Java transform.@AutoValue.Builder abstract static class Builder<K, V> implements ExternalTransformBuilder<External.Configuration, PBegin, PCollection<KV<K, V>>> { abstract Builder<K, V> setConsumerConfig(Map<String, Object> config); abstract Builder<K, V> setTopics(List<String> topics); /** Remaining property declarations omitted for clarity. */ abstract Read<K, V> build(); @Override public PTransform<PBegin, PCollection<KV<K, V>>> buildExternal( External.Configuration config) { setTopics(ImmutableList.copyOf(config.topics)); /** Remaining property defaults omitted for clarity. */ } }For complete examples, see JavaCountBuilder and JavaPrefixBuilder.
Note that the
buildExternalmethod can perform additional operations before setting properties received from external SDKs in the transform. For example,buildExternalcan validate properties available in the configuration object before setting them in the transform.Register the transform as an external cross-language transform by defining a class that implements
ExternalTransformRegistrar. You must annotate your class with theAutoServiceannotation to ensure that your transform is registered and instantiated properly by the expansion service.In your registrar class, define a Uniform Resource Name (URN) for your transform. The URN must be a unique string that identifies your transform with the expansion service.
From within your registrar class, define a configuration class for the parameters used during the initialization of your transform by the external SDK.
The following example from the KafkaIO transform shows how to implement steps two through four:
@AutoService(ExternalTransformRegistrar.class) public static class External implements ExternalTransformRegistrar { public static final String URN = "beam:external:java:kafka:read:v1"; @Override public Map<String, Class<? extends ExternalTransformBuilder<?, ?, ?>>> knownBuilders() { return ImmutableMap.of( URN, (Class<? extends ExternalTransformBuilder<?, ?, ?>>) (Class<?>) AutoValue_KafkaIO_Read.Builder.class); } /** Parameters class to expose the Read transform to an external SDK. */ public static class Configuration { private Map<String, String> consumerConfig; private List<String> topics; public void setConsumerConfig(Map<String, String> consumerConfig) { this.consumerConfig = consumerConfig; } public void setTopics(List<String> topics) { this.topics = topics; } /** Remaining properties omitted for clarity. */ } }For additional examples, see JavaCountRegistrar and JavaPrefixRegistrar.
After you have implemented the ExternalTransformBuilder and ExternalTransformRegistrar interfaces, your transform can be registered and created successfully by the default Java expansion service.
Starting the expansion service
You can use an expansion service with multiple transforms in the same pipeline. The Beam Java SDK provides a default expansion service for Java transforms. You can also write your own expansion service, but that’s generally not needed, so it’s not covered in this section.
Perform the following to start up a Java expansion service directly:
# Build a JAR with both your transform and the expansion service
# Start the expansion service at the specified port.
$ jar -jar /path/to/expansion_service.jar <PORT_NUMBER>The expansion service is now ready to serve transforms on the specified port.
When creating SDK-specific wrappers for your transform, you may be able to use SDK-provided utilities to start up an expansion service. For example, the Python SDK provides the utilities JavaJarExpansionService and BeamJarExpansionService for starting up a Java expansion service using a JAR file.
Including dependencies
If your transform requires external libraries, you can include them by adding them to the classpath of the expansion service. After they are included in the classpath, they will be staged when your transform is expanded by the expansion service.
Writing SDK-specific wrappers
Your cross-language Java transform can be called through the lower-level ExternalTransform class in a multi-language pipeline (as described in the next section); however, if possible, you should write an SDK-specific wrapper in the language of the pipeline (such as Python) to access the transform instead. This higher-level abstraction will make it easier for pipeline authors to use your transform.
To create an SDK wrapper for use in a Python pipeline, do the following:
Create a Python module for your cross-language transform(s).
In the module, use one of the
PayloadBuilderclasses to build the payload for the initial cross-language transform expansion request.The parameter names and types of the payload should map to parameter names and types of the configuration POJO provided to the Java
ExternalTransformBuilder. Parameter types are mapped across SDKs using a Beam schema. Parameter names are mapped by simply converting Python underscore-separated variable names to camel-case (Java standard).In the following example, kafka.py uses
NamedTupleBasedPayloadBuilderto build the payload. The parameters map to the Java KafkaIO.External.Configuration config object defined in the previous section.class ReadFromKafkaSchema(typing.NamedTuple): consumer_config: typing.Mapping[str, str] topics: typing.List[str] # Other properties omitted for clarity. payload = NamedTupleBasedPayloadBuilder(ReadFromKafkaSchema(...))Start an expansion service, unless one is specified by the pipeline creator. The Beam Python SDK provides the utilities
JavaJarExpansionServiceandBeamJarExpansionServicefor starting up an expansion service using a JAR file.JavaJarExpansionServicecan be used to start up an expansion service using the path (a local path or a URL) to a given JAR file.BeamJarExpansionServicecan be used to start an expansion service from a JAR released with Beam.For transforms released with Beam, do the following:
Add a Gradle target to Beam that can be used to build a shaded expansion service JAR for the target Java transform. This target should produce a Beam JAR that contains all dependencies needed for expanding the Java transform, and the JAR should be released with Beam. You might be able to use an existing Gradle target that offers an aggregated version of an expansion service JAR (for example, for all GCP IO).
In your Python module, instantiate
BeamJarExpansionServicewith the Gradle target.expansion_service = BeamJarExpansionService('sdks:java:io:expansion-service:shadowJar')
Add a Python wrapper transform class that extends
ExternalTransform. Pass the payload and expansion service defined above as parameters to the constructor of theExternalTransformparent class.
13.1.2. Creating cross-language Python transforms
Any Python transforms defined in the scope of the expansion service should be accessible by specifying their fully qualified names. For example, you could use Python’s ReadFromText transform in a Java pipeline with its fully qualified name apache_beam.io.ReadFromText:
p.apply("Read",
PythonExternalTransform.<PBegin, PCollection<String>>from("apache_beam.io.ReadFromText")
.withKwarg("file_pattern", options.getInputFile())
.withKwarg("validate", false))
PythonExternalTransform has other useful methods such as withExtraPackages for staging PyPI package dependencies and withOutputCoder for setting an output coder. If your transform exists in an external package, make sure to specify that package using withExtraPackages, for example:
p.apply("Read",
PythonExternalTransform.<PBegin, PCollection<String>>from("my_python_package.BeamReadPTransform")
.withExtraPackages(ImmutableList.of("my_python_package")))
Alternatively, you may want to create a Python module that registers an existing Python transform as a cross-language transform for use with the Python expansion service and calls into that existing transform to perform its intended operation. A registered URN can be used later in an expansion request for indicating an expansion target.
Defining the Python module
Define a Uniform Resource Name (URN) for your transform. The URN must be a unique string that identifies your transform with the expansion service.
TEST_COMPK_URN = "beam:transforms:xlang:test:compk"For an existing Python transform, create a new class to register the URN with the Python expansion service.
@ptransform.PTransform.register_urn(TEST_COMPK_URN, None) class CombinePerKeyTransform(ptransform.PTransform):From within the class, define an expand method that takes an input PCollection, runs the Python transform, and then returns the output PCollection.
def expand(self, pcoll): return pcoll \ | beam.CombinePerKey(sum).with_output_types( typing.Tuple[unicode, int])As with other Python transforms, define a
to_runner_api_parametermethod that returns the URN.def to_runner_api_parameter(self, unused_context): return TEST_COMPK_URN, NoneDefine a static
from_runner_api_parametermethod that returns an instantiation of the cross-language Python transform.@staticmethod def from_runner_api_parameter( unused_ptransform, unused_parameter, unused_context): return CombinePerKeyTransform()
Starting the expansion service
An expansion service can be used with multiple transforms in the same pipeline. The Beam Python SDK provides a default expansion service for you to use with your Python transforms. You are free to write your own expansion service, but that is generally not needed, so it is not covered in this section.
Perform the following steps to start up the default Python expansion service directly:
Create a virtual environment and install the Apache Beam SDK.
Start the Python SDK’s expansion service with a specified port.

$ export PORT_FOR_EXPANSION_SERVICE=12345Import any modules that contain transforms to be made available using the expansion service.
$ python -m apache_beam.runners.portability.expansion_service_test -p $PORT_FOR_EXPANSION_SERVICE --pickle_library=cloudpickleThis expansion service is now ready to serve up transforms on the address `localhost:$PORT_FOR_EXPANSION_SERVICE
13.1.3. Creating cross-language Go transforms
Go currently does not support creating cross-language transforms, only using cross-language transforms from other languages; see more at Issue 21767.
13.1.4. Defining a URN
Developing a cross-language transform involves defining a URN for registering the transform with an expansion service. In this section we provide a convention for defining such URNs. Following this convention is optional but it will ensure that your transform will not run into conflicts when registering in an expansion service along with transforms developed by other developers.
13.1.4.1. Schema
A URN should consist of the following components:
- ns-id: A namespace identifier. Default recommendation is
beam:transform. - org-identifier: Identifies the organization where the transform was defined. Transforms defined in Apache Beam use
org.apache.beamfor this. - functionality-identifier: Identifies the functionality of the cross-language transform.
- version: a version number for the transform.
We provide the schema from the URN convention in augmented Backus–Naur form. Keywords in upper case are from the URN spec.
transform-urn = ns-id “:” org-identifier “:” functionality-identifier “:” version
ns-id = (“beam” / NID) “:” “transform”
id-char = ALPHA / DIGIT / "-" / "." / "_" / "~" ; A subset of characters allowed in a URN
org-identifier = 1*id-char
functionality-identifier = 1*id-char
version = “v” 1*(DIGIT / “.”) ; For example, ‘v1.2’13.1.4.2. Examples
Below we’ve given some example transform classes and corresponding URNs to be used.
- A transform offered with Apache Beam that writes Parquet files.
beam:transform:org.apache.beam:parquet_write:v1
- A transform offered with Apache Beam that reads from Kafka with metadata.
beam:transform:org.apache.beam:kafka_read_with_metadata:v1
- A transform developed by organization abc.org that reads from data store MyDatastore.
beam:transform:org.abc:mydatastore_read:v1
13.2. Using cross-language transforms
Depending on the SDK language of the pipeline, you can use a high-level SDK-wrapper class, or a low-level transform class to access a cross-language transform.
13.2.1. Using cross-language transforms in a Java pipeline
Users have three options to use cross-language transforms in a Java pipeline. At the highest level of abstraction, some popular Python transforms are accessible through dedicated Java wrapper transforms. For example, the Java SDK has the DataframeTransform class, which uses the Python SDK’s DataframeTransform, and it has the RunInference class, which uses the Python SDK’s RunInference, and so on. When an SDK-specific wrapper transform is not available for a target Python transform, you can use the lower-level PythonExternalTransform class instead by specifying the fully qualified name of the Python transform. If you want to try external transforms from SDKs other than Python (including Java SDK itself), you can also use the lowest-level External class.
Using an SDK wrapper
To use a cross-language transform through an SDK wrapper, import the module for the SDK wrapper and call it from your pipeline, as shown in the example:
import org.apache.beam.sdk.extensions.python.transforms.DataframeTransform;
input.apply(DataframeTransform.of("lambda df: df.groupby('a').sum()").withIndexes())
Using the PythonExternalTransform class
When an SDK-specific wrapper is not available, you can access the Python cross-language transform through the PythonExternalTransform class by specifying the fully qualified name and the constructor arguments of the target Python transform.
input.apply(
PythonExternalTransform.<PCollection<Row>, PCollection<Row>>from(
"apache_beam.dataframe.transforms.DataframeTransform")
.withKwarg("func", PythonCallableSource.of("lambda df: df.groupby('a').sum()"))
.withKwarg("include_indexes", true))
Using the External class
Make sure you have any runtime environment dependencies (like the JRE) installed on your local machine (either directly on the local machine or available through a container). See the expansion service section for more details.
Note: When including Python transforms from within a Java pipeline, all Python dependencies have to be included in the SDK harness container.
Start up the expansion service for the SDK that is in the language of the transform you’re trying to consume, if not available.
Make sure the transform you are trying to use is available and can be used by the expansion service.
Include External.of(…) when instantiating your pipeline. Reference the URN, payload, and expansion service. For examples, see the cross-language transform test suite.
After the job has been submitted to the Beam runner, shutdown the expansion service by terminating the expansion service process.
13.2.2. Using cross-language transforms in a Python pipeline
If a Python-specific wrapper for a cross-language transform is available, use that. Otherwise, you have to use the lower-level ExternalTransform class to access the transform.
Using an SDK wrapper
To use a cross-language transform through an SDK wrapper, import the module for the SDK wrapper and call it from your pipeline, as shown in the example:
from apache_beam.io.kafka import ReadFromKafka
kafka_records = (
pipeline
| 'ReadFromKafka' >> ReadFromKafka(
consumer_config={
'bootstrap.servers': self.bootstrap_servers,
'auto.offset.reset': 'earliest'
},
topics=[self.topic],
max_num_records=max_num_records,
expansion_service=<Address of expansion service>))
Using the ExternalTransform class
When an SDK-specific wrapper isn’t available, you will have to access the cross-language transform through the ExternalTransform class.
Make sure you have any runtime environment dependencies (like the JRE) installed on your local machine. See the expansion service section for more details.
Start up the expansion service for the SDK that is in the language of the transform you’re trying to consume, if not available. Python provides several classes for automatically starting expansion java services such as JavaJarExpansionService and BeamJarExpansionService which can be passed directly as an expansion service to
beam.ExternalTransform. Make sure the transform you’re trying to use is available and can be used by the expansion service.For Java, make sure the builder and registrar for the transform are available in the classpath of the expansion service.
Include
ExternalTransformwhen instantiating your pipeline. Reference the URN, payload, and expansion service. You can use one of the availablePayloadBuilderclasses to build the payload forExternalTransform.with pipeline as p: res = ( p | beam.Create(['a', 'b']).with_output_types(unicode) | beam.ExternalTransform( TEST_PREFIX_URN, ImplicitSchemaPayloadBuilder({'data': '0'}), <expansion service>)) assert_that(res, equal_to(['0a', '0b']))For additional examples, see addprefix.py and javacount.py.
After the job has been submitted to the Beam runner, shut down any manually started expansion services by terminating the expansion service process.
Using the JavaExternalTransform class
Python has the ability to invoke Java-defined transforms via proxy objects as if they were Python transforms. These are invoked as follows
```py
MyJavaTransform = beam.JavaExternalTransform('fully.qualified.ClassName', classpath=[jars])
with pipeline as p:
res = (
p
| beam.Create(['a', 'b']).with_output_types(unicode)
| MyJavaTransform(javaConstructorArg, ...).builderMethod(...)
assert_that(res, equal_to(['0a', '0b']))
```
Python’s getattr method can be used if the method names in java are reserved
Python keywords such as from.
As with other external transforms, either a pre-started expansion service can be provided, or jar files that include the transform, its dependencies, and Beam’s expansion service in which case an expansion service will be auto-started.
13.2.3. Using cross-language transforms in a Go pipeline
If a Go-specific wrapper for a cross-language is available, use that. Otherwise, you have to use the lower-level CrossLanguage function to access the transform.
Expansion Services
The Go SDK supports automatically starting Java expansion services if an expansion address is not provided, although this is slower than
providing a persistent expansion service. Many wrapped Java transforms manage perform this automatically; if you wish to do this manually, use the xlangx package’s
UseAutomatedJavaExpansionService() function. In order to use Python cross-language transforms, you must manually start any necessary expansion
services on your local machine and ensure they are accessible to your code during pipeline construction.
Using an SDK wrapper
To use a cross-language transform through an SDK wrapper, import the package for the SDK wrapper and call it from your pipeline as shown in the example:
import (
"github.com/apache/beam/sdks/v2/go/pkg/beam/io/xlang/kafkaio"
)
// Kafka Read using previously defined values.
kafkaRecords := kafkaio.Read(
s,
expansionAddr, // Address of expansion service.
bootstrapAddr,
[]string{topicName},
kafkaio.MaxNumRecords(numRecords),
kafkaio.ConsumerConfigs(map[string]string{"auto.offset.reset": "earliest"}))
Using the CrossLanguage function
When an SDK-specific wrapper isn’t available, you will have to access the cross-language transform through the beam.CrossLanguage function.
Make sure you have the appropriate expansion service running. See the expansion service section for details.
Make sure the transform you’re trying to use is available and can be used by the expansion service. Refer to Creating cross-language transforms for details.
Use the
beam.CrossLanguagefunction in your pipeline as appropriate. Reference the URN, payload, expansion service address, and define inputs and outputs. You can use the beam.CrossLanguagePayload function as a helper for encoding a payload. You can use the beam.UnnamedInput and beam.UnnamedOutput functions as shortcuts for single, unnamed inputs/outputs or define a map for named ones.type prefixPayload struct { Data string `beam:"data"` } urn := "beam:transforms:xlang:test:prefix" payload := beam.CrossLanguagePayload(prefixPayload{Data: prefix}) expansionAddr := "localhost:8097" outT := beam.UnnamedOutput(typex.New(reflectx.String)) res := beam.CrossLanguage(s, urn, payload, expansionAddr, beam.UnnamedInput(inputPCol), outT)After the job has been submitted to the Beam runner, shutdown the expansion service by terminating the expansion service process.
13.2.4. Using cross-language transforms in a Typescript pipeline
Using a Typescript wrapper for a cross-language pipeline is similar to using any other transform, provided the dependencies (e.g. a recent Python interpreter or a Java JRE) is available. For example, most of the Typescript IOs are simply wrappers around Beam transforms from other languages.
If a wrapper is not already available, one can use it explicitly using apache_beam.transforms.external.rawExternalTransform. which takes a `urn` (a string identifying the transform), a `payload` (a binary or json object parameterizing the transform), and a `expansionService` which can either be an address of a pre-started service or a callable returning an auto-started expansion service object.
For example, one could write
pcoll.applyAsync(
rawExternalTransform(
"beam:registered:urn",
{arg: value},
"localhost:expansion_service_port"
)
);
Note that pcoll must have a cross-language compatible coder coder such as SchemaCoder.
This can be ensured with the withCoderInternal
or withRowCoder
transforms, e.g.
const result = pcoll.apply(
beam.withRowCoder({ intFieldName: 0, stringFieldName: "" })
);
Coder can also be specified on the output if it cannot be inferred, e.g.
In addition, there are several utilities such as pythonTransform that make it easier to invoke transforms from specific languages:
const result: PCollection<number> = await pcoll
.apply(
beam.withName("UpdateCoder1", beam.withRowCoder({ a: 0, b: 0 }))
)
.applyAsync(
pythonTransform(
// Fully qualified name
"apache_beam.transforms.Map",
// Positional arguments
[pythonCallable("lambda x: x.a + x.b")],
// Keyword arguments
{},
// Output type if it cannot be inferred
{ requestedOutputCoders: { output: new VarIntCoder() } }
)
);
Cross-language transforms can also be defined in line, which can be useful for accessing features or libraries not available in the calling SDK
const result: PCollection<string> = await pcoll
.apply(withCoderInternal(new StrUtf8Coder()))
.applyAsync(
pythonTransform(
// Define an arbitrary transform from a callable.
"__callable__",
[
pythonCallable(`
def apply(pcoll, prefix, postfix):
return pcoll | beam.Map(lambda s: prefix + s + postfix)
`),
],
// Keyword arguments to pass above, if any.
{ prefix: "x", postfix: "y" },
// Output type if it cannot be inferred
{ requestedOutputCoders: { output: new StrUtf8Coder() } }
)
);
13.3. Runner Support
Currently, portable runners such as Flink, Spark, and the direct runner can be used with multi-language pipelines.
Dataflow supports multi-language pipelines through the Dataflow Runner v2 backend architecture.
13.4 Tips and Troubleshooting
For additional tips and troubleshooting information, see here.
14 Batched DoFns
Batched DoFns are currently a Python-only feature.
Batched DoFns enable users to create modular, composable components that operate on batches of multiple logical elements. These DoFns can leverage vectorized Python libraries, like numpy, scipy, and pandas, which operate on batches of data for efficiency.
14.1 Basics
Batched DoFns are currently a Python-only feature.
A trivial Batched DoFn might look like this:
class MultiplyByTwo(beam.DoFn):
# Type
def process_batch(self, batch: np.ndarray) -> Iterator[np.ndarray]:
yield batch * 2
# Declare what the element-wise output type is
def infer_output_type(self, input_element_type):
return input_element_typeThis DoFn can be used in a Beam pipeline that otherwise operates on individual elements. Beam will implicitly buffer elements and create numpy arrays on the input side, and on the output side it will explode the numpy arrays back into individual elements:
(p | beam.Create([1, 2, 3, 4]).with_output_types(np.int64)
| beam.ParDo(MultiplyByTwo()) # Implicit buffering and batch creation
| beam.Map(lambda x: x/3)) # Implicit batch explosionNote that we use
PTransform.with_output_types to
set the element-wise typehint for the output of beam.Create. Then, when
MultiplyByTwo is applied to this PCollection, Beam recognizes that
np.ndarray is an acceptable batch type to use in conjunction with np.int64
elements. We will use numpy typehints like these throughout this guide, but
Beam supports typehints from other libraries as well, see Supported Batch
Types.
In the previous case, Beam will implicitly create and explode batches at the input and output boundaries. However, if Batched DoFns with equivalent types are chained together, this batch creation and explosion will be elided. The batches will be passed straight through! This makes it much simpler to efficiently compose transforms that operate on batches.
(p | beam.Create([1, 2, 3, 4]).with_output_types(np.int64)
| beam.ParDo(MultiplyByTwo()) # Implicit buffering and batch creation
| beam.ParDo(MultiplyByTwo()) # Batches passed through
| beam.ParDo(MultiplyByTwo()))14.2 Element-wise Fallback
Batched DoFns are currently a Python-only feature.
For some DoFns you may be able to provide both a batched and an element-wise
implementation of your desired logic. You can do this by simply defining both
process and process_batch:
class MultiplyByTwo(beam.DoFn):
def process(self, element: np.int64) -> Iterator[np.int64]:
# Multiply an individual int64 by 2
yield element * 2
def process_batch(self, batch: np.ndarray) -> Iterator[np.ndarray]:
# Multiply a _batch_ of int64s by 2
yield batch * 2When executing this DoFn, Beam will select the best implementation to use given
the context. Generally, if the inputs to a DoFn are already batched Beam will
use the batched implementation; otherwise it will use the element-wise
implementation defined in the process method.
Note that, in this case, there is no need to define infer_output_type. This is
because Beam can get the output type from the typehint on process.
14.3 Batch Production vs. Batch Consumption
Batched DoFns are currently a Python-only feature.
By convention, Beam assumes that the process_batch method, which consumes
batched inputs, will also produce batched outputs. Similarly, Beam assumes the
process method will produce individual elements. This can be overridden with
the @beam.DoFn.yields_elements and
@beam.DoFn.yields_batches decorators. For example:
# Consumes elements, produces batches
class ReadFromFile(beam.DoFn):
@beam.DoFn.yields_batches
def process(self, path: str) -> Iterator[np.ndarray]:
...
yield array
# Declare what the element-wise output type is
def infer_output_type(self):
return np.int64
# Consumes batches, produces elements
class WriteToFile(beam.DoFn):
@beam.DoFn.yields_elements
def process_batch(self, batch: np.ndarray) -> Iterator[str]:
...
yield output_path14.4 Supported Batch Types
Batched DoFns are currently a Python-only feature.
We’ve used numpy types in the Batched DoFn implementations in this guide –
np.int64 as the element typehint and np.ndarray as the corresponding
batch typehint – but Beam supports typehints from other libraries as well.
numpy
| Element Typehint | Batch Typehint |
|---|---|
Numeric types (int, np.int32, bool, …) | np.ndarray (or NumpyArray) |
pandas
| Element Typehint | Batch Typehint |
|---|---|
Numeric types (int, np.int32, bool, …) | pd.Series |
bytes | |
Any | |
| Beam Schema Types | pd.DataFrame |
pyarrow
| Element Typehint | Batch Typehint |
|---|---|
Numeric types (int, np.int32, bool, …) | pd.Series |
Any | |
List | |
Mapping | |
| Beam Schema Types | pa.Table |
Other types?
If there are other batch types you would like to use with Batched DoFns, please file an issue.
14.5 Dynamic Batch Input and Output Types
Batched DoFns are currently a Python-only feature.
For some Batched DoFns, it may not be sufficient to declare batch types
statically, with typehints on process and/or process_batch. You may need to
declare these types dynamically. You can do this by overriding the
get_input_batch_type
and
get_output_batch_type
methods on your DoFn:
# Utilize Beam's parameterized NumpyArray typehint
from apache_beam.typehints.batch import NumpyArray
class MultipyByTwo(beam.DoFn):
# No typehints needed
def process_batch(self, batch):
yield batch * 2
def get_input_batch_type(self, input_element_type):
return NumpyArray[input_element_type]
def get_output_batch_type(self, input_element_type):
return NumpyArray[input_element_type]
def infer_output_type(self, input_element_type):
return input_element_type14.6 Batches and Event-time Semantics
Batched DoFns are currently a Python-only feature.
Currently, batches must have a single set of timing information (event time,
windows, etc…) that applies to every logical element in the batch. There is
currently no mechanism to create batches that span multiple timestamps. However,
it is possible to retrieve this timing information in Batched DoFn
implementations. This information can be accessed by using the conventional
DoFn.*Param attributes:
class RetrieveTimingDoFn(beam.DoFn):
def process_batch(
self,
batch: np.ndarray,
timestamp=beam.DoFn.TimestampParam,
pane_info=beam.DoFn.PaneInfoParam,
) -> Iterator[np.ndarray]:
...
def infer_output_type(self, input_type):
return input_type15 Transform service
The Apache Beam SDK versions 2.49.0 and later include a Docker Compose service named Transform service.
The following diagram illustrates the basic architecture of the Transform service.
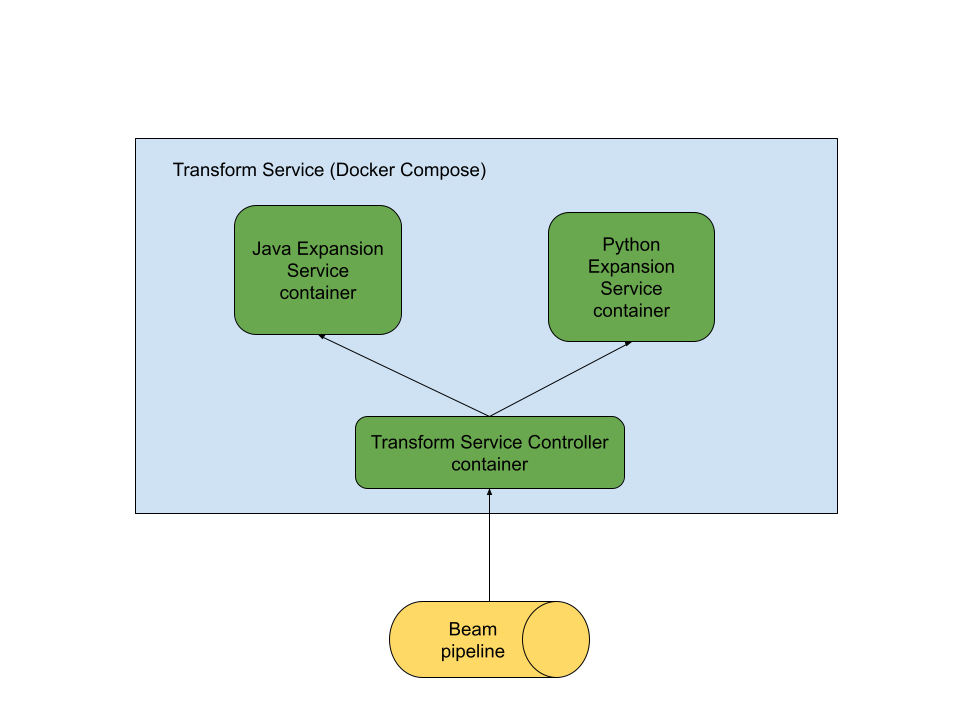
To use the Transform service, Docker must be available on the machine that starts the service.
The Transform service has several primary use cases.
15.1 Using the transform service to upgrade transforms
Transform service can be used to upgrade (or downgrade) the Beam SDK versions of supported individual transforms used by Beam pipelines without changing the Beam version of the pipelines. This feature is currently only available for Beam Java SDK 2.53.0 and later. Currently, the following transforms are available for upgrading:
- BigQuery read transform (URN: beam:transform:org.apache.beam:bigquery_read:v1)
- BigQuery write transform (URN: beam:transform:org.apache.beam:bigquery_write:v1)
- Kafka read transform (URN: beam:transform:org.apache.beam:kafka_read_with_metadata:v2)
- Kafka write transform (URN: beam:transform:org.apache.beam:kafka_write:v2)
To use this feature, you can simply execute a Java pipeline with additional pipeline options that specify the URNs of the transforms you would like to upgrade and the Beam version you would like to upgrade the transforms to. All transforms in the pipeline with matching URNs will be upgraded.
For example, to upgrade the BigQuery read transform for a pipeline run using Beam 2.53.0 to a future Beam version 2.xy.z, you can specify the following additional pipelines options.
--transformsToOverride=beam:transform:org.apache.beam:bigquery_read:v1 --transformServiceBeamVersion=2.xy.zThis feature is currently not available for Python SDK.This feature is currently not available for Go SDK.Note that the framework will automatically download the relevant Docker containers and startup the transform service for you.
Please see here for a full example that uses this feature to upgrade BigQuery read and write transforms.
15.2 Using the Transform service for multi-language pipelines
Transform service implements the Beam expansion API. This allows Beam multi-language pipelines to use the transform service when expanding transforms available within the transform service.
The main advantage here is that multi-language pipelines will be able to operate without installing support for additional language runtimes. For example, Beam Python pipelines that use Java transforms such as
KafkaIO can operate without installing Java locally during job submission as long as Docker is available in the system.
In some cases, Apache Beam SDKs can automatically start the Transform service.
The Java
PythonExternalTransformAPI automatically starts the Transform service when a Python runtime isn’t available locally, but Docker is.The Apache Beam Python multi-language wrappers might automatically start the Transform service when you’re using Java transforms, a Java language runtime isn’t available locally, and Docker is available locally.
Beam users also have the option to manually start a transform service and use that as the expansion service used by multi-language pipelines.
15.3 Manually starting the transform service
A Beam Transform service instance can be manually started by using utilities provided with Apache Beam SDKs.
java -jar beam-sdks-java-transform-service-app-<Beam version for the jar>.jar --port <port> --beam_version <Beam version for the transform service> --project_name <a unique ID for the transform service> --command uppython -m apache_beam.utils.transform_service_launcher --port <port> --beam_version <Beam version for the transform service> --project_name <a unique ID for the transform service> --command upThis feature is currently in development.To stop the transform service, use the following commands.
java -jar beam-sdks-java-transform-service-app-<Beam version for the jar>.jar --port <port> --beam_version <Beam version for the transform service> --project_name <a unique ID for the transform service> --command downpython -m apache_beam.utils.transform_service_launcher --port <port> --beam_version <Beam version for the transform service> --project_name <a unique ID for the transform service> --command downThis feature is currently in development.15.4 Portable transforms included in the Transform service
Beam Transform service includes a number of transforms implemented in the Apache Beam Java and Python SDKs.
Currently, the following transforms are included in the Transform service:
Java transforms: Google Cloud I/O connectors, the Kafka I/O connector, and the JDBC I/O connector
Python transforms: all portable transforms implemented within the Apache Beam Python SDK, such as RunInference and DataFrame transforms.
For a more comprehensive list of available transforms, see the Transform service developer guide.
Last updated on 2026/07/06
Have you found everything you were looking for?
Was it all useful and clear? Is there anything that you would like to change? Let us know!